Alpine CDA-9887 Owners Manual - Page 28
Checking the SAT Radio ID Number, Storing Channel Presets, Receiving Stored Channels, Storing - remote
 |
UPC - 793276711373
View all Alpine CDA-9887 manuals
Add to My Manuals
Save this manual to your list of manuals |
Page 28 highlights
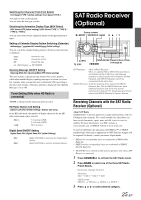
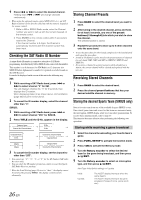
4 Press or Holding down continuously. to select the desired channel. or will change channels • When using the optional remote control (RUE-4190, etc.), an SAT Radio Channel can be directly called up with the numeric keypad of the remote control. 1 While in XM or SIRIUS Radio mode, enter the Channel number you want to call up with the numeric keypad on the remote control. 2 Press ENTER on the remote control within 5 seconds to receive the Channel. If the channel number is 3 digits, the Channel is automatically received after the channel number has been input. Checking the SAT Radio ID Number A unique Radio ID number is required to subscribe to SAT Radio programming. Each third party XM or SIRIUS radio comes with this number. This number is an 8 character (for XM Radio) or 12 character (for SIRIUS Radio) alphanumeric number. It is printed on a label found on the SAT Receiver. It can also be displayed on the screen of this unit in the following way. XM: 1 While receiving a SAT Radio band, press or to select channel "0" for XM. The unit displays channel No. "0" for 2 seconds, then displays the ID number. While displaying Radio ID as shown above, Demonstration (page 23) become nonfunctional. 2 To cancel the ID number display, select the channel other than "0". SIRIUS: 1 While receiving a SAT Radio band, press or to select channel "255" for SIRIUS. 2 Press TITLE until the ID No. appears in the display. Category Name Channel No./Channel Name ID No. * ID No. Composer Name * ID No. Channel No./Channel Name Calendar/Clock (Blank) (Blank) Category Name Channel No./Channel Name 3 To cancel the ID number display, set the channel to other than "255". • You cannot use "O", "S", "I", or "F" for the ID Number (XM radio Receiver only). • You can check the ID number printed on a label on your third party, SAT Radio Receiver package. * When the Scroll Setting (page 24) is set to "Auto", the display cannot be switched by pressing TITLE. The display contents switch alternately. Storing Channel Presets 1 Press BAND to select the desired band you want to store. 2 After tuning in the desired channel, press and hold, for at least 2 seconds, any one of the preset buttons (1 through 6) into which you wish to store the channel. The selected station is stored. 3 Repeat the procedure to store up to 5 other channels onto the same band. • To use this procedure for other bands, simply select the band desired and repeat the procedure. • A total of 18 channels can be stored in the preset memory (6 channels for each band; XM1, XM2 and XM3 or SIRIUS1, SIRIUS2 and SIRIUS3). • If you store a channel in a preset memory which already has a station, the current channel will be cleared and replaced with the new one. Receiving Stored Channels 1 Press BAND to select the desired band. 2 Press the channel preset buttons that has your desired satellite channel in memory. Storing the desired Sports Team (SIRIUS only) Store a favorite team from one of the available leagues SIRIUS covers. Once stored, game times and scores for that team are announced using the interruption ALERT display while receiving other programming. To receive these announcements, refer to page 27. This function becomes effective after performing the following two operations. Storing while receiving a game broadcast 1 Select the channel broadcasting your favorite team's game. 2 Press FUNC./SETUP to activate the function mode. 3 Press 1(M) to activate the Memory mode. 4 Turn the Rotary encoder to select the desired team for the game being broadcast, and then press / /ENT. 5 Turn the Rotary encoder to select an interruption type, and then press / /ENT. Alert Type Initial (Initial setting) Update Initial: Update: The ALERT display interrupts when the game begins. The ALERT display interrupts by game progress (change of score, game result, etc.). 26-EN
-
 1
1 -
2
-
3
-
4
-
5
-
6
-
7
-
8
-
9
-
10
-
11
-
12
-
13
-
14
-
15
-
16
-
17
-
18
-
19
-
20
-
21
-
22
-
 23
23 -
 24
24 -
 25
25 -
 26
26 -
 27
27 -
 28
28 -
 29
29 -
 30
30 -
 31
31 -
 32
32 -
 33
33 -
34
-
35
-
36
-
37
-
38
-
39
-
40
-
41
-
42
-
43
-
44
-
45
-
46
-
47
-
48
-
49
-
50
-
51
-
52
-
53
-
54
-
55
-
56
-
57
-
58
-
59
-
60
-
61
-
62
-
63
-
64
-
65
-
66
-
67
-
68
-
69
-
70
-
71
-
72
-
73
-
74
-
75
-
76
-
77
-
78
-
79
-
80
-
81
-
82
-
83
-
84
-
85
-
86
-
87
-
88
-
89
-
90
-
91
-
92
-
93
-
94
-
95
-
96
-
97
-
98
-
99
-
100
-
101
-
102
-
103
-
104
-
105
-
106
-
107
-
108
-
109
-
110
-
111
-
112
-
113
-
114
-
115
-
116
-
117
-
118
-
119
-
120
-
121
-
122
-
123
-
124
-
125
-
126
-
127
-
128
-
129
-
130
-
131
-
132
 |
 |
