Alpine CDA-9887 Owners Manual - Page 31
Optional - ipod cable
 |
UPC - 793276711373
View all Alpine CDA-9887 manuals
Add to My Manuals
Save this manual to your list of manuals |
Page 31 highlights
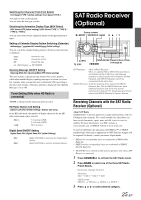
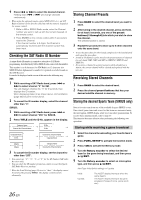
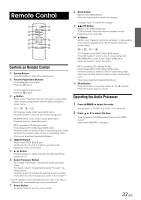
SIRIUS mode: Category Name Channel No./Channel Name Composer Name *2 Song Name (Blank) (Blank) Artist Name *2 Song Name Channel No./Channel Name Calendar/Clock Channel Number/Channel Name *3 Remaining time of instant replay Category Name Channel No./Channel Name *1 When ADF is turned OFF, this information is not displayed (see "Setting the Auxiliary Data Field Display" on page 29). Displayed in 1 line when text amount is small. *2 When the "Scroll Setting" (page 24) is set to "Auto", the display cannot be switched by pressing TITLE. The display contents switch alternately. *3 Displayed only during instant replay. • When the "Scroll Setting" (page 24) is set to "Auto", the display scrolls continuously. When the Scroll Setting is set to "Manual," the display scrolls only once after any function is performed (PRESET, BAND, SEARCH, etc.). "Channel No." and "Calendar/Clock" displays do not scroll. • Depending on the model, the display may differ from the one shown above. Setting the Auxiliary Data Field Display The XM Auxiliary Data Field (ADF) display can be switched on or off. There is no ADF function for the SIRIUS receiver. 1 Press and hold FUNC./SETUP for at least 2 seconds to select the SETUP selection mode. 2 Turn the Rotary encoder to select the TUNER mode, and then press / /ENT. Bluetooth GENERAL TUNER* Bluetooth AUDIO DISPLAY * Only when HD Radio/SAT Radio is connected. 3 Turn the Rotary encoder to select the XM ADF mode, and then press / /ENT. 4 Turn the Rotary encoder to select XM ADF ON/ OFF, and then press / /ENT. When setting to ON, Auxiliary Data Field is displayed by pressing TITLE (Refer to the "Changing the Display" section page 28). 5 Press and hold FUNC./SETUP for at least 2 seconds to return to normal mode. • Pressing /RTN returns to the previous SETUP mode. • If no operation is performed for 60 seconds, SETUP is canceled. iPod® (Optional) Rotary encoder / /ENT SOURCE/ 45 6 /RTN /ESC Preset buttons (1 through 6) TITLE An iPod® can be connected to this unit by using the proprietary ALPINE FULL SPEED™ Connection Cable (KCE-422i) (sold separately). When this unit is connected by using the cable, the controls on the iPod are not functional. iPods usable with this unit • The unit can be used with the fourth generation and above iPod, iPod photo, iPod mini or iPod nano. iPod Shuffle cannot be used, however. • Touch wheel or scroll wheel type iPods without the dock connector cannot be connected to the unit. • The unit can be used with the following iPod versions. Correct function of earlier versions cannot be guaranteed. Fourth generation iPod: Ver. 3.1.1 Fifth generation iPod: Ver. 1.1.2 iPod photo: Ver. 1.2.1 iPod mini: Ver. 1.4.1 iPod nano: Ver. 1.2 • The unit cannot be used with software versions earlier than "2006-06-28". For details about "iPod Software Update," refer to the iPod Instruction Manual. Playback 1 Press SOURCE/ to switch to the iPod mode. TUNER XM/SIRIUS*1 DISC iPod*2 CHANGER*3 TUNER *1 Only when XM Radio or Sirius Radio is connected. *2 Only when the iPod is connected. *3 Only when the CD changer is connected. 2 Press or to select the desired song. Return to the beginning of the current song: Press . Fast backward: Press and hold . Advance to the beginning of the next song: Press . Fast forward: Press and hold . 3 To pause playback, press / /ENT. Pressing / /ENT again will resume playback. • A song playing on the iPod while it is connected to this unit will continue to play from where it was paused after disconnection. 29-EN
-
 1
1 -
2
-
3
-
4
-
5
-
6
-
7
-
8
-
9
-
10
-
11
-
12
-
13
-
14
-
15
-
16
-
17
-
18
-
19
-
20
-
21
-
22
-
23
-
24
-
25
-
 26
26 -
 27
27 -
 28
28 -
 29
29 -
 30
30 -
 31
31 -
 32
32 -
 33
33 -
 34
34 -
 35
35 -
 36
36 -
37
-
38
-
39
-
40
-
41
-
42
-
43
-
44
-
45
-
46
-
47
-
48
-
49
-
50
-
51
-
52
-
53
-
54
-
55
-
56
-
57
-
58
-
59
-
60
-
61
-
62
-
63
-
64
-
65
-
66
-
67
-
68
-
69
-
70
-
71
-
72
-
73
-
74
-
75
-
76
-
77
-
78
-
79
-
80
-
81
-
82
-
83
-
84
-
85
-
86
-
87
-
88
-
89
-
90
-
91
-
92
-
93
-
94
-
95
-
96
-
97
-
98
-
99
-
100
-
101
-
102
-
103
-
104
-
105
-
106
-
107
-
108
-
109
-
110
-
111
-
112
-
113
-
114
-
115
-
116
-
117
-
118
-
119
-
120
-
121
-
122
-
123
-
124
-
125
-
126
-
127
-
128
-
129
-
130
-
131
-
132
 |
 |