Asus R50A User Manual - Page 53
Configuring the camera settings, Image File Type
 |
View all Asus R50A manuals
Add to My Manuals
Save this manual to your list of manuals |
Page 53 highlights
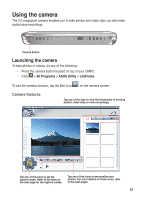
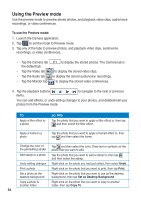
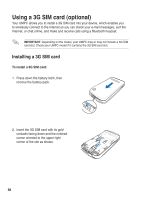
Configuring the camera settings Use the following camera setting icons to configure the camera settings: Icon Description Shooting mode Tap to set to any of these shooting modes: Night Scene, Portrait, Slow Shutter, and Custom. Flash Tap to turn the flash mode on/off. Timer Tap to set the timer to 5 or 10 seconds, or tap to turn off the timer. Continuous Shoot Tap this icon to create a seamless effect when taking successive photos. Resolution Tap to set the screen resolution to 160 x 120, 176 x 240, 320 x 240, 352 x 288, or 640 x 480. Date Tap to set the date stamp format that you want to add to your photo. JPG Quality If your photo is a .jpg file, tap this icon to set the jpg quality to Good, Fine, or Normal. Image File Type Tap this icon to set the photo's file type to BMP, JPG, GIF, PNG, or TIFF. Brightness Tap to set the level of brightness. Contrast Tap to set the contrast level. Default Tap this icon to restore the camera settings to its default values. Filter Tap to add filter effects to your photo. Frame Tap to add frame effects to your photo. Advanced Settings Tap to configure the advanced settings. 5353
-
 1
1 -
2
-
3
-
4
-
5
-
6
-
7
-
8
-
9
-
10
-
11
-
12
-
13
-
14
-
15
-
16
-
17
-
18
-
19
-
20
-
21
-
22
-
23
-
24
-
25
-
26
-
27
-
28
-
29
-
30
-
31
-
32
-
33
-
34
-
35
-
36
-
37
-
38
-
39
-
40
-
41
-
42
-
43
-
44
-
45
-
46
-
47
-
 48
48 -
 49
49 -
 50
50 -
 51
51 -
 52
52 -
 53
53 -
 54
54 -
 55
55 -
 56
56 -
 57
57 -
 58
58 -
59
-
60
-
61
-
62
-
63
-
64
-
65
-
66
-
67
-
68
-
69
-
70
-
71
-
72
-
73
-
74
-
75
-
76
 |
 |
