Brother International ADS-2800W Users Guide - Page 199
Select an Email Address from the Address Book, Shortcut, Settings ADS-2800W / ADS-3600W
 |
View all Brother International ADS-2800W manuals
Add to My Manuals
Save this manual to your list of manuals |
Page 199 highlights
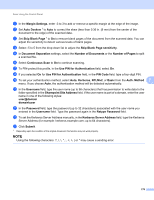
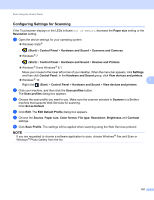
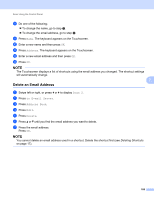
Scan Using the Control Panel Advanced Settings NOTE • To save the settings as a new default, press Set New Default. • To restore all settings to the factory settings, press Factory Reset. 8 Press Start. The machine starts scanning and then sends the scanned document to the email address directly. NOTE To save the settings as a shortcut, press Save as Shortcut. For more information, see Shortcut Settings (ADS-2800W / ADS-3600W) on page 12. Select an Email Address from the Address Book 7 1 Press Address Book. 7 2 Press . The keyboard appears on the Touchscreen. NOTE • The LDAP protocol supports you to search for email addresses on your server. For information on how to configure LDAP protocol, see Changing LDAP Configuration in the Network User's Guide. • The LDAP search result will be shown on the Touchscreen with result. before the local address book search 3 Enter the initial characters for your search and then press OK. The machine starts searching the Address Book, and then the search result will be shown. 4 Swipe left or right, or press a or b until you find the name you are looking for. 5 Press the name from the result. 6 Press Apply. NOTE • To register an email address in the Address Book, see Set Up the Address Book (ADS-2800W / ADS-3600W) on page 185. • You can select up to 300 email addresses from the Address Book and enter up to 50 email addresses manually. The scanned data will be sent to all of the addresses at the same time. 183
-
 1
1 -
2
-
3
-
4
-
5
-
6
-
7
-
8
-
9
-
10
-
11
-
12
-
13
-
14
-
15
-
16
-
17
-
18
-
19
-
20
-
21
-
22
-
23
-
24
-
25
-
26
-
27
-
28
-
29
-
30
-
31
-
32
-
33
-
34
-
35
-
36
-
37
-
38
-
39
-
40
-
41
-
42
-
43
-
44
-
45
-
46
-
47
-
48
-
49
-
50
-
51
-
52
-
53
-
54
-
55
-
56
-
57
-
58
-
59
-
60
-
61
-
62
-
63
-
64
-
65
-
66
-
67
-
68
-
69
-
70
-
71
-
72
-
73
-
74
-
75
-
76
-
77
-
78
-
79
-
80
-
81
-
82
-
83
-
84
-
85
-
86
-
87
-
88
-
89
-
90
-
91
-
92
-
93
-
94
-
95
-
96
-
97
-
98
-
99
-
100
-
101
-
102
-
103
-
104
-
105
-
106
-
107
-
108
-
109
-
110
-
111
-
112
-
113
-
114
-
115
-
116
-
117
-
118
-
119
-
120
-
121
-
122
-
123
-
124
-
125
-
126
-
127
-
128
-
129
-
130
-
131
-
132
-
133
-
134
-
135
-
136
-
137
-
138
-
139
-
140
-
141
-
142
-
143
-
144
-
145
-
146
-
147
-
148
-
149
-
150
-
151
-
152
-
153
-
154
-
155
-
156
-
157
-
158
-
159
-
160
-
161
-
162
-
163
-
164
-
165
-
166
-
167
-
168
-
169
-
170
-
171
-
172
-
173
-
174
-
175
-
176
-
177
-
178
-
179
-
180
-
181
-
182
-
183
-
184
-
185
-
186
-
187
-
188
-
189
-
190
-
191
-
192
-
193
-
 194
194 -
 195
195 -
 196
196 -
 197
197 -
 198
198 -
 199
199 -
 200
200 -
 201
201 -
 202
202 -
 203
203 -
 204
204 -
205
-
206
-
207
-
208
-
209
-
210
-
211
-
212
-
213
-
214
-
215
-
216
-
217
-
218
-
219
-
220
-
221
-
222
-
223
-
224
-
225
-
226
-
227
-
228
-
229
-
230
-
231
-
232
-
233
-
234
-
235
-
236
-
237
-
238
-
239
-
240
-
241
-
242
-
243
-
244
-
245
-
246
-
247
-
248
-
249
-
250
-
251
-
252
-
253
-
254
-
255
-
256
-
257
-
258
-
259
-
260
-
261
-
262
-
263
-
264
-
265
-
266
-
267
-
268
-
269
-
270
-
271
-
272
-
273
-
274
-
275
-
276
-
277
-
278
-
279
-
280
-
281
-
282
-
283
-
284
-
285
-
286
-
287
-
288
-
289
-
290
 |
 |
