Brother International ADS-2800W Users Guide - Page 83
Documents with Facing s, Receipts, Clippings, Photos, and Other Documents, face down
 |
View all Brother International ADS-2800W manuals
Add to My Manuals
Save this manual to your list of manuals |
Page 83 highlights
Scan Preparation 3 Place the Carrier Sheet face down in the ADF between the Guides until you feel it touch the inside of the machine. NOTE To reduce the white space in the center of a scanned page, be sure to position the folded edge of the original document close to the edge of the Carrier Sheet. 3 Documents with Facing Pages 3 Follow the steps of Documents Printed on Non-standard Size Paper on page 66. Receipts, Clippings, Photos, and Other Documents 3 Make sure documents with ink or correction fluid are completely dry. 1 Insert the document into the Carrier Sheet. 67
-
 1
1 -
2
-
3
-
4
-
5
-
6
-
7
-
8
-
9
-
10
-
11
-
12
-
13
-
14
-
15
-
16
-
17
-
18
-
19
-
20
-
21
-
22
-
23
-
24
-
25
-
26
-
27
-
28
-
29
-
30
-
31
-
32
-
33
-
34
-
35
-
36
-
37
-
38
-
39
-
40
-
41
-
42
-
43
-
44
-
45
-
46
-
47
-
48
-
49
-
50
-
51
-
52
-
53
-
54
-
55
-
56
-
57
-
58
-
59
-
60
-
61
-
62
-
63
-
64
-
65
-
66
-
67
-
68
-
69
-
70
-
71
-
72
-
73
-
74
-
75
-
76
-
77
-
 78
78 -
 79
79 -
 80
80 -
 81
81 -
 82
82 -
 83
83 -
 84
84 -
 85
85 -
 86
86 -
 87
87 -
 88
88 -
89
-
90
-
91
-
92
-
93
-
94
-
95
-
96
-
97
-
98
-
99
-
100
-
101
-
102
-
103
-
104
-
105
-
106
-
107
-
108
-
109
-
110
-
111
-
112
-
113
-
114
-
115
-
116
-
117
-
118
-
119
-
120
-
121
-
122
-
123
-
124
-
125
-
126
-
127
-
128
-
129
-
130
-
131
-
132
-
133
-
134
-
135
-
136
-
137
-
138
-
139
-
140
-
141
-
142
-
143
-
144
-
145
-
146
-
147
-
148
-
149
-
150
-
151
-
152
-
153
-
154
-
155
-
156
-
157
-
158
-
159
-
160
-
161
-
162
-
163
-
164
-
165
-
166
-
167
-
168
-
169
-
170
-
171
-
172
-
173
-
174
-
175
-
176
-
177
-
178
-
179
-
180
-
181
-
182
-
183
-
184
-
185
-
186
-
187
-
188
-
189
-
190
-
191
-
192
-
193
-
194
-
195
-
196
-
197
-
198
-
199
-
200
-
201
-
202
-
203
-
204
-
205
-
206
-
207
-
208
-
209
-
210
-
211
-
212
-
213
-
214
-
215
-
216
-
217
-
218
-
219
-
220
-
221
-
222
-
223
-
224
-
225
-
226
-
227
-
228
-
229
-
230
-
231
-
232
-
233
-
234
-
235
-
236
-
237
-
238
-
239
-
240
-
241
-
242
-
243
-
244
-
245
-
246
-
247
-
248
-
249
-
250
-
251
-
252
-
253
-
254
-
255
-
256
-
257
-
258
-
259
-
260
-
261
-
262
-
263
-
264
-
265
-
266
-
267
-
268
-
269
-
270
-
271
-
272
-
273
-
274
-
275
-
276
-
277
-
278
-
279
-
280
-
281
-
282
-
283
-
284
-
285
-
286
-
287
-
288
-
289
-
290
 |
 |

Scan Preparation
67
3
3
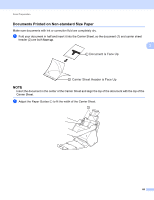
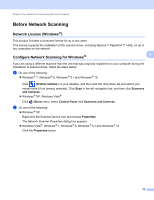
Place the Carrier Sheet
face down
in the ADF between the Guides until you feel it touch the inside of
the machine.
NOTE
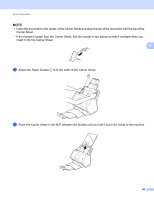
To reduce the white space in the center of a scanned page, be sure to position the folded edge of the
original document close to the edge of the Carrier Sheet.
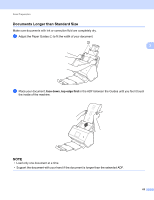
Documents with Facing Pages
3
Follow the steps of
Documents Printed on Non-standard Size Paper
on page 66.
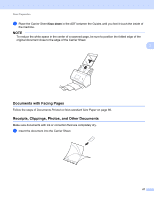
Receipts, Clippings, Photos, and Other Documents
3
Make sure documents with ink or correction fluid are completely dry.
1
Insert the document into the Carrier Sheet.