Brother International MFC-J280W Users Manual - English - Page 32
Photo, Normal, No Paper Fed
 |
View all Brother International MFC-J280W manuals
Add to My Manuals
Save this manual to your list of manuals |
Page 32 highlights
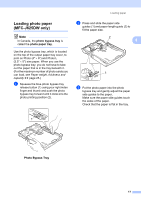
Chapter 2 Note • Always make sure that the paper is not curled or wrinkled. • The Photo indicator confirms that the photo bypass tray is in the Photo printing position. The A4/LTR indicator confirms that the photo bypass tray is in the Normal printing position. d When you have finished printing photos return the photo bypass tray to the Normal printing position. If you do not, you will get a No Paper Fed error when you use Letter or Legal size paper. Squeeze the blue photo bypass tray release button (1) using your right index finger and thumb and pull the photo bypass tray back until it clicks (2). 1 2 18
-
 1
1 -
2
-
3
-
4
-
5
-
6
-
7
-
8
-
9
-
10
-
11
-
12
-
13
-
14
-
15
-
16
-
17
-
18
-
19
-
20
-
21
-
22
-
23
-
24
-
25
-
26
-
 27
27 -
 28
28 -
 29
29 -
 30
30 -
 31
31 -
 32
32 -
 33
33 -
 34
34 -
 35
35 -
 36
36 -
 37
37 -
38
-
39
-
40
-
41
-
42
-
43
-
44
-
45
-
46
-
47
-
48
-
49
-
50
-
51
-
52
-
53
-
54
-
55
-
56
-
57
-
58
-
59
-
60
-
61
-
62
-
63
-
64
-
65
-
66
-
67
-
68
-
69
-
70
-
71
-
72
-
73
-
74
-
75
-
76
-
77
-
78
-
79
-
80
-
81
-
82
-
83
-
84
-
85
-
86
-
87
-
88
-
89
-
90
-
91
-
92
-
93
-
94
-
95
-
96
-
97
-
98
-
99
-
100
-
101
-
102
-
103
-
104
-
105
-
106
-
107
-
108
-
109
-
110
-
111
-
112
-
113
-
114
-
115
-
116
-
117
-
118
-
119
-
120
-
121
-
122
-
123
-
124
-
125
-
126
-
127
-
128
-
129
-
130
-
131
-
132
-
133
-
134
-
135
-
136
-
137
-
138
-
139
-
140
-
141
-
142
-
143
-
144
-
145
-
146
-
147
-
148
-
149
-
150
 |
 |
Chapter 2
18
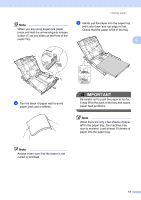
Note
•
Always make sure that the paper is not
curled or wrinkled.
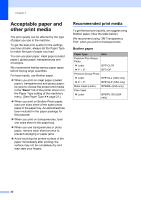
•
The Photo indicator confirms that the
photo bypass tray is in the
Photo
printing
position. The A4/LTR indicator confirms
that the photo bypass tray is in the
Normal
printing position.
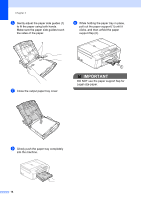
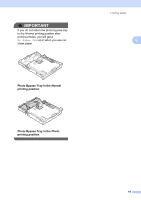
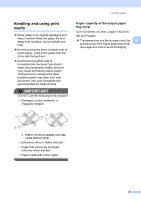
d
When you have finished printing photos
return the photo bypass tray to the
Normal
printing position. If you do not,
you will get a
No Paper Fed
error
when you use Letter or Legal size paper.
Squeeze the blue photo bypass tray
release button (1) using your right index
finger and thumb and pull the photo
bypass tray back until it clicks (2).
2
1