Brother International MFC-J835DW Advanced Users Manual - English - Page 59
Cropping
 |
View all Brother International MFC-J835DW manuals
Add to My Manuals
Save this manual to your list of manuals |
Page 59 highlights
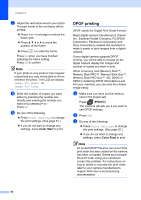
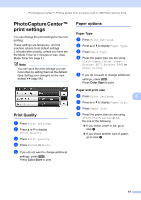
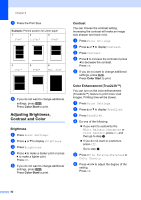
PhotoCapture Center™: Printing photos from a memory card or USB Flash memory drive g Do one of the following: If you want to customize another color enhancement, repeat steps e to f. If you want to change other settings, press to display the print setting menu and press the setting you want to change. (See page 51.) h If you do not want to change additional settings, press . Press Color Start to print. Note • White Balance This setting adjusts the hue of the white areas of an image. Lighting, camera settings and other influences will affect the appearance of white. The white areas of a picture may be slightly pink, yellow or some other color. By using this setting, you can correct that effect and bring the white areas back to pure white. • Sharpness This setting enhances the detail of an image, similar to adjusting the fine focus on a camera. If the image is not in true focus and you cannot see the fine details of the picture, then adjust the sharpness. • Color Density This setting adjusts the total amount of color in the image. You can increase or decrease the amount of color in an image to improve a washed out or weak picture. Cropping 8 If your photo is too long or wide to fit the available space on your chosen layout, part of the image will automatically be cropped. The factory setting is On. If you want to print the whole image, turn this setting to Off. When you set Cropping to Off, also set Borderless to Off. (See Borderless printing uu page 54.) a Press Print Settings. b Press a or b to display Cropping. c Press Cropping. d Press Off (or On). e If you do not want to change additional settings, press . Press Color Start to print. Cropping: On 8 8 Cropping: Off 8 53
-
 1
1 -
2
-
3
-
4
-
5
-
6
-
7
-
8
-
9
-
10
-
11
-
12
-
13
-
14
-
15
-
16
-
17
-
18
-
19
-
20
-
21
-
22
-
23
-
24
-
25
-
26
-
27
-
28
-
29
-
30
-
31
-
32
-
33
-
34
-
35
-
36
-
37
-
38
-
39
-
40
-
41
-
42
-
43
-
44
-
45
-
46
-
47
-
48
-
49
-
50
-
51
-
52
-
53
-
 54
54 -
 55
55 -
 56
56 -
 57
57 -
 58
58 -
 59
59 -
 60
60 -
 61
61 -
 62
62 -
 63
63 -
 64
64 -
65
-
66
-
67
-
68
-
69
-
70
-
71
-
72
-
73
-
74
-
75
-
76
-
77
-
78
-
79
-
80
-
81
-
82
 |
 |