Brother International PEDESIGN 7.0 Quick Reference Guide - English - Page 33
Understanding Windows and Using Tools
 |
View all Brother International PEDESIGN 7.0 manuals
Add to My Manuals
Save this manual to your list of manuals |
Page 33 highlights
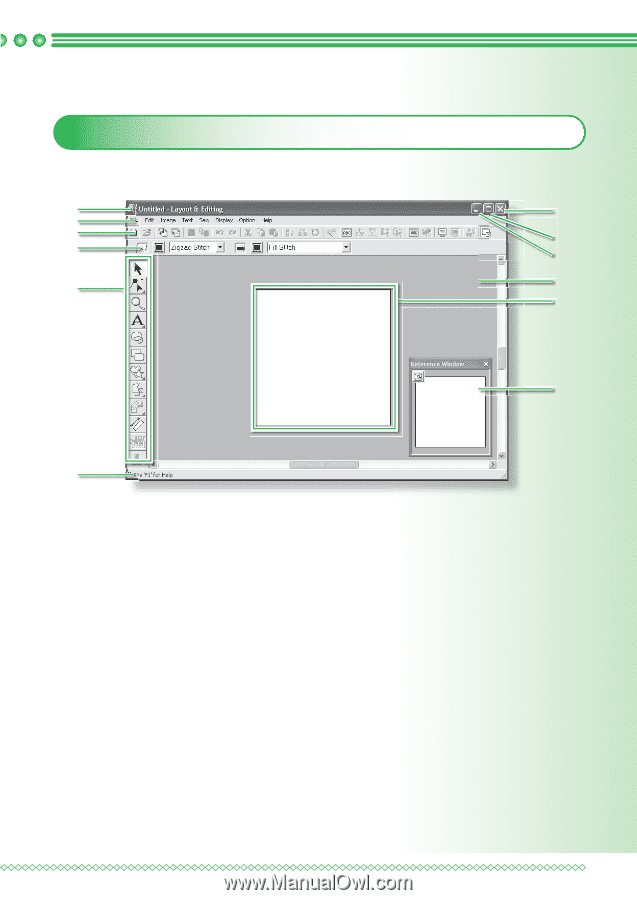
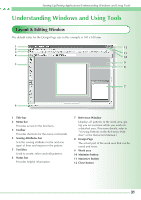
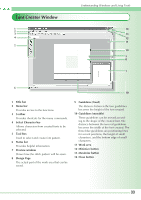
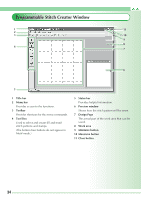
Starting Up/Exiting Applications/Understanding Windows and Using Tools Understanding Windows and Using Tools Layout & Editing Window The default value for the Design Page size in this example is 100 x 100 mm. 1 2 12 3 11 4 10 5 9 8 7 6 1 Title bar 2 Menu bar Provides access to the functions. 3 Toolbar Provides shortcuts for the menu commands. 4 Sewing Attributes bar Sets the sewing attributes (color and sew type) of lines and regions in the pattern. 5 Tool Box Used to create, select and edit patterns. 6 Status bar Provides helpful information. 7 Reference Window Displays all patterns in the work area, giving you an overview while you work on a detailed area. (For more details, refer to "Viewing Patterns in the Reference Window" of the Instruction Manual.) 8 Design Page The actual part of the work area that can be saved and sewn. 9 Work area 10 Minimize button 11 Maximize button 12 Close button 31
-
 1
1 -
2
-
3
-
4
-
5
-
6
-
7
-
8
-
9
-
10
-
11
-
12
-
13
-
14
-
15
-
16
-
17
-
18
-
19
-
20
-
21
-
22
-
23
-
24
-
25
-
26
-
27
-
 28
28 -
 29
29 -
 30
30 -
 31
31 -
 32
32 -
 33
33 -
 34
34 -
 35
35 -
 36
36 -
 37
37 -
 38
38 -
39
-
40
-
41
-
42
-
43
-
44
-
45
-
46
-
47
-
48
-
49
-
50
 |
 |