Brother International PEDESIGN 7.0 Quick Reference Guide - English - Page 38
Automatically Converting an Image to an, Embroidery Design Auto Punch Function - pe design 7 embroidery
 |
View all Brother International PEDESIGN 7.0 manuals
Add to My Manuals
Save this manual to your list of manuals |
Page 38 highlights
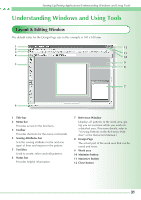
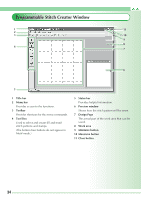
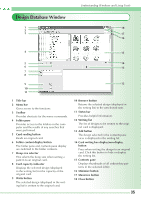
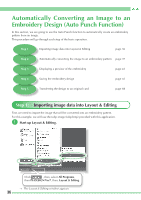
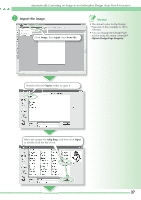
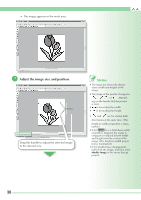
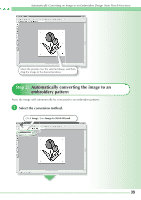
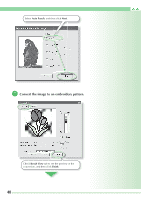
Automatically Converting an Image to an Embroidery Design (Auto Punch Function) In this section, we are going to use the Auto Punch function to automatically create an embroidery pattern from an image. This procedure will go through each step of the basic operation. Step 1 Importing image data into Layout & Editing page 36 Step 2 Automatically converting the image to an embroidery pattern page 39 Step 3 Displaying a preview of the embroidery page 41 Step 4 Saving the embroidery design page 42 Step 5 Transferring the design to an original card page 44 Step 1: Importing image data into Layout & Editing First, we need to import the image that will be converted into an embroidery pattern. For this example, we will use the tulip image (tulip.bmp) provided with this application. a Start up Layout & Editing. Click , then, select All Programs, then PE-DESIGN Ver7, then, Layout & Editing. → The Layout & Editing window appears. 36
-
 1
1 -
2
-
3
-
4
-
5
-
6
-
7
-
8
-
9
-
10
-
11
-
12
-
13
-
14
-
15
-
16
-
17
-
18
-
19
-
20
-
21
-
22
-
23
-
24
-
25
-
26
-
27
-
28
-
29
-
30
-
31
-
32
-
 33
33 -
 34
34 -
 35
35 -
 36
36 -
 37
37 -
 38
38 -
 39
39 -
 40
40 -
 41
41 -
 42
42 -
 43
43 -
44
-
45
-
46
-
47
-
48
-
49
-
50
 |
 |