Canon Color imageCLASS MF9280Cdn imageCLASS MF9280Cdn/MF9220Cdn Starter Guide - Page 14
Make sure the following screen is displayed on, the display, then press, to proceed to
 |
View all Canon Color imageCLASS MF9280Cdn manuals
Add to My Manuals
Save this manual to your list of manuals |
Page 14 highlights
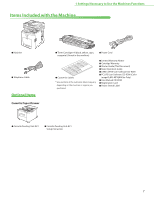
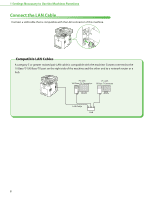
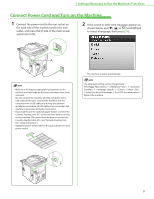
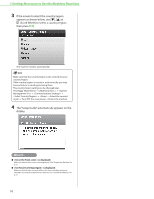
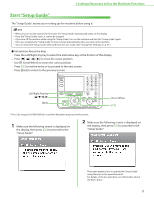
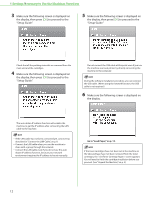
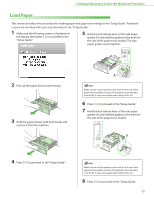
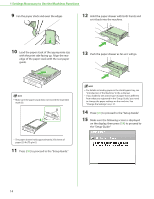
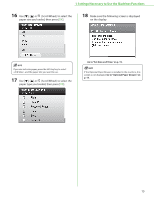
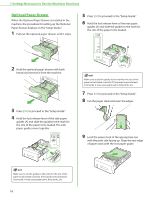
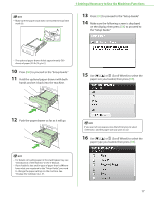
1 Settings Necessary to Use the Machines Functions 3 Make sure the following screen is displayed on the display, then press [OK] to proceed to the "Setup Guide." 5 Make sure the following screen is displayed on the display, then press [OK] to proceed to the "Setup Guide." Check that all the packing materials are removed from the main unit and the cartridges. 4 Make sure the following screen is displayed on the display, then press [OK] to proceed to the "Setup Guide." Do not connect the USB cable at this point even if you use the machine as a local printer by directly connecting the machine to the computer. During the software installation procedure, you can connect the USB cable. (When using the network function, the USB cable is not required.) 6 Make sure the following screen is displayed on the display. The auto obtain IP address function will enables the machine to get the IP address after connecting the LAN cable to the machine. - If the LAN cable has not been connected yet, connect it as described in "Connect the LAN Cable," on p. 8. - Connect the LAN cable when you use the machine to share with a group through the network. - Connect the LAN cable even if you do not use the auto obtain IP address function, because your network environment requires the IP address to be set manually. Go to "Load Paper," on p. 13. If the toner cartridges have not been set in the machine or the tabs and tape have not been removed from the toner cartridges, the screen appears. You will need to finish the cartridge installation before you proceed. (See "Unpack the Machine," on p. 3.) 12
-
 1
1 -
2
-
3
-
4
-
5
-
6
-
7
-
8
-
 9
9 -
 10
10 -
 11
11 -
 12
12 -
 13
13 -
 14
14 -
 15
15 -
 16
16 -
 17
17 -
 18
18 -
 19
19 -
20
-
21
-
22
-
23
-
24
-
25
-
26
-
27
-
28
-
29
-
30
-
31
-
32
-
33
-
34
-
35
-
36
-
37
-
38
-
39
-
40
-
41
-
42
-
43
-
44
-
45
-
46
-
47
-
48
-
49
-
50
-
51
-
52
-
53
-
54
-
55
-
56
-
57
-
58
-
59
-
60
-
61
-
62
-
63
-
64
 |
 |
