Canon Color imageCLASS MF9280Cdn imageCLASS MF9280Cdn/MF9220Cdn Starter Guide - Page 39

Change the Settings, Telephone Number Registration

Page 39 highlights

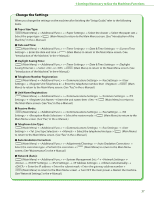
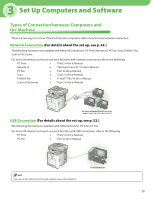
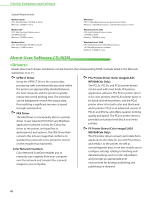
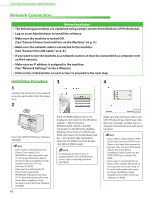
1 Settings Necessary to Use the Machines Functions Change the Settings When you change the settings on the machine after finishing the "Setup Guide," refer to the following items. ● Paper Size/Type: (Main Menu) → → → Select the drawer → Select the paper size → Select the paper type → (Main Menu) to return to the Main Menu screen. (See "Introduction of the Machine," in the e-Manual.) ● Date and Time: (Main Menu) → → → → → Enter the date and time → (Main Menu) to return to the Main Menu screen. (See "Introduction of the Machine," in the e-Manual.) ● Daylight Saving Time: (Main Menu) → → → → → Select or → (Main Menu) to return to the Main Menu screen. (See "Introduction of the Machine," in the e-Manual.) ● Telephone Number Registration: (Main Menu) → → → → → → Enter the telephone number, then → (Main Menu) to return to the Main Menu screen. (See "Fax," in the e-Manual.) ● Unit Name Registration: (Main Menu) → → → → → → Enter the unit name, then → (Main Menu) to return to the Main Menu screen. (See "Fax," in the e-Manual.) ● Receive Mode: (Main Menu) → → → → → → Select the receive mode → (Main Menu) to return to the Main Menu screen. (See "Fax," in the e-Manual.) ● Telephone Line Type: (Main Menu) → → → → → → → Select the telephone line type → (Main Menu) to return to the Main Menu screen. (See "Fax," in the e-Manual.) ● Auto Gradation Correction: (Main Menu) → → → → Select the correction type → Perform the correction → (Main Menu) to return to the Main Menu screen. (See "Maintenance," in the e-Manual.) ● Network (Auto): (Main Menu) → → * → → → → → → → → Enter the IP address → Enter the subnet mask → Enter the gateway address number → (Main Menu) to return to the Main Menu screen. → Turn OFF the main power → Restart the machine. (See "Network Settings," in the e-Manual.) 37

  • 1
  • 2
  • 3
  • 4
  • 5
  • 6
  • 7
  • 8
  • 9
  • 10
  • 11
  • 12
  • 13
  • 14
  • 15
  • 16
  • 17
  • 18
  • 19
  • 20
  • 21
  • 22
  • 23
  • 24
  • 25
  • 26
  • 27
  • 28
  • 29
  • 30
  • 31
  • 32
  • 33
  • 34
  • 35
  • 36
  • 37
  • 38
  • 39
  • 40
  • 41
  • 42
  • 43
  • 44
  • 45
  • 46
  • 47
  • 48
  • 49
  • 50
  • 51
  • 52
  • 53
  • 54
  • 55
  • 56
  • 57
  • 58
  • 59
  • 60
  • 61
  • 62
  • 63
  • 64

37
1 Settings Necessary to Use the Machines Functions
When you change the settings on the machine after finishing the “Setup Guide,” refer to the following
items.
Paper Size/Type:
(Main Menu)
<Additional Func.>
<Paper Settings>
Select the drawer
Select the paper size
Select the paper type
(Main Menu) to return to the Main Menu screen. (See “Introduction of the
Machine,” in the e-Manual.)
Date and Time:
(Main Menu)
<Additional Func.>
<Timer Settings>
<Date & Time Settings>
<Current Time
Settings>
Enter the date and time
(Main Menu) to return to the Main Menu screen. (See
“Introduction of the Machine,” in the e-Manual.)
Daylight Saving Time:
(Main Menu)
<Additional Func.>
<Timer Settings>
<Date & Time Settings>
<Daylight
Saving Time Set.>
Select <On> or <Off>
(Main Menu) to return to the Main Menu screen. (See
“Introduction of the Machine,” in the e-Manual.)
Telephone Number Registration:
(Main Menu)
<Additional Func.>
<Communications Settings>
<Fax Settings>
<User
Settings>
<Register Unit Telephone #>
Enter the telephone number, then <Register>
(Main
Menu) to return to the Main Menu screen. (See “Fax,” in the e-Manual.)
Unit Name Registration:
(Main Menu)
<Additional Func.>
<Communications Settings>
<Common Settings>
<TX
Settings>
<Register Unit Name>
Enter the unit name, then <Set>
(Main Menu) to return to
the Main Menu screen. (See “Fax,” in the e-Manual.)
Receive Mode:
(Main Menu)
<Additional Func.>
<Communications Settings>
<Fax Settings>
<RX
Settings>
<Reception Mode Selection>
Select the receive mode
(Main Menu) to return to the
Main Menu screen. (See “Fax,” in the e-Manual.)
Telephone Line Type:
(Main Menu)
<Additional Func.>
<Communications Settings>
<Fax Settings>
<User
Settings>
<Tel. Line Type Selection>
<Manual>
Select the telephone line type
(Main Menu)
to return to the Main Menu screen. (See “Fax,” in the e-Manual.)
Auto Gradation Correction:
(Main Menu)
<Additional Func.>
<Adjustment/Cleaning>
<Auto Gradation Correction>
Select the correction type
Perform the correction
(Main Menu) to return to the Main Menu
screen. (See “Maintenance,” in the e-Manual.)
Network (Auto):
(Main Menu)
<Additional Func.>
<System Management Set.>*
<Network Settings>
<Done>
<TCP/IP Settings>
<IPv4 Settings>
<IP Address Settings>
<Obtain Automatically>
<DHCP>
Enter the IP address
Enter the subnet mask
Enter the gateway address number
(Main Menu) to return to the Main Menu screen.
Turn OFF the main power
Restart the machine.
(See “Network Settings,” in the e-Manual.)
Change the Settings