Canon Color imageCLASS MF9280Cdn imageCLASS MF9280Cdn/MF9220Cdn Starter Guide - Page 36
Scroll Wheel to, the display. Use
 |
View all Canon Color imageCLASS MF9280Cdn manuals
Add to My Manuals
Save this manual to your list of manuals |
Page 36 highlights
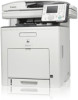
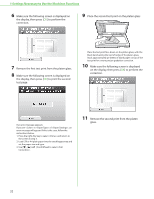
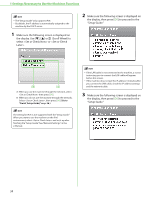
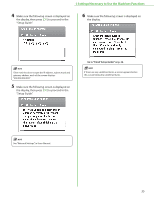
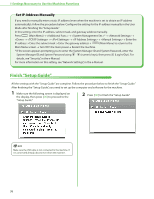
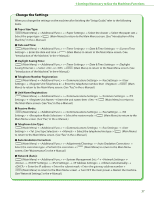
1 Settings Necessary to Use the Machines Functions - The "Setup Guide" only supports IPv4. - By default, the IP address is automatically assigned to the machine by the DHCP server. 1 Make sure the following screen is displayed on the display. Use or (Scroll Wheel) to select or . 2 Make sure the following screen is displayed on the display, then press [OK] to proceed to the "Setup Guide." A: When you use the machine through the network, select then press [OK]. B: When you do not use the machine through the network, Select , then press [OK]. (Go to "Finish 'Setup Guide'," on p. 36.) - If the LAN cable is not connected to the machine, a screen instructing you to connect the LAN cable will appear before this screen. - If the machine dose not get the IP address 3 minutes after you connect the LAN cable, check the IP address settings and the network cable. 3 Make sure the following screen is displayed on the display, then press [OK] to proceed to the "Setup Guide." The setting for IPv6 is not supported with the "Setup Guide." When you want to use the machine on the IPv6 environment, select and set it up after finishing the "Setup Guide." See "Network Settings," in the e-Manual. 34
-
 1
1 -
2
-
3
-
4
-
5
-
6
-
7
-
8
-
9
-
10
-
11
-
12
-
13
-
14
-
15
-
16
-
17
-
18
-
19
-
20
-
21
-
22
-
23
-
24
-
25
-
26
-
27
-
28
-
29
-
30
-
 31
31 -
 32
32 -
 33
33 -
 34
34 -
 35
35 -
 36
36 -
 37
37 -
 38
38 -
 39
39 -
 40
40 -
 41
41 -
42
-
43
-
44
-
45
-
46
-
47
-
48
-
49
-
50
-
51
-
52
-
53
-
54
-
55
-
56
-
57
-
58
-
59
-
60
-
61
-
62
-
63
-
64
 |
 |