Canon DR-7080C User Manual - Page 23
Operation Panel - error
 |
View all Canon DR-7080C manuals
Add to My Manuals
Save this manual to your list of manuals |
Page 23 highlights
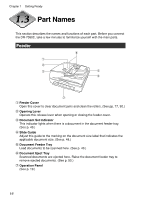
Operation Panel 1.3 Part Names 1 q Menu Key Press this key to cycle the display through the various user modes, as shown below. (See "About the User Modes," on p. 68.) w Set Keys Use these keys to change the setting of the currently displayed user mode. (See p. 72.) e Enter Key Press this key to register the currently displayed user mode setting. (See p. 72.) r Display Panel Displays the number of scanned pages, error codes, etc. t Job Keys Use these keys to scroll through registered job numbers (01 through 99) on the display panel. (See "Job Function," on p. 20.) Pressing the [Start] key while a job number is displayed starts scanning of the document and forwards the scanned image to the registered job. y New File Key This key is active for applications that support batch separation. This key lights when pressed or in accordance with the application's batch separation settings. Scanning the next document while this key is lit causes the scanned image to be stored in a different file or folder than the previously scanned document. u Start Key The Start key lamp lights when the key is enabled by the Count Only Mode or the application's settings. Pressing the [Start] key while its lamp is lit causes scanning to start. i Stop Key Pressing this key stops an ongoing scanning operation. This key is also used to cancel a mode setting and clear an error indicator from the counter display area. 19
-
 1
1 -
2
-
3
-
4
-
5
-
6
-
7
-
8
-
9
-
10
-
11
-
12
-
13
-
14
-
15
-
16
-
17
-
 18
18 -
 19
19 -
 20
20 -
 21
21 -
 22
22 -
 23
23 -
 24
24 -
 25
25 -
 26
26 -
 27
27 -
 28
28 -
29
-
30
-
31
-
32
-
33
-
34
-
35
-
36
-
37
-
38
-
39
-
40
-
41
-
42
-
43
-
44
-
45
-
46
-
47
-
48
-
49
-
50
-
51
-
52
-
53
-
54
-
55
-
56
-
57
-
58
-
59
-
60
-
61
-
62
-
63
-
64
-
65
-
66
-
67
-
68
-
69
-
70
-
71
-
72
-
73
-
74
-
75
-
76
-
77
-
78
-
79
-
80
-
81
-
82
-
83
-
84
-
85
-
86
-
87
-
88
-
89
-
90
-
91
-
92
-
93
-
94
-
95
-
96
-
97
-
98
-
99
-
100
-
101
-
102
-
103
-
104
-
105
-
106
-
107
-
108
-
109
-
110
-
111
-
112
 |
 |
