Canon PowerShot A100 Software Starter Guide DC SD Ver.9 - Page 114
Camera User Guide
 |
View all Canon PowerShot A100 manuals
Add to My Manuals
Save this manual to your list of manuals |
Page 114 highlights
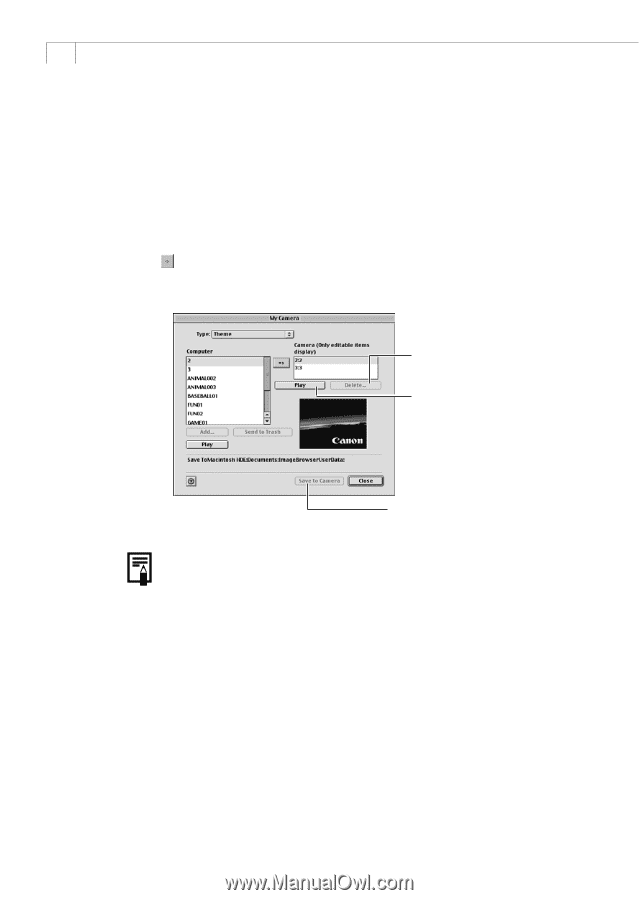
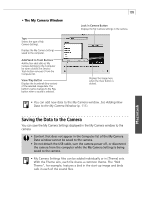
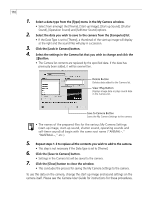
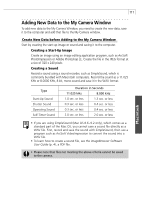
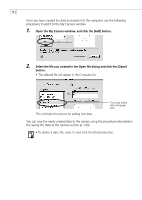
110 1. Select a data type from the [Type] menu in the My Camera window. • Select from amongst the [Theme], [Start-up Image], [Start-up Sound], [Shutter Sound], [Operation Sound] and [Selftimer Sound] options. 2. Select the data you wish to save to the camera from the [Computer] list. • If the Data Type is set to [Theme], a thumbnail of the start-up image will display at the right and the sound files will play in succession. 3. Click the [Look in Camera] button. 4. Select the settings in the Camera list that you wish to change and click the button. • The Camera list contents are replaced by the specified data. If the data has previously been added, it will be overwritten. Delete Button Deletes data added to the Camera list. View / Play Button Displays image data or plays sound data in the Camera list. Save to Camera Button Saves the My Camera Settings to the camera. • The names of the prepared files for the various My Camera Settings (start-up image, start-up sound, shutter sound, operating sounds and self-timer sound) all begin with the same root name ("ANIMAL~," "BASEBALL~," etc.). 5. Repeat steps 1-3 to replace all the contents you wish to add to the camera. • This step is not necessary if the Data Type is set to [Theme]. 6. Click the [Save to Camera] button. • Settings in the Camera list will be saved to the camera. 7. Click the [Close] button to close the window. • This concludes the process for saving the My Camera Settings to the camera. To use this data on the camera, change the start-up image and sound settings on the camera itself. Please see the Camera User Guide for instructions for these procedures.
-
 1
1 -
2
-
3
-
4
-
5
-
6
-
7
-
8
-
9
-
10
-
11
-
12
-
13
-
14
-
15
-
16
-
17
-
18
-
19
-
20
-
21
-
22
-
23
-
24
-
25
-
26
-
27
-
28
-
29
-
30
-
31
-
32
-
33
-
34
-
35
-
36
-
37
-
38
-
39
-
40
-
41
-
42
-
43
-
44
-
45
-
46
-
47
-
48
-
49
-
50
-
51
-
52
-
53
-
54
-
55
-
56
-
57
-
58
-
59
-
60
-
61
-
62
-
63
-
64
-
65
-
66
-
67
-
68
-
69
-
70
-
71
-
72
-
73
-
74
-
75
-
76
-
77
-
78
-
79
-
80
-
81
-
82
-
83
-
84
-
85
-
86
-
87
-
88
-
89
-
90
-
91
-
92
-
93
-
94
-
95
-
96
-
97
-
98
-
99
-
100
-
101
-
102
-
103
-
104
-
105
-
106
-
107
-
108
-
 109
109 -
 110
110 -
 111
111 -
 112
112 -
 113
113 -
 114
114 -
 115
115 -
 116
116 -
 117
117 -
 118
118 -
 119
119 -
120
-
121
-
122
-
123
 |
 |