Canon PowerShot A100 Software Starter Guide DC SD Ver.9 - Page 97
Click [List for Development Condition Settings].
 |
View all Canon PowerShot A100 manuals
Add to My Manuals
Save this manual to your list of manuals |
Page 97 highlights
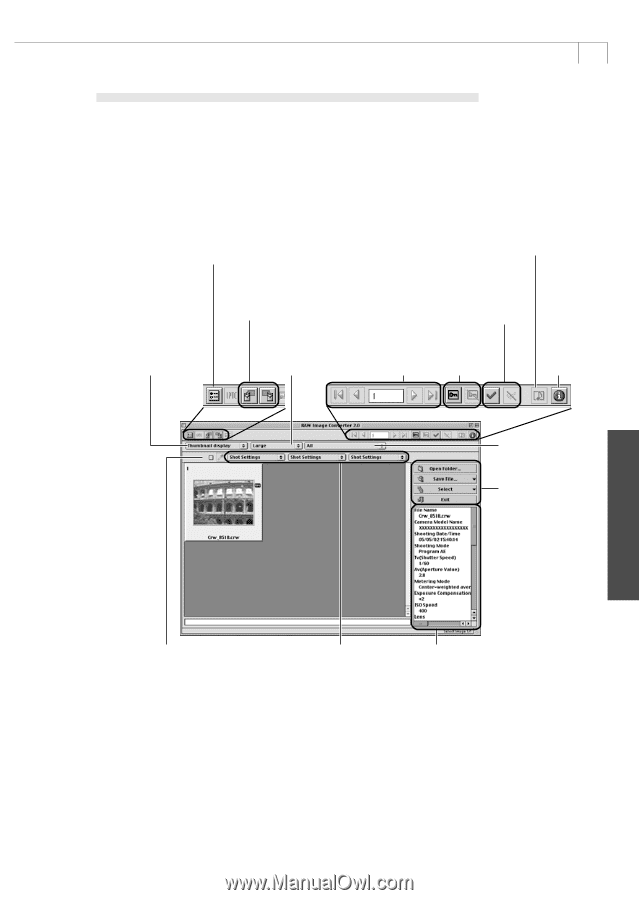
93 Converting RAW Images with Quality Adjustment 1. Select a RAW image in the RAW Image Selection list in the RAW Image Converter main window. 2. Click [List for Development Condition Settings]. • The following window will display. Preference Settings Button Click here to check or change the image transfer settings and set the RAW image processing method (p. 92). Display Mode List Box Click here to select between the Thumbnail and Preview display modes. Rotate 90º Buttons Click here to rotate the selected image left or right 90º Display Size List Box Click here to select an image display size. Sound Memo Play Button Click this to play sound memos attached to images. Checkmark On/Off Button Click here to choose the selection method when the check mark is selected and the [Select] button is clicked. Image Protection Selection On/Off Buttons Button Help Button Click here to select your camera model. Main Buttons Buttons for saving files, quitting and other functions appear here. Macintosh Click here and then select a white area in the preview image to set the white balance to that value. Click one of these to change, from left to right, the [White Balance], [Contrast] or [Saturation]. Image Information Display Area 3. Select your camera model. 4. Adjust the image quality as required. 5. Click the [Convert and Save] button in the Save File section to save the file in the JPEG or TIFF formats (p. 91).
-
 1
1 -
2
-
3
-
4
-
5
-
6
-
7
-
8
-
9
-
10
-
11
-
12
-
13
-
14
-
15
-
16
-
17
-
18
-
19
-
20
-
21
-
22
-
23
-
24
-
25
-
26
-
27
-
28
-
29
-
30
-
31
-
32
-
33
-
34
-
35
-
36
-
37
-
38
-
39
-
40
-
41
-
42
-
43
-
44
-
45
-
46
-
47
-
48
-
49
-
50
-
51
-
52
-
53
-
54
-
55
-
56
-
57
-
58
-
59
-
60
-
61
-
62
-
63
-
64
-
65
-
66
-
67
-
68
-
69
-
70
-
71
-
72
-
73
-
74
-
75
-
76
-
77
-
78
-
79
-
80
-
81
-
82
-
83
-
84
-
85
-
86
-
87
-
88
-
89
-
90
-
91
-
 92
92 -
 93
93 -
 94
94 -
 95
95 -
 96
96 -
 97
97 -
 98
98 -
 99
99 -
 100
100 -
 101
101 -
 102
102 -
103
-
104
-
105
-
106
-
107
-
108
-
109
-
110
-
111
-
112
-
113
-
114
-
115
-
116
-
117
-
118
-
119
-
120
-
121
-
122
-
123
 |
 |