Canon PowerShot A100 Software Starter Guide DC SD Ver.9 - Page 95
Click the [Convert and Save with Current Settings] button.
 |
View all Canon PowerShot A100 manuals
Add to My Manuals
Save this manual to your list of manuals |
Page 95 highlights
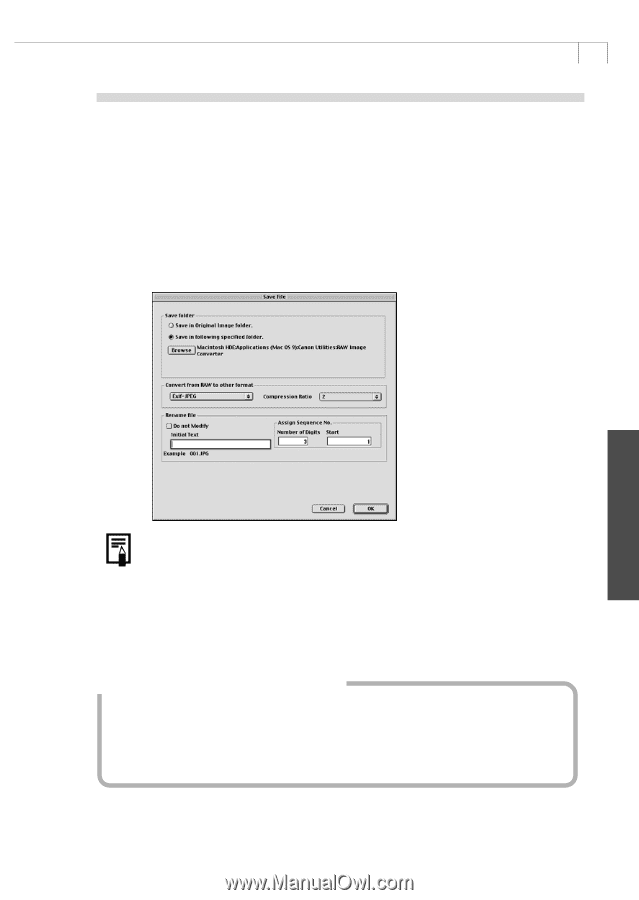
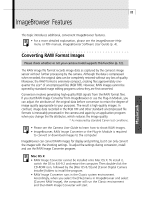
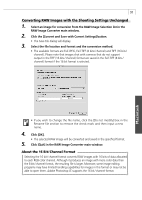
91 Converting RAW Images with the Shooting Settings Unchanged 1. Select an image for conversion from the RAW Image Selection list in the RAW Image Converter main window. 2. Click the [Convert and Save with Current Settings] button. • The Save File dialog will display. 3. Select the file location and format and the conversion method. • The available formats are Exif-JPEG, Exif-TIFF (8 bits / channel) and TIFF (16 bits / channel). Please note that images shot with cameras that do not support output in the TIFF (16 bits / channel) format are saved in the Exif-TIFF (8 bits / channel) format if the 16 bit format is selected. • If you wish to change the file name, click the [Do not modify] box in the Rename file section to remove the check mark and then input a new name. 4. Click [OK]. • The selected RAW image will be converted and saved in the specified format. 5. Click [Quit] in the RAW Image Converter main window. About the 16 Bit / Channel Format Selecting the 16 bit / channel format converts RAW images with 16 bits of data allocated to each RGB color channel. Although it produces an image with more color data than the 8 bit / channel format, the resulting file is larger. Moreover, some image editing programs may have limited handling capabilities for images in this format or may not be able to open them. Adobe Photoshop LE supports the 16 bit / channel format. Macintosh
-
 1
1 -
2
-
3
-
4
-
5
-
6
-
7
-
8
-
9
-
10
-
11
-
12
-
13
-
14
-
15
-
16
-
17
-
18
-
19
-
20
-
21
-
22
-
23
-
24
-
25
-
26
-
27
-
28
-
29
-
30
-
31
-
32
-
33
-
34
-
35
-
36
-
37
-
38
-
39
-
40
-
41
-
42
-
43
-
44
-
45
-
46
-
47
-
48
-
49
-
50
-
51
-
52
-
53
-
54
-
55
-
56
-
57
-
58
-
59
-
60
-
61
-
62
-
63
-
64
-
65
-
66
-
67
-
68
-
69
-
70
-
71
-
72
-
73
-
74
-
75
-
76
-
77
-
78
-
79
-
80
-
81
-
82
-
83
-
84
-
85
-
86
-
87
-
88
-
89
-
 90
90 -
 91
91 -
 92
92 -
 93
93 -
 94
94 -
 95
95 -
 96
96 -
 97
97 -
 98
98 -
 99
99 -
 100
100 -
101
-
102
-
103
-
104
-
105
-
106
-
107
-
108
-
109
-
110
-
111
-
112
-
113
-
114
-
115
-
116
-
117
-
118
-
119
-
120
-
121
-
122
-
123
 |
 |