Canon PowerShot G12 PowerShot G12 Camera User Guide - Page 110
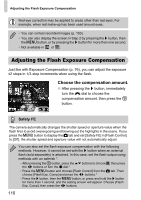
Adjusting the Flash Exposure Compensation
 |
View all Canon PowerShot G12 manuals
Add to My Manuals
Save this manual to your list of manuals |
Page 110 highlights
Adjusting the Flash Exposure Compensation Red-eye correction may be applied to areas other than red eyes. For example, when red make-up has been used around eyes. • You can correct recorded images (p. 150). • You can also display the screen in Step 2 by pressing the r button, then the n button, or by pressing the r button for more than one second. • Not available in or . Adjusting the Flash Exposure Compensation Just like with Exposure Compensation (p. 76), you can adjust the exposure ±2 stops in 1/3-stop increments when using the flash. Choose the compensation amount. ● After pressing the r button, immediately turn the ÷ dial to choose the compensation amount, then press the m button. Safety FE The camera automatically changes the shutter speed or aperture value when the flash fires to avoid overexposing and blowing out the highlights in the scene. If you press the n button to display the 4 tab and set [Safety FE] in [Flash Control] to [Off], the shutter speed and aperture value will not automatically adjust. You can also set the flash exposure compensation with the following methods. However, it cannot be set with the r button when an external flash (sold separately) is attached. In this case, set the flash output using methods with an asterisk *. • After pressing the m button, press the op buttons to choose ~, then press the qr buttons or turn the Ê dial.* • Press the n button and choose [Flash Control] from the 4 tab. Then choose [Flash Exp. Comp] and press the qr buttons.* • Press the r button, then the n button, or press and hold the r button for more than 1 second, and the setting screen will appear. Choose [Flash Exp. Comp], then press the qr buttons. 110
-
 1
1 -
2
-
3
-
4
-
5
-
6
-
7
-
8
-
9
-
10
-
11
-
12
-
13
-
14
-
15
-
16
-
17
-
18
-
19
-
20
-
21
-
22
-
23
-
24
-
25
-
26
-
27
-
28
-
29
-
30
-
31
-
32
-
33
-
34
-
35
-
36
-
37
-
38
-
39
-
40
-
41
-
42
-
43
-
44
-
45
-
46
-
47
-
48
-
49
-
50
-
51
-
52
-
53
-
54
-
55
-
56
-
57
-
58
-
59
-
60
-
61
-
62
-
63
-
64
-
65
-
66
-
67
-
68
-
69
-
70
-
71
-
72
-
73
-
74
-
75
-
76
-
77
-
78
-
79
-
80
-
81
-
82
-
83
-
84
-
85
-
86
-
87
-
88
-
89
-
90
-
91
-
92
-
93
-
94
-
95
-
96
-
97
-
98
-
99
-
100
-
101
-
102
-
103
-
104
-
 105
105 -
 106
106 -
 107
107 -
 108
108 -
 109
109 -
 110
110 -
 111
111 -
 112
112 -
 113
113 -
 114
114 -
 115
115 -
116
-
117
-
118
-
119
-
120
-
121
-
122
-
123
-
124
-
125
-
126
-
127
-
128
-
129
-
130
-
131
-
132
-
133
-
134
-
135
-
136
-
137
-
138
-
139
-
140
-
141
-
142
-
143
-
144
-
145
-
146
-
147
-
148
-
149
-
150
-
151
-
152
-
153
-
154
-
155
-
156
-
157
-
158
-
159
-
160
-
161
-
162
-
163
-
164
-
165
-
166
-
167
-
168
-
169
-
170
-
171
-
172
-
173
-
174
-
175
-
176
-
177
-
178
-
179
-
180
-
181
-
182
-
183
-
184
-
185
-
186
-
187
-
188
-
189
-
190
-
191
-
192
-
193
-
194
-
195
-
196
-
197
-
198
-
199
-
200
-
201
-
202
-
203
-
204
-
205
-
206
-
207
-
208
-
209
-
210
-
211
-
212
-
213
-
214
 |
 |
