Canon PowerShot G12 PowerShot G12 Camera User Guide - Page 179
Changing the Ring Color Sold Separately, Using the Remote Switch Sold Separately
 |
View all Canon PowerShot G12 manuals
Add to My Manuals
Save this manual to your list of manuals |
Page 179 highlights
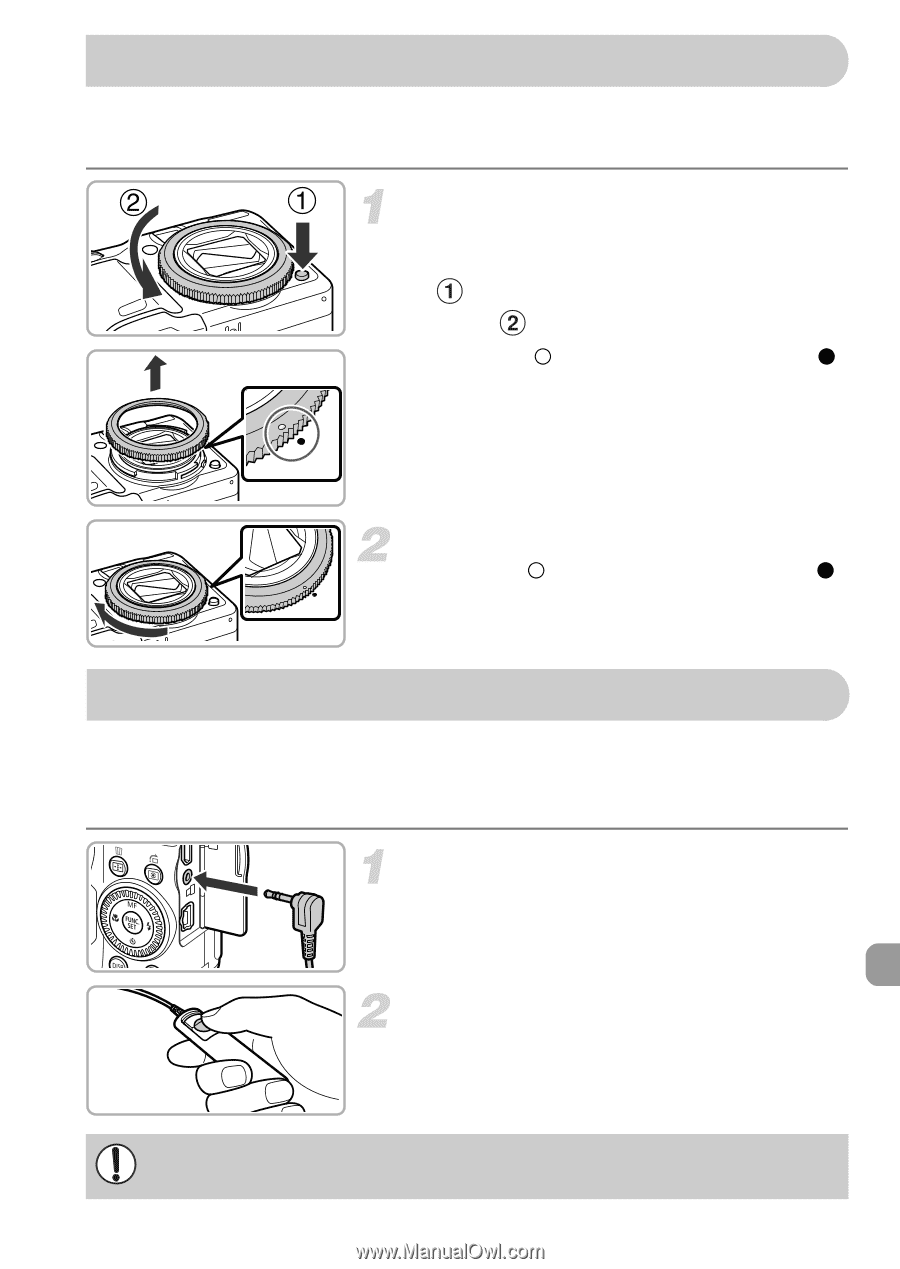
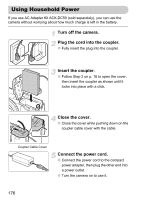
Changing the Ring Color (Sold Separately) You can change the color of the ring using the separately sold Ring Accessory Kit RAK-DC-2. Remove the ring. ● Be sure the camera is turned off. ● While pressing the ring release button ( ), turn the ring in the direction of the arrow ( ). ● When the "{" mark on the ring and the "z" mark on the camera are aligned, lift off the ring. Attach the ring. ● Align the "{" mark on the ring with the "z" mark on the camera and turn the ring in the direction of the arrow. Using the Remote Switch (Sold Separately) By using the RS60-E3 Remote Switch (sold separately), you can avoid any camera shake that may occur when you press the shutter button. The remote switch is useful when using slow shutter speeds. Connect the remote switch. ● Be sure the camera is turned off. ● Open the terminal cover and insert the remote switch plug. Shoot. ● Press the release button on the remote switch to shoot. Bulb photographs cannot be taken with this camera. 179
-
 1
1 -
2
-
3
-
4
-
5
-
6
-
7
-
8
-
9
-
10
-
11
-
12
-
13
-
14
-
15
-
16
-
17
-
18
-
19
-
20
-
21
-
22
-
23
-
24
-
25
-
26
-
27
-
28
-
29
-
30
-
31
-
32
-
33
-
34
-
35
-
36
-
37
-
38
-
39
-
40
-
41
-
42
-
43
-
44
-
45
-
46
-
47
-
48
-
49
-
50
-
51
-
52
-
53
-
54
-
55
-
56
-
57
-
58
-
59
-
60
-
61
-
62
-
63
-
64
-
65
-
66
-
67
-
68
-
69
-
70
-
71
-
72
-
73
-
74
-
75
-
76
-
77
-
78
-
79
-
80
-
81
-
82
-
83
-
84
-
85
-
86
-
87
-
88
-
89
-
90
-
91
-
92
-
93
-
94
-
95
-
96
-
97
-
98
-
99
-
100
-
101
-
102
-
103
-
104
-
105
-
106
-
107
-
108
-
109
-
110
-
111
-
112
-
113
-
114
-
115
-
116
-
117
-
118
-
119
-
120
-
121
-
122
-
123
-
124
-
125
-
126
-
127
-
128
-
129
-
130
-
131
-
132
-
133
-
134
-
135
-
136
-
137
-
138
-
139
-
140
-
141
-
142
-
143
-
144
-
145
-
146
-
147
-
148
-
149
-
150
-
151
-
152
-
153
-
154
-
155
-
156
-
157
-
158
-
159
-
160
-
161
-
162
-
163
-
164
-
165
-
166
-
167
-
168
-
169
-
170
-
171
-
172
-
173
-
 174
174 -
 175
175 -
 176
176 -
 177
177 -
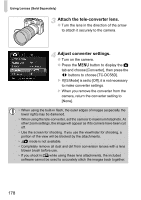 178
178 -
 179
179 -
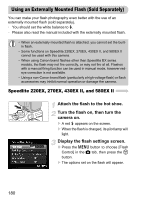 180
180 -
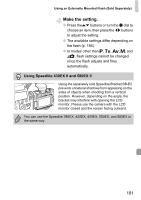 181
181 -
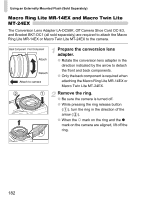 182
182 -
 183
183 -
 184
184 -
185
-
186
-
187
-
188
-
189
-
190
-
191
-
192
-
193
-
194
-
195
-
196
-
197
-
198
-
199
-
200
-
201
-
202
-
203
-
204
-
205
-
206
-
207
-
208
-
209
-
210
-
211
-
212
-
213
-
214
 |
 |