Canon ZR700 ZR700 ZR600 Instruction Manual - Page 77
Press the PAUSE
 |
UPC - 013803063691
View all Canon ZR700 manuals
Add to My Manuals
Save this manual to your list of manuals |
Page 77 highlights
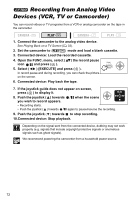
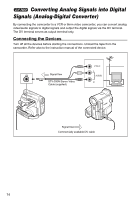
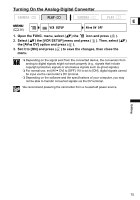
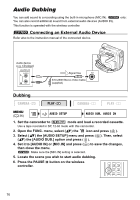
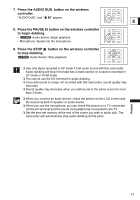
7. Press the AUDIO DUB. button on the wireless controller. "AUDIO DUB." and " " appear. PAUSE SLOW ZERO SET AUDIO DUB. MEMORY TV SCREEN E 8. Press the PAUSE button on the wireless controller to begin dubbing. • Audio device: Begin playback. • Microphone: Speak into the microphone. PLAY STOP PAUSE SLOW ZERO SET AUDIO DUB. MEMORY TV SCREEN 9. Press the STOP button on the wireless controller to stop dubbing. Audio device: Stop playback. PLAY STOP PAUSE SLOW ZERO SET AUDIO DUB. MEMORY TV SCREEN Use only tapes recorded in SP mode 12-bit audio sound with this camcorder. Audio dubbing will stop if the tape has a blank section or a section recorded in LP mode or 16-bit mode. You cannot use the DV terminal for audio dubbing. If you add sound to a tape not recorded with this camcorder, sound quality may decrease. Sound quality may decrease when you add sound to the same scene for more than 3 times. When you connect an audio device, check the picture on the LCD screen and the sound via built-in speaker or audio device. When you use the microphone, you can check the picture on a TV connected via the AV terminal and the sound via headphones connected to the TV. Set the zero set memory at the end of the scene you wish to audio dub. The camcorder will automatically stop audio dubbing at that point. Editing 77
-
 1
1 -
2
-
3
-
4
-
5
-
6
-
7
-
8
-
9
-
10
-
11
-
12
-
13
-
14
-
15
-
16
-
17
-
18
-
19
-
20
-
21
-
22
-
23
-
24
-
25
-
26
-
27
-
28
-
29
-
30
-
31
-
32
-
33
-
34
-
35
-
36
-
37
-
38
-
39
-
40
-
41
-
42
-
43
-
44
-
45
-
46
-
47
-
48
-
49
-
50
-
51
-
52
-
53
-
54
-
55
-
56
-
57
-
58
-
59
-
60
-
61
-
62
-
63
-
64
-
65
-
66
-
67
-
68
-
69
-
70
-
71
-
 72
72 -
 73
73 -
 74
74 -
 75
75 -
 76
76 -
 77
77 -
 78
78 -
 79
79 -
 80
80 -
 81
81 -
 82
82 -
83
-
84
-
85
-
86
-
87
-
88
-
89
-
90
-
91
-
92
-
93
-
94
-
95
-
96
-
97
-
98
-
99
-
100
-
101
-
102
-
103
-
104
-
105
-
106
-
107
-
108
-
109
-
110
-
111
-
112
-
113
-
114
-
115
-
116
-
117
-
118
-
119
-
120
-
121
-
122
-
123
-
124
-
125
-
126
-
127
-
128
-
129
-
130
-
131
 |
 |
