Canon imageCLASS 2300N Basic Guide for imageCLASS 2300 - Page 101
Connecting to a Computer, Connecting to a Network - service manual
 |
View all Canon imageCLASS 2300N manuals
Add to My Manuals
Save this manual to your list of manuals |
Page 101 highlights
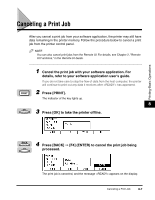
Connecting to a Computer Connect the machine to a computer or network using an interface cable supporting bidirectional communication or a 100Base-TX or 10Base-T Ethernet cable. IMPORTANT To avoid risk of a shock hazard, turn OFF the main power switch located on the right side of the machine and unplug the power cord from the power outlet, before connecting an interface cable or network cable. (See Chapter 1, "Before You Start Using This Machine," in the Reference Guide.) NOTE This machine is not supplied with an interface cable or a network cable. Please purchase the cable to match your computer or network. For how to connect the interface or network cable to the machine, see the Set-Up Sheet for Networking and Printing. Printing-Basic Operations Connecting to a Network 8 This machine has a built-in print server that is compatible with TCP/IP to allow use as a network printer for UNIX and Windows. The print server is supplied with a 100Base-TX/10Base-T port, therefore you can simply connect it to a LAN. You need a LAN cable and hub to connect the machine to your network. NOTE The print server of this machine is compatible with a NetWare® network. For details, contact your service representative. The print server of this machine automatically detects the connected 100Base-TX or 10Base-T interface. After connecting the network cable, perform the following setups. For details of each setup, consult the corresponding manual. - Installing the printer driver. (See Chapter1, "Before You Start Using This Machine," in the PCL Printer Guide.) - Date/time setting and system management setting. (See Chapter 3, "Selecting and Storing Settings," and Chapter 5, "System Manager Settings," in the Reference Guide.) - Print server and network settings. (See Chapter 2, "Using a TCP/IP Network (Windows/ UNIX)," in the Network Guide.) 8-4 Connecting to a Computer
-
 1
1 -
2
-
3
-
4
-
5
-
6
-
7
-
8
-
9
-
10
-
11
-
12
-
13
-
14
-
15
-
16
-
17
-
18
-
19
-
20
-
21
-
22
-
23
-
24
-
25
-
26
-
27
-
28
-
29
-
30
-
31
-
32
-
33
-
34
-
35
-
36
-
37
-
38
-
39
-
40
-
41
-
42
-
43
-
44
-
45
-
46
-
47
-
48
-
49
-
50
-
51
-
52
-
53
-
54
-
55
-
56
-
57
-
58
-
59
-
60
-
61
-
62
-
63
-
64
-
65
-
66
-
67
-
68
-
69
-
70
-
71
-
72
-
73
-
74
-
75
-
76
-
77
-
78
-
79
-
80
-
81
-
82
-
83
-
84
-
85
-
86
-
87
-
88
-
89
-
90
-
91
-
92
-
93
-
94
-
95
-
 96
96 -
 97
97 -
 98
98 -
 99
99 -
 100
100 -
 101
101 -
 102
102 -
 103
103 -
 104
104 -
 105
105 -
 106
106 -
107
-
108
-
109
-
110
-
111
-
112
-
113
-
114
-
115
-
116
-
117
-
118
-
119
-
120
-
121
-
122
-
123
-
124
-
125
-
126
-
127
-
128
-
129
-
130
-
131
-
132
-
133
-
134
-
135
-
136
-
137
-
138
-
139
-
140
-
141
-
142
-
143
-
144
-
145
-
146
-
147
-
148
-
149
-
150
-
151
-
152
-
153
-
154
-
155
-
156
 |
 |
