Cisco AIR-BR350-E-K9 Hardware Installation Guide - Page 34
Enter, Setup, Express Setup, Configuration Server, Gateway
 |
View all Cisco AIR-BR350-E-K9 manuals
Add to My Manuals
Save this manual to your list of manuals |
Page 34 highlights
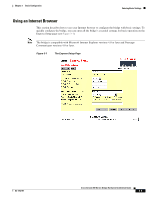
Entering Basic Settings Chapter 3 Basic Configuration Follow these steps to enter basic settings with an Internet browser: Step 1 Step 2 Step 3 Open your Internet browser. Enter or paste the bridge's IP address in the browser's location field. Press Enter. When the bridge's Summary Status page appears, click Setup. When the Setup page appears, click Express Setup. Note If the bridge is new and its factory configuration has not been changed, the Express Setup page appears instead of the Summary Status page when you first browse to the bridge. Step 4 Step 5 Enter a system name for the bridge in the System Name field. A descriptive system name makes it easy to identify the bridge on your network; for example: Factory Bridge. Select a configuration server protocol from the Configuration Server Protocol pull-down menu. The configuration server protocol you select should match your network's method of IP address assignment. The Configuration Server link takes you to the Boot Server Setup page, which you use to configure the bridge to work with your network's BOOTP or DHCP servers for automatic assignment of IP addresses. Note Cisco recommends assigning a static IP address to your bridge to simplify network management and to prevent delays in receiving an address through DHCP. To assign a static IP address to your bridge, select None from the Configuration Server Protocol pull-down menu and enter the IP address for the bridge in the Default IP Address field. Step 6 Step 7 Step 8 Step 9 Step 10 The Configuration Server Protocol pull-down menu options include: • None-This setting is used when you want to manually assign a static IP address to your bridge or your network does not have a working automatic system for IP address assignment. • BOOTP-With Bootstrap Protocol, IP addresses are hard-coded based on MAC addresses. • DHCP-With Dynamic Host Configuration Protocol, IP addresses are "leased" for predetermined periods of time. Enter an IP address in the Default IP address field. If DHCP is not enabled, the IP address you enter in this field will be the bridge's static IP address. If DHCP or BOOTP is enabled, the address you enter in this field provides the IP address only when no server responds with an IP address for the bridge. Enter an IP subnet mask in the Default IP Subnet Mask field to identify the subnetwork so the bridge's IP address can be recognized on the LAN. If DHCP or BOOTP is not enabled, this field is the subnet mask. If DHCP or BOOTP is enabled, this field provides the subnet mask only when no server responds to the bridge's DHCP or BOOTP request. Enter the IP address of your default internet gateway in the Default Gateway field. The entry 255.255.255.255 indicates no gateway. Clicking the Gateway link takes you to the Routing Setup page, which you use to configure the bridge to communicate with the IP network routing system. Enter an SSID for the bridge in the Radio Service Set ID (SSID) field. The SSID is a unique identifier that client devices use to associate with the bridge. The SSID can be any alphanumeric entry from 2 to 32 characters long. Select a network role for the bridge from the Role in Radio Network pull-down menu. The menu contains the following options: Cisco Aironet 350 Series Bridge Hardware Installation Guide 3-6 OL-1412-01
-
 1
1 -
2
-
3
-
4
-
5
-
6
-
7
-
8
-
9
-
10
-
11
-
12
-
13
-
14
-
15
-
16
-
17
-
18
-
19
-
20
-
21
-
22
-
23
-
24
-
25
-
26
-
27
-
28
-
 29
29 -
 30
30 -
 31
31 -
 32
32 -
 33
33 -
 34
34 -
 35
35 -
 36
36 -
 37
37 -
 38
38 -
 39
39 -
40
-
41
-
42
-
43
-
44
-
45
-
46
-
47
-
48
-
49
-
50
-
51
-
52
-
53
-
54
-
55
-
56
-
57
-
58
-
59
-
60
-
61
-
62
-
63
-
64
-
65
-
66
-
67
-
68
-
69
-
70
-
71
-
72
-
73
-
74
-
75
-
76
 |
 |