Cisco ASR1002 Quick Start Guide - Page 3
Prepare for Installation, Site Preparation and Unpacking, Tools and Parts - acs
 |
UPC - 882658196416
View all Cisco ASR1002 manuals
Add to My Manuals
Save this manual to your list of manuals |
Page 3 highlights
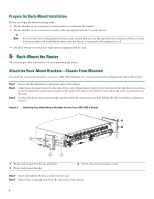
4 Prepare for Installation This section contains information about tools and parts, warnings, site preparation information, and information for equipment shelf or tabletop installation and rack-mount installation. Warning Only trained and qualified personnel should install, replace, or service this equipment. Statement 1030 Caution The eUSB panel door on the side of the Cisco ASR 1002-F Router must not be opened. There is a Do Not Tamper label on the panel door. Do not remove the label. If there is a problem with the eUSB flash card, the chassis should be returned. Note Only Cisco software release code four supports the new Cisco ASR 1002-F Router. Do not use earlier versions of Cisco software code. Before beginning this router installation, read the Regulatory Compliance and Safety Information for the Cisco ASR 1000 Series Aggregation Services Routers document. Site Preparation and Unpacking • Lift the router safely out of the packing container. • Ensure the power service at the site is suitable for the router you are installing. • Check the packing slip to ensure that all the proper components are present. • Locate and have accessible the Site Log for recording information about this installation. Tools and Parts Use the following list of tools and parts as a checklist for preparing to install the Cisco ASR 1002-F Router: • ESD-preventative wrist strap • AC power cord • Appropriate cables to connect the router to the network and to the console terminal • Tape measure and level (optional) • Screwdrivers: Number 2 Phillips screwdriver and 3.5-mm or 3/16-inch flat-blade screwdriver • Chassis ground lugs and screws • The rack-mount kit includes screws for the 19-inch rack-mount brackets (front and rear rails) • Two cable management brackets and screws for both sides of the chassis Prepare for Equipment Shelf or Tabletop Installation For an equipment shelf or tabletop installation, verify the following before installing the router: • The router is off the floor and has adequate ventilation. • An adequate chassis ground (earth) connection exists for the router. • The router needs at last 3 inches (7.62 cm) of clearance at the inlet and exhaust vents (front and rear of router). • The router needs 19 inches (48.26 cm) of clearance at the front and rear to allow for installation or to access cables or equipment. 3
-
 1
1 -
 2
2 -
 3
3 -
 4
4 -
 5
5 -
 6
6 -
 7
7 -
 8
8 -
 9
9 -
10
-
11
-
12
-
13
-
14
-
15
-
16
-
17
-
18
-
19
-
20
-
21
-
22
-
23
-
24
-
25
-
26
-
27
-
28
-
29
-
30
-
31
-
32
-
33
-
34
-
35
-
36
-
37
-
38
 |
 |