Cisco ASR1002 Quick Start Guide - Page 5
Attach the Rack-Mount Brackets-Chassis Rear-Mounted, Four-Post Rack Installation, Step 6 - rack mount
 |
UPC - 882658196416
View all Cisco ASR1002 manuals
Add to My Manuals
Save this manual to your list of manuals |
Page 5 highlights
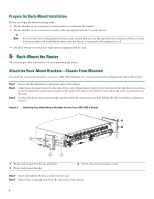
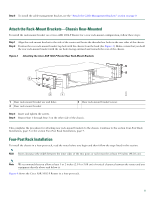
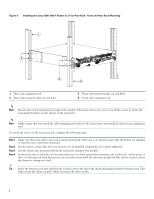
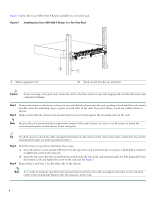
Step 6 To install the cable-management bracket, see the "Attach the Cable-Management Brackets" section on page 9. Attach the Rack-Mount Brackets-Chassis Rear-Mounted To install the rack-mount bracket on a Cisco ASR 1002-F Router for a rear rack-mount configuration, follow these steps: Step 1 Step 2 Align the rack-mount bracket to the side of the router and locate the threaded ear holes in the rear sides of the chassis. Position the rear rack-mount bracket top hole with the chassis from the back (See Figure 3). Make certain that you hold the rear rack-mount bracket with the ear holes facing outward and towards the rear of the chassis. Figure 3 Attaching the Cisco ASR 1002-F Router Rear Rack-Mount Brackets 3 280279 2 1 1 Rear rack-mount bracket ear and holes 2 Rear rack-mount bracket 3 Rear rack-mount bracket screws Step 3 Insert and tighten the screws. Step 4 Repeat Step 1 through Step 3 on the other side of the chassis. This completes the procedure for attaching rear rack-mount brackets to the chassis. Continue to the section Four-Post Rack Installation, page 5 or the section Two-Post Rack Installation, page 7. Four-Post Rack Installation To install the chassis in a four-post rack, read the notes before you begin and then follow the steps listed in this section. Note Inner clearance (the width between the inner sides of the two posts or rails) must be at least 19 inches (48.26 cm). Note We recommend that you allow at least 1 or 2 inches (2.54 or 5.08 cm) of vertical clearance between the router and any equipment directly above and below it. Figure 4 shows the Cisco ASR 1002-F Router in a four-post rack. 5
-
 1
1 -
 2
2 -
 3
3 -
 4
4 -
 5
5 -
 6
6 -
 7
7 -
 8
8 -
 9
9 -
 10
10 -
 11
11 -
12
-
13
-
14
-
15
-
16
-
17
-
18
-
19
-
20
-
21
-
22
-
23
-
24
-
25
-
26
-
27
-
28
-
29
-
30
-
31
-
32
-
33
-
34
-
35
-
36
-
37
-
38
 |
 |
