Cisco ASR1002 Quick Start Guide - Page 4
Prepare for Rack-Mount Installation, 5 Rack-Mount the Router - spa
 |
UPC - 882658196416
View all Cisco ASR1002 manuals
Add to My Manuals
Save this manual to your list of manuals |
Page 4 highlights
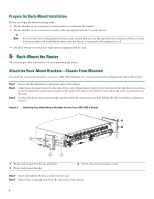
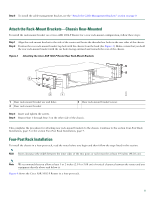
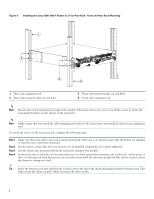
Prepare for Rack-Mount Installation Before you begin the rack-mounting tasks: • Decide whether or not you want to front-mount or rear-mount the chassis. • Decide whether or not you want to attach cable-management brackets to your chassis. Note If you install cable-management brackets, make certain that you use the specified rack-mount ear holes as stated in the procedure and install the brackets after the chassis is mounted in the equipment rack. • Decide if two-post or four-post rack-mount equipment will be used. 5 Rack-Mount the Router This section provides information for rack-mounting the router. Attach the Rack-Mount Brackets-Chassis Front-Mounted To install the rack-mount brackets on a Cisco ASR 1002-F Router for a front rack-mount configuration, follow these steps: Step 1 Step 2 Step 3 Locate the threaded holes in the front sides of the chassis. Align the rack-mount bracket to the side of the router. Depending on which set of rack-mount bracket holes you choose to use to attach the rack-mount bracket to the router, the chassis will either be recessed in the rack or protrude from the rack. Position the front rack-mount bracket top hole with the chassis first top hole behind the side vent holes as shown in Figure 2. Figure 2 Attaching Front Rack-Mount Brackets for the Cisco ASR 1002-F Router 0 A/L C/A 1 A/L C/A 2 A/L C/A 3 A/L C/A STATUS 274497 3 SPA-4XOC3-POS 0 2 1 1 Front rack-mount bracket ear and holes 2 Front rack-mount bracket 3 Front rack-mount bracket screws Step 4 Insert and tighten the black screws on one side. Step 5 Repeat Step 1 through Step 4 on the other side of the chassis. 4
-
 1
1 -
 2
2 -
 3
3 -
 4
4 -
 5
5 -
 6
6 -
 7
7 -
 8
8 -
 9
9 -
 10
10 -
11
-
12
-
13
-
14
-
15
-
16
-
17
-
18
-
19
-
20
-
21
-
22
-
23
-
24
-
25
-
26
-
27
-
28
-
29
-
30
-
31
-
32
-
33
-
34
-
35
-
36
-
37
-
38
 |
 |
