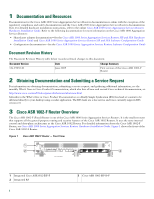
Cisco ASR1002 Quick Start Guide - Page 7
Two-Post Rack Installation, Step 5
 |
UPC - 882658196416
View all Cisco ASR1002 manuals
Add to My Manuals
Save this manual to your list of manuals |
Page 7 highlights
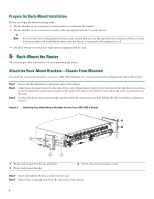
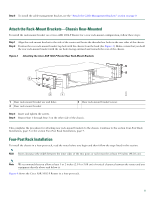
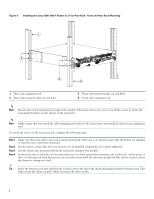
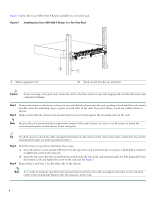
Tip To allow space to attach the cable-management brackets to the chassis in the rack easily, make certain that you use the rack-mount bracket ear holes specified in Step 5. Step 5 Hold the chassis in position against the mounting rails and follow these steps: a. Insert the bottom screw into the second bracket ear hole from the bottom of the rack-mount bracket ear and use a hand-held screwdriver to tighten the screw to the rack rail. b. Insert the top screw into the second bracket ear hole from the top of the rack-mount bracket ear hole diagonally from the bottom screw and tighten the screw to the rack rail. See Figure 4. c. Repeat Step 4 and Step 5 for the other side of the chassis. Note As a result of using the specified rack-mount bracket ear holes, the cable-management bracket can be attached easily to the rack-mount bracket after the chassis is in the rack. This completes the procedure for installing the chassis in a four-post rack. Proceed to the "Attach the Cable-Management Brackets" section on page 9 to continue the installation. Two-Post Rack Installation To install the chassis in a two-post rack, read the notes before you begin and then follow the steps listed in this section. Note Inner clearance (the width between the inner sides of the two posts or rails) must be at least 19 inches (48.26 cm). Note Make certain that you attach the cable-management brackets to the chassis after you install the chassis in an equipment rack. 7
-
 1
1 -
 2
2 -
 3
3 -
 4
4 -
 5
5 -
 6
6 -
 7
7 -
 8
8 -
 9
9 -
 10
10 -
 11
11 -
 12
12 -
13
-
14
-
15
-
16
-
17
-
18
-
19
-
20
-
21
-
22
-
23
-
24
-
25
-
26
-
27
-
28
-
29
-
30
-
31
-
32
-
33
-
34
-
35
-
36
-
37
-
38
 |
 |
