Compaq LTE 5000 Compaq LTE 5000 Family of Personal Computers Beyond Setup - Page 31
Customizing the Pointing Device, Replacing the Pointing Device Cap
 |
View all Compaq LTE 5000 manuals
Add to My Manuals
Save this manual to your list of manuals |
Page 31 highlights
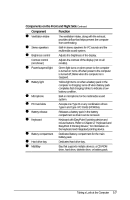
The left — and right ˜ mouse buttons are below the spacebar. The mouse buttons are easily pressed with your left or right thumb. EasyPoint II Pointing Device and Mouse Buttons NOTE: If an external pointing device is connected, the integrated pointing device is automatically disabled and the external pointing device must be used. Customizing the Pointing Device To customize the pointing device and mouse button settings, click the Windows Start button, point to Settings, click Control Panel, then double-click the Mouse icon. Replacing the Pointing Device Cap A spare pointing device cap is supplied with the computer. If you need to replace the cap, pull up gently to remove the cap. If the white plastic cap underneath also detaches, replace the white cap and then place the supplied cap over it. 2-2 Keyboard and EasyPoint II Pointing Device
-
 1
1 -
2
-
3
-
4
-
5
-
6
-
7
-
8
-
9
-
10
-
11
-
12
-
13
-
14
-
15
-
16
-
17
-
18
-
19
-
20
-
21
-
22
-
23
-
24
-
25
-
 26
26 -
 27
27 -
 28
28 -
 29
29 -
 30
30 -
 31
31 -
 32
32 -
 33
33 -
 34
34 -
 35
35 -
 36
36 -
37
-
38
-
39
-
40
-
41
-
42
-
43
-
44
-
45
-
46
-
47
-
48
-
49
-
50
-
51
-
52
-
53
-
54
-
55
-
56
-
57
-
58
-
59
-
60
-
61
-
62
-
63
-
64
-
65
-
66
-
67
-
68
-
69
-
70
-
71
-
72
-
73
-
74
-
75
-
76
-
77
-
78
-
79
-
80
-
81
-
82
-
83
-
84
-
85
-
86
-
87
-
88
-
89
-
90
-
91
-
92
-
93
-
94
-
95
-
96
-
97
-
98
-
99
-
100
-
101
-
102
-
103
-
104
-
105
-
106
-
107
-
108
-
109
-
110
-
111
-
112
-
113
-
114
-
115
-
116
-
117
-
118
-
119
-
120
-
121
-
122
-
123
-
124
-
125
-
126
-
127
-
128
-
129
-
130
-
131
-
132
-
133
-
134
-
135
-
136
-
137
-
138
-
139
-
140
-
141
-
142
-
143
-
144
-
145
-
146
-
147
-
148
-
149
-
150
-
151
-
152
-
153
-
154
-
155
-
156
-
157
-
158
-
159
-
160
-
161
-
162
-
163
-
164
-
165
-
166
-
167
-
168
-
169
-
170
-
171
-
172
-
173
-
174
-
175
-
176
-
177
-
178
-
179
-
180
-
181
-
182
-
183
-
184
-
185
-
186
-
187
-
188
 |
 |
