Compaq dx2810 Service Reference Guide: HP Compaq dx2810 and dx2818 Business PC - Page 130
To install the power supply, reverse the removal procedure., out of the chassis.
 |
View all Compaq dx2810 manuals
Add to My Manuals
Save this manual to your list of manuals |
Page 130 highlights
7. Remove the three screws that secure the power supply to the back of the chassis. 8. Remove the screw that secures the power supply to the base of the computer. 9. Slide the power supply about 1.25 cm (1/2-inch) toward the front of the chassis, rotate the power supply toward the heatsink so it clears the lip at the top of the chassis, and then lift the power supply out of the chassis. To install the power supply, reverse the removal procedure. 120 Chapter 8 Removal and Replacement Procedures Small Form Factor (SFF) Chassis
-
 1
1 -
2
-
3
-
4
-
5
-
6
-
7
-
8
-
9
-
10
-
11
-
12
-
13
-
14
-
15
-
16
-
17
-
18
-
19
-
20
-
21
-
22
-
23
-
24
-
25
-
26
-
27
-
28
-
29
-
30
-
31
-
32
-
33
-
34
-
35
-
36
-
37
-
38
-
39
-
40
-
41
-
42
-
43
-
44
-
45
-
46
-
47
-
48
-
49
-
50
-
51
-
52
-
53
-
54
-
55
-
56
-
57
-
58
-
59
-
60
-
61
-
62
-
63
-
64
-
65
-
66
-
67
-
68
-
69
-
70
-
71
-
72
-
73
-
74
-
75
-
76
-
77
-
78
-
79
-
80
-
81
-
82
-
83
-
84
-
85
-
86
-
87
-
88
-
89
-
90
-
91
-
92
-
93
-
94
-
95
-
96
-
97
-
98
-
99
-
100
-
101
-
102
-
103
-
104
-
105
-
106
-
107
-
108
-
109
-
110
-
111
-
112
-
113
-
114
-
115
-
116
-
117
-
118
-
119
-
120
-
121
-
122
-
123
-
124
-
 125
125 -
 126
126 -
 127
127 -
 128
128 -
 129
129 -
 130
130 -
 131
131 -
 132
132 -
 133
133 -
 134
134 -
 135
135 -
136
-
137
-
138
-
139
-
140
-
141
-
142
-
143
-
144
-
145
-
146
-
147
-
148
-
149
-
150
-
151
-
152
-
153
-
154
-
155
-
156
-
157
-
158
-
159
-
160
-
161
-
162
 |
 |

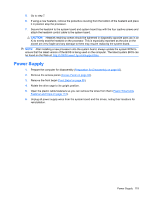
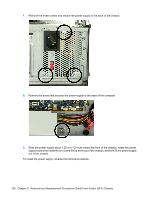
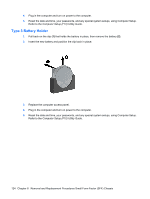
7.
Remove the three screws that secure the power supply to the back of the chassis.
8.
Remove the screw that secures the power supply to the base of the computer.
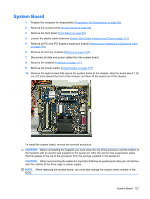
9.
Slide the power supply about 1.25 cm (1/2-inch) toward the front of the chassis, rotate the power
supply toward the heatsink so it clears the lip at the top of the chassis, and then lift the power supply
out of the chassis.
To install the power supply, reverse the removal procedure.
120
Chapter 8
Removal and Replacement Procedures Small Form Factor (SFF) Chassis