Craftsman 22901 Instruction Manual - Page 15
See
 |
View all Craftsman 22901 manuals
Add to My Manuals
Save this manual to your list of manuals |
Page 15 highlights
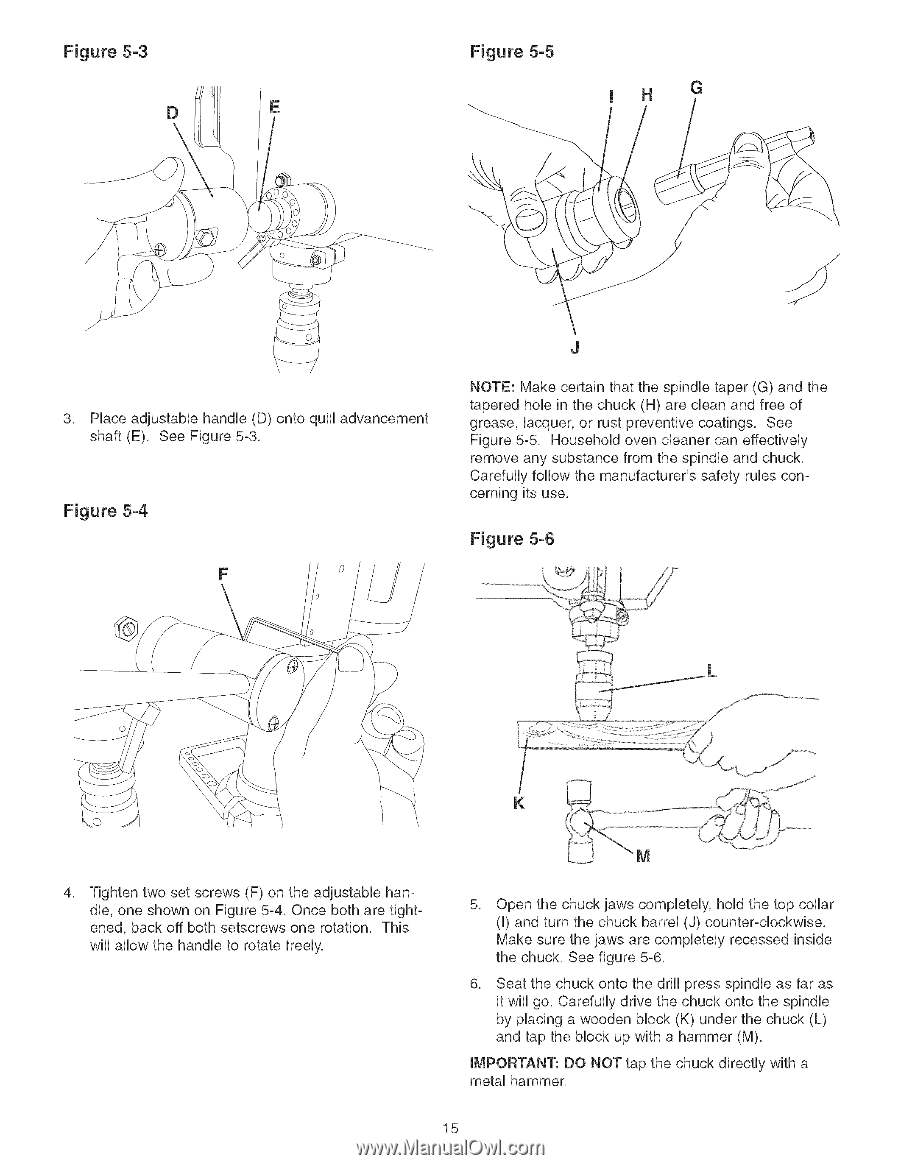
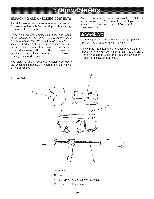
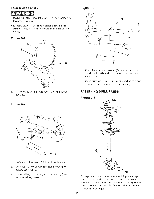
Figure 5-3 D E Figure 5-5 G 3, Piace adjustabie handie (D) onto quHi advancement shaft (E), See Figure 5-3, Figure 5-4 F NOTE: Make certain that the spindie taper (G) and the tapered hob in the chuck (H) are clean and free of grease, iacquer, or rust preventive coatings, See Figure 5-5 Househoid oven cieaner can effectiveiy remove any substance from the spindie and chuck, Carefuliy follow the manufacturer's safety rubs concerning its use, Figure 5-6 K 4, Tighten two set screws (F) on the adjustable handle, one shown on Figure 5-4, Once both are tightened, back off both setscrews one rotation, This will allow the handle to rotate freely, 5, Open the chuck jaws completely, hold the top collar (I) and turn the chuck barrel (J) counter-clockwise, Make sure the jaws are completely recessed inside the chuck, See figure 5-6, 6, Seat the chuck onto the drill press spindle as far as it wiii go, Carefully drive the chuck onto the spindle by placing a wooden block (K) under the chuck (L) and tap the block up with a hammer (M), IMPORTANT: DO NOT tap the chuck directly with a metal hammer, 15
-
 1
1 -
2
-
3
-
4
-
5
-
6
-
7
-
8
-
9
-
 10
10 -
 11
11 -
 12
12 -
 13
13 -
 14
14 -
 15
15 -
 16
16 -
 17
17 -
 18
18 -
 19
19 -
 20
20 -
21
-
22
-
23
-
24
-
25
-
26
-
27
-
28
-
29
-
30
-
31
-
32
-
33
-
34
-
35
-
36
-
37
-
38
-
39
-
40
-
41
-
42
-
43
-
44
-
45
-
46
-
47
-
48
-
49
-
50
-
51
-
52
-
53
-
54
-
55
-
56
-
57
-
58
-
59
-
60
 |
 |