Craftsman 22901 Instruction Manual - Page 21
Go Not Stare Into Beam
 |
View all Craftsman 22901 manuals
Add to My Manuals
Save this manual to your list of manuals |
Page 21 highlights
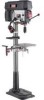
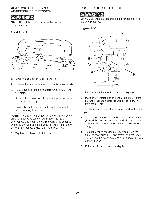
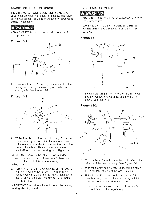
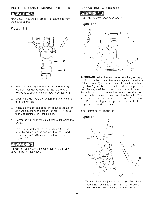
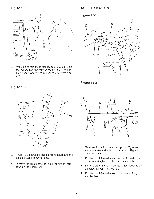
ADJUSTING RETURN SPRING The drHHchuck wHHautomaticaHHyreturn showily to its upper position when the handHe is reHeased, The return spring was properHy adjusted at the factory, However, to adjust, if necessary: ,, MAKE CERTAIN the drill press is disconnected from the power source, Figure 14-1 LASER ADJUSTMENTS ,, MAKE CERTAIN the drHHpress is disconnected from the power source, LASER LIGHT - gO NOT STARE INTO BEAM, APERTURE, or into a reflection from a mirror-Hike surface, Figure 15-1 A 1, Loosen both nuts (A) and (B), Make sure that the spring housing (C) remains engaged with head casting (D), See Figure 14-1, Figure 14-2 IB i t t i t t t i t t 1, HnstaHaHlignment pin (A) into chuck (B), make sure that the pointed end (C) of the alignment pin is down, See Figure 15-1, Figure 15-2 F D E 2, While firmHy hoHding the spring housing (C) puHHthe spring housing out and rotate it (counter-cHockwise to increase or cHockwise to decrease the spring ten- sion) untiHthe boss (E) is engaged with the next notch (F) on the spring housing, See Figure 14-2, /G H IMPORTANT: Because the return spring is under tension, it wiHHwant to unwind (clockwise). Make sure you have a firm hoHdof the spring housing before puHHingit out, 3, Turn the nut (B) untiHit contacts the spring housing (C), then back the nut (B) out 1/4 turn from the spring housing (C), Tighten the nut (A) against the nut (B) to Hockthe nuts from turning, See Figure 14-1 and 14-2, IMPORTANT: The inside nut shouHd not contact spring housing when tightened, J 2, Turn the Haser ON with the rocker switch (D) on the Heftside of the Haser housing, See Figure 15-2, 3, With the 2,5mm hex wrench (E), Hoosen the screw (F) in the top, Heftside of the Haserhousing, 4, Using knob (G) Hocated on the underside of the Haser housing, rotate the Haser beam (H) untiH it is chose to center on the aHignment pin (A), 5, Tighten screw (F), making sure the Haserbeam does not move off the aHignment pin, 21
-
 1
1 -
2
-
3
-
4
-
5
-
6
-
7
-
8
-
9
-
10
-
11
-
12
-
13
-
14
-
15
-
 16
16 -
 17
17 -
 18
18 -
 19
19 -
 20
20 -
 21
21 -
 22
22 -
 23
23 -
 24
24 -
 25
25 -
 26
26 -
27
-
28
-
29
-
30
-
31
-
32
-
33
-
34
-
35
-
36
-
37
-
38
-
39
-
40
-
41
-
42
-
43
-
44
-
45
-
46
-
47
-
48
-
49
-
50
-
51
-
52
-
53
-
54
-
55
-
56
-
57
-
58
-
59
-
60
 |
 |