Craftsman 22901 Instruction Manual - Page 17
DONOTexpose, thedrillpresstorainor operate, indamplocations, correctly, andareinworkingorder
 |
View all Craftsman 22901 manuals
Add to My Manuals
Save this manual to your list of manuals |
Page 17 highlights
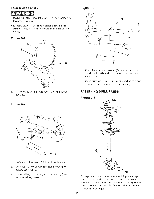
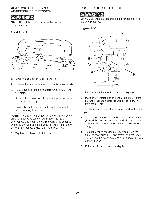
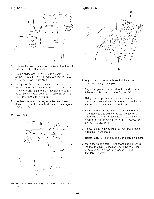
DONOTexposethedrillpressto rainor operatethe in damplocations, MAKESUREall partshavebeenassemblecdorrectly andarein workingorder, Figure 8-2 SWITCH OPERATION CHmLDPROOF THE WORKSHOP AREA by removing switch keys, unplugging tools from the electrical receptacles, and using padlocks, Figure 8-1 4. When the Drill Press is not in use, the "ON" button should be locked so that it cannot be started, 8. Using the padlock (E) included with your Drill Press, lift the red iOFF[ paddle (C) and place the padlock through the hobs in the side of the "ON" button and then lock the padlock, Make sure keys have been removed from padlock and placed where no children can get them, See Figure 8-2, 8. To use the Drill Press, unlock and remove the padlock from the "ON" button, 1, The ON/OFF switch (A) is located on the front of the drill press head, See Figure 8-1, 2. To turn the Drill Press on, press the green ON button (B) in one-half inch, Note: There is a safety feature on the switch to insure that the switch must be completely pressed before the motor will start, 8. To turn the Drill Press off, press the large red OFF paddle (C) or lift the paddle and press directly on the red "OFF" button (D), See Figure 8-1 and 8-2, IMPORTANT: When the machine is not in use, the switch should be locked in the OFF position to prevent unauthorized use, 17
-
 1
1 -
2
-
3
-
4
-
5
-
6
-
7
-
8
-
9
-
10
-
11
-
 12
12 -
 13
13 -
 14
14 -
 15
15 -
 16
16 -
 17
17 -
 18
18 -
 19
19 -
 20
20 -
 21
21 -
 22
22 -
23
-
24
-
25
-
26
-
27
-
28
-
29
-
30
-
31
-
32
-
33
-
34
-
35
-
36
-
37
-
38
-
39
-
40
-
41
-
42
-
43
-
44
-
45
-
46
-
47
-
48
-
49
-
50
-
51
-
52
-
53
-
54
-
55
-
56
-
57
-
58
-
59
-
60
 |
 |