Craftsman 22901 Instruction Manual - Page 20
C, See
 |
View all Craftsman 22901 manuals
Add to My Manuals
Save this manual to your list of manuals |
Page 20 highlights
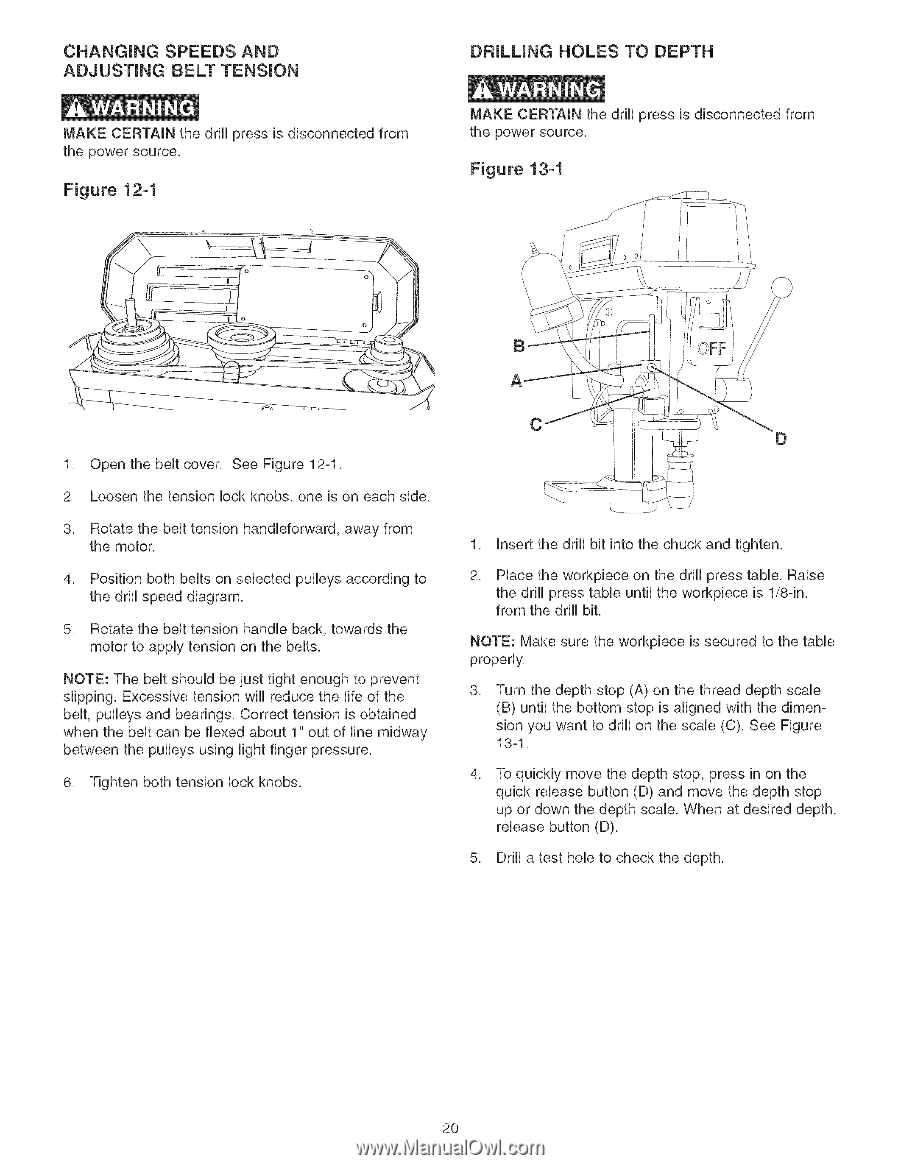
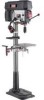
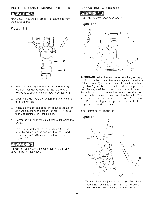
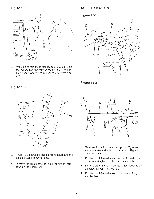
CHANGUNG SPEEDS AND ADJUSTING BELT TENSUON MAKE CERTAIN the drill press is disconnected from the power source, Figure 12-1 DF_ULUNG HOLES TO DEPTH MAKE CERTAIN the drHHpress is disconnected from the power source, Figure 13-1 1, Open the beHtcover, See Figure 12-1, 2 Loosen the tension lock knobs, one is on each side, 3, Rotate the belt tension handleforward, away from the motor, 4, Position both belts on selected pulleys according to the drill speed diagram, 5, Rotate the belt tension handle back, towards the motor to apply tension on the belts, NOTE: The beHtshouHd be just tight enough to prevent shipping, Excessive tension wHHreduce the Nfe of the beHt,puHHeysand bearings, Correct tension is obtained when the belt can be flexed about 1" out of line midway between the puHHeysusing Hightfinger pressure, 6, Tighten both tension lock knobs, A C D 1, Insert the drill bit into the chuck and tighten, 2, Place the workpiece on the drill press table, Raise the drill press table until the workpiece is 1/8-in, from the drill bit, NOTE: Make sure the workpiece is secured to the table properly, 3, Turn the depth stop (A) on the thread depth scale (B) until the bottom stop is aligned with the dimension you want to drill on the scab (C), See Figure 13-1, 4, To quickly move the depth stop, press in on the quick release button (D) and move the depth stop up or down the depth scab, When at desired depth, release button (D), 5, Drill a test hole to check the depth, 2O
-
 1
1 -
2
-
3
-
4
-
5
-
6
-
7
-
8
-
9
-
10
-
11
-
12
-
13
-
14
-
 15
15 -
 16
16 -
 17
17 -
 18
18 -
 19
19 -
 20
20 -
 21
21 -
 22
22 -
 23
23 -
 24
24 -
 25
25 -
26
-
27
-
28
-
29
-
30
-
31
-
32
-
33
-
34
-
35
-
36
-
37
-
38
-
39
-
40
-
41
-
42
-
43
-
44
-
45
-
46
-
47
-
48
-
49
-
50
-
51
-
52
-
53
-
54
-
55
-
56
-
57
-
58
-
59
-
60
 |
 |