D-Link 3250TG Product Manual - Page 100
Snmpv3
 |
UPC - 790069250682
View all D-Link 3250TG manuals
Add to My Manuals
Save this manual to your list of manuals |
Page 100 highlights
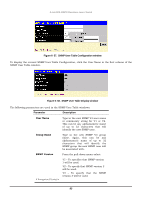
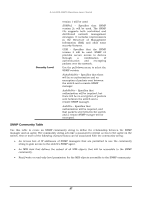
D-Link DES-3250TG Standalone Layer 2 Switch Figure 6- 55. User Account Modify Table window 1. Enter the new user name, assign an initial password, and then confirm the new password. Determine whether the new user should have Admin or User privileges. 2. Click Apply to make the user addition effective. 3. A listing of all user accounts and access levels is shown in the User Account Management window. This list is updated when Apply is executed. Click Show All User Account Entries to access this window. Please remember that Apply makes changes to the switch configuration for the current session only. All changes (including User additions or updates) must be entered into non-volatile ram using the Save Changes command on the Maintenance menu - if you want these changes to be permanent. SNMPV3 The DES-3250TG supports the Simple Network Management Protocol (SNMP) versions 1, 2c, and 3. The SNMP version used to monitor and control the switch can be specified by the administrator. The three versions of SNMP vary in the level of security provided between the management station and the network device. SNMP settings are configured using the menus located on the SNMP V3 folder of the Web manager. Workstations on the network that are allowed SNMP privileged access to the switch can be restricted with the Management Station IP Address window. SNMP User Table Use the SNMP User Table to create a new SNMP user and add the user to an existing SNMP group or to a newly created group. Figure 6- 56. SNMP User Table window To delete an existing entry, click the selection button in the Delete column on the far right that corresponds to the port you want to configure. To create a new entry, click the Add button, a separate window will appear. 92
-
 1
1 -
2
-
3
-
4
-
5
-
6
-
7
-
8
-
9
-
10
-
11
-
12
-
13
-
14
-
15
-
16
-
17
-
18
-
19
-
20
-
21
-
22
-
23
-
24
-
25
-
26
-
27
-
28
-
29
-
30
-
31
-
32
-
33
-
34
-
35
-
36
-
37
-
38
-
39
-
40
-
41
-
42
-
43
-
44
-
45
-
46
-
47
-
48
-
49
-
50
-
51
-
52
-
53
-
54
-
55
-
56
-
57
-
58
-
59
-
60
-
61
-
62
-
63
-
64
-
65
-
66
-
67
-
68
-
69
-
70
-
71
-
72
-
73
-
74
-
75
-
76
-
77
-
78
-
79
-
80
-
81
-
82
-
83
-
84
-
85
-
86
-
87
-
88
-
89
-
90
-
91
-
92
-
93
-
94
-
 95
95 -
 96
96 -
 97
97 -
 98
98 -
 99
99 -
 100
100 -
 101
101 -
 102
102 -
 103
103 -
 104
104 -
 105
105 -
106
-
107
-
108
-
109
-
110
-
111
-
112
-
113
-
114
-
115
-
116
-
117
-
118
-
119
-
120
-
121
-
122
-
123
-
124
-
125
-
126
-
127
-
128
-
129
-
130
-
131
-
132
-
133
-
134
-
135
-
136
-
137
-
138
-
139
-
140
-
141
-
142
-
143
-
144
-
145
-
146
-
147
-
148
-
149
 |
 |
