Dell 2135cn User Guide - Page 119
c. Fax Cover Settings
 |
UPC - 884116001980
View all Dell 2135cn manuals
Add to My Manuals
Save this manual to your list of manuals |
Page 119 highlights
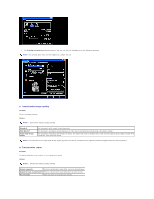
c. Fax Cover Page Settings Clicking this button displays the Fax Cover Page Settings dialog box. You can specify if you want to attach a cover page to your fax. Fax Cover Page Purpose: This option allows you to specify whether to attach a cover page to your fax. Values: NOTE: * denotes the factory default setting. Use Printer Settings Attach None* Determines whether or not to attach a cover page to your fax depending on the setting you specify in Fax Cover Page on the operator panel. Attaches a cover page to your fax. Does not attach a cover page to your fax. Sender Purpose: Select whether to print the sender's name on the fax cover page. Values: NOTE: * denotes the factory default setting. Use Printer Settings* Determines whether or not to print the sender's name on the fax cover page based on the printer settings. Enter a sender name Allows you to enter a sender's name that will be printed on the fax cover page in Sender Name. Sender Name This option allows you to enter a sender's name that will be printed on the fax cover page. The sender's name can be up to 30 characters. If it exceeds 30 characters, only the first 30 characters will be valid. 5. Click OK to close the Printing Preferences dialog box. 6. Click Print. The Set/Check Fax Transmission: dialog box opens. 7. Enter the destination for the recipient. The following procedure is for entering the destination. For details on how to enter the destination, please refer to the Help file for the driver. a. Enter the name and phone number directly. b. Specify a destination that is saved to the Phone Book on the PC. c. Specify a destination that is saved to the Address Book on the Dell 2135cn Color Laser Multifunction Printer.* * This can only be used if the PC and the Dell 2135cn Color Laser Multifunction Printer are connected with a USB cable.
-
 1
1 -
2
-
3
-
4
-
5
-
6
-
7
-
8
-
9
-
10
-
11
-
12
-
13
-
14
-
15
-
16
-
17
-
18
-
19
-
20
-
21
-
22
-
23
-
24
-
25
-
26
-
27
-
28
-
29
-
30
-
31
-
32
-
33
-
34
-
35
-
36
-
37
-
38
-
39
-
40
-
41
-
42
-
43
-
44
-
45
-
46
-
47
-
48
-
49
-
50
-
51
-
52
-
53
-
54
-
55
-
56
-
57
-
58
-
59
-
60
-
61
-
62
-
63
-
64
-
65
-
66
-
67
-
68
-
69
-
70
-
71
-
72
-
73
-
74
-
75
-
76
-
77
-
78
-
79
-
80
-
81
-
82
-
83
-
84
-
85
-
86
-
87
-
88
-
89
-
90
-
91
-
92
-
93
-
94
-
95
-
96
-
97
-
98
-
99
-
100
-
101
-
102
-
103
-
104
-
105
-
106
-
107
-
108
-
109
-
110
-
111
-
112
-
113
-
 114
114 -
 115
115 -
 116
116 -
 117
117 -
 118
118 -
 119
119 -
 120
120 -
 121
121 -
 122
122 -
 123
123 -
 124
124 -
125
-
126
-
127
-
128
-
129
-
130
-
131
-
132
-
133
-
134
-
135
-
136
-
137
-
138
-
139
-
140
-
141
-
142
-
143
-
144
-
145
-
146
-
147
-
148
-
149
-
150
-
151
-
152
-
153
-
154
-
155
-
156
-
157
-
158
-
159
-
160
-
161
-
162
-
163
-
164
-
165
-
166
-
167
-
168
-
169
-
170
-
171
-
172
-
173
-
174
-
175
-
176
-
177
-
178
-
179
-
180
-
181
-
182
-
183
-
184
-
185
-
186
-
187
-
188
-
189
-
190
-
191
-
192
-
193
-
194
-
195
-
196
-
197
-
198
-
199
-
200
-
201
-
202
-
203
-
204
-
205
-
206
-
207
-
208
-
209
-
210
-
211
-
212
-
213
-
214
-
215
-
216
-
217
-
218
-
219
-
220
-
221
-
222
-
223
-
224
-
225
-
226
-
227
-
228
-
229
-
230
-
231
-
232
-
233
-
234
-
235
-
236
-
237
-
238
-
239
-
240
-
241
-
242
-
243
-
244
-
245
-
246
-
247
-
248
-
249
-
250
-
251
-
252
-
253
-
254
-
255
-
256
-
257
-
258
-
259
-
260
 |
 |
