Dell 2135cn User Guide - Page 181
Entering Values
 |
UPC - 884116001980
View all Dell 2135cn manuals
Add to My Manuals
Save this manual to your list of manuals |
Page 181 highlights
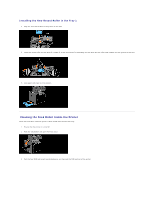
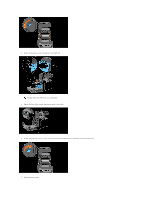
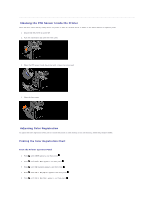
Entering Values From the Printer Operator Panel Using the operator panel, enter the values found in the color registration chart to make adjustments. 1. Press until >SETUP appears, and then press . 2. Press until >Admin Menu appears, and then press . 3. Press until >Maintenance appears, and then press . 4. Press until >Color Reg Adjust appears, and then press . 5. Press until >Enter Adjustment appears, and then press . 6. >Lateral Adjustment is displayed. Press to specify the values for the lateral direction. The cursor is located at the first digit of the Lateral Adjustment. 7. Press or until you reach the value (for example, +3) displayed on the chart. 8. Press once and move the cursor to the next value. 9. Repeat steps 6 and 7 to enter all of the digits of the Lateral Adjustment, and then press . 10. Press until >Process Adjustment appears, and then press to specify the values for the process direction. The cursor is located at the first digit of the Process Adjustment. 11. Press or until you reach the value (for example, +3) displayed on the chart. 12. Press once and move the cursor to the next value. 13. Repeat steps 11 and 12 to enter all of the digits of the Process Adjustment, and then press . 14. Press the button. 15. Press until >Color Reg Chart appears, and then press . The color registration chart is printed with the new values. 16. Press . 17. Adjust till all straight lines are at the value of 0. Viewing the images before and after will help. From Your Computer Using the Tool Box, enter the values that you found in the color registration chart to make adjustments. 1. Click start® All Programs® Dell Printers® Additional Color Laser Software® Quick Launch Utility. The Quick Launch Utility dialog box opens. 2. Click the Tool Box button. The Tool Box dialog box opens. 3. Select the printer from Printer Name. The Tool Box opens.
-
 1
1 -
2
-
3
-
4
-
5
-
6
-
7
-
8
-
9
-
10
-
11
-
12
-
13
-
14
-
15
-
16
-
17
-
18
-
19
-
20
-
21
-
22
-
23
-
24
-
25
-
26
-
27
-
28
-
29
-
30
-
31
-
32
-
33
-
34
-
35
-
36
-
37
-
38
-
39
-
40
-
41
-
42
-
43
-
44
-
45
-
46
-
47
-
48
-
49
-
50
-
51
-
52
-
53
-
54
-
55
-
56
-
57
-
58
-
59
-
60
-
61
-
62
-
63
-
64
-
65
-
66
-
67
-
68
-
69
-
70
-
71
-
72
-
73
-
74
-
75
-
76
-
77
-
78
-
79
-
80
-
81
-
82
-
83
-
84
-
85
-
86
-
87
-
88
-
89
-
90
-
91
-
92
-
93
-
94
-
95
-
96
-
97
-
98
-
99
-
100
-
101
-
102
-
103
-
104
-
105
-
106
-
107
-
108
-
109
-
110
-
111
-
112
-
113
-
114
-
115
-
116
-
117
-
118
-
119
-
120
-
121
-
122
-
123
-
124
-
125
-
126
-
127
-
128
-
129
-
130
-
131
-
132
-
133
-
134
-
135
-
136
-
137
-
138
-
139
-
140
-
141
-
142
-
143
-
144
-
145
-
146
-
147
-
148
-
149
-
150
-
151
-
152
-
153
-
154
-
155
-
156
-
157
-
158
-
159
-
160
-
161
-
162
-
163
-
164
-
165
-
166
-
167
-
168
-
169
-
170
-
171
-
172
-
173
-
174
-
175
-
 176
176 -
 177
177 -
 178
178 -
 179
179 -
 180
180 -
 181
181 -
 182
182 -
 183
183 -
 184
184 -
 185
185 -
 186
186 -
187
-
188
-
189
-
190
-
191
-
192
-
193
-
194
-
195
-
196
-
197
-
198
-
199
-
200
-
201
-
202
-
203
-
204
-
205
-
206
-
207
-
208
-
209
-
210
-
211
-
212
-
213
-
214
-
215
-
216
-
217
-
218
-
219
-
220
-
221
-
222
-
223
-
224
-
225
-
226
-
227
-
228
-
229
-
230
-
231
-
232
-
233
-
234
-
235
-
236
-
237
-
238
-
239
-
240
-
241
-
242
-
243
-
244
-
245
-
246
-
247
-
248
-
249
-
250
-
251
-
252
-
253
-
254
-
255
-
256
-
257
-
258
-
259
-
260
 |
 |