Dell 2135cn User Guide - Page 210
Assign an IP Address
 |
UPC - 884116001980
View all Dell 2135cn manuals
Add to My Manuals
Save this manual to your list of manuals |
Page 210 highlights
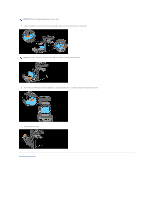
From Your Computer 1. Click start® All Programs® Dell Printers® Additional Color Laser Software® Quick Launch Utility. The Quick Launch Utility dialog box opens. 2. Click the Tool Box button. The Tool Box dialog box opens. 3. Select the printer from Printer Name. The Tool Box opens. 4. Click the Printer Settings Report tab. 5. Select Reports from the list at the left side of the page. The Reports page is displayed. 6. Click the System Settings button. The System Settings page is printed. Assign an IP Address An IP address is a unique number that consists of four sections that are delimited by a period and can include up to three digits in each section, for example, 111.222.33.44. Assigning an IP address already in use can cause network performance issues. NOTE: Assigning an IP address is considered as an advanced function and is normally done by a system administrator. From the Printer Operator Panel For more information on using your operator panel, see "Operator Panel". 1. Turn on the printer. >COPY appears. 2. Press until >SETUP appears, and then press . 3. Press until >Admin Menu appears, and then press . 4. Press until >Wired Network appears, and then press . 5. Press until >TCP/IP appears, and then press . 6. >Get IP Address is displayed. Press . 7. Panel is displayed. Press . 8. Press the button. 9. Press until >IP Address appears, and then press . The cursor is located at the first digit of the IP address. 10. Use the ten keys to enter the first digit of the IP address, and then press . The cursor moves to the next digit. NOTE: You can only enter one digit at a time and must press after entering each digit.
-
 1
1 -
2
-
3
-
4
-
5
-
6
-
7
-
8
-
9
-
10
-
11
-
12
-
13
-
14
-
15
-
16
-
17
-
18
-
19
-
20
-
21
-
22
-
23
-
24
-
25
-
26
-
27
-
28
-
29
-
30
-
31
-
32
-
33
-
34
-
35
-
36
-
37
-
38
-
39
-
40
-
41
-
42
-
43
-
44
-
45
-
46
-
47
-
48
-
49
-
50
-
51
-
52
-
53
-
54
-
55
-
56
-
57
-
58
-
59
-
60
-
61
-
62
-
63
-
64
-
65
-
66
-
67
-
68
-
69
-
70
-
71
-
72
-
73
-
74
-
75
-
76
-
77
-
78
-
79
-
80
-
81
-
82
-
83
-
84
-
85
-
86
-
87
-
88
-
89
-
90
-
91
-
92
-
93
-
94
-
95
-
96
-
97
-
98
-
99
-
100
-
101
-
102
-
103
-
104
-
105
-
106
-
107
-
108
-
109
-
110
-
111
-
112
-
113
-
114
-
115
-
116
-
117
-
118
-
119
-
120
-
121
-
122
-
123
-
124
-
125
-
126
-
127
-
128
-
129
-
130
-
131
-
132
-
133
-
134
-
135
-
136
-
137
-
138
-
139
-
140
-
141
-
142
-
143
-
144
-
145
-
146
-
147
-
148
-
149
-
150
-
151
-
152
-
153
-
154
-
155
-
156
-
157
-
158
-
159
-
160
-
161
-
162
-
163
-
164
-
165
-
166
-
167
-
168
-
169
-
170
-
171
-
172
-
173
-
174
-
175
-
176
-
177
-
178
-
179
-
180
-
181
-
182
-
183
-
184
-
185
-
186
-
187
-
188
-
189
-
190
-
191
-
192
-
193
-
194
-
195
-
196
-
197
-
198
-
199
-
200
-
201
-
202
-
203
-
204
-
 205
205 -
 206
206 -
 207
207 -
 208
208 -
 209
209 -
 210
210 -
 211
211 -
 212
212 -
 213
213 -
 214
214 -
 215
215 -
216
-
217
-
218
-
219
-
220
-
221
-
222
-
223
-
224
-
225
-
226
-
227
-
228
-
229
-
230
-
231
-
232
-
233
-
234
-
235
-
236
-
237
-
238
-
239
-
240
-
241
-
242
-
243
-
244
-
245
-
246
-
247
-
248
-
249
-
250
-
251
-
252
-
253
-
254
-
255
-
256
-
257
-
258
-
259
-
260
 |
 |
