Dell 2135cn User Guide - Page 211
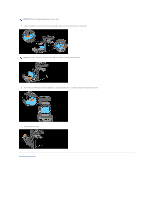
Connecting the Telephone Line
 |
UPC - 884116001980
View all Dell 2135cn manuals
Add to My Manuals
Save this manual to your list of manuals |
Page 211 highlights
11. Enter the rest of the digits, and then press . 12. Press the button. 13. Press until >Subnet Mask appears, and then press . 14. Repeat steps 10 to 11 to set Subnet Mask, and then press . 15. Press the button. 16. Press until >Gateway Address appears, and then press . 17. Repeat steps 10 to 11 to set the Gateway Address, and then press . 18. Turn off the printer, and then turn it on again. From Your Computer 1. Click start® All Programs® Dell Printers® Additional Color Laser Software® Quick Launch Utility. The Quick Launch Utility dialog box opens. 2. Click the Tool Box button. The Tool Box dialog box opens. 3. Select the printer from Printer Name. The Tool Box opens. 4. Click the Printer Maintenance tab. 5. Select TCP/IP Settings from the list at the left side of the page. The TCP/IP Settings page is displayed. 6. Select the mode from IP Address Mode, and then enter the values in IP Address, Subnet Mask, and Gateway Address. 7. Press the Apply New Settings button to take effect. You can also assign the IP address to the printer when installing the printer drivers with the installer. When you use the Network Installation feature, and the Get IP Address is set to AutoIP or DHCP on the operator panel menu, you can set the IP address from 0.0.0.0 to the desired IP address on the printer selection window. Verify the IP Settings 1. Print another System Settings page. 2. Look under the TCP/IP heading on the System Settings page to ensure that the IP address, subnet mask, and gateway are what you expected. OR Ping the printer and verify that it responds. For example, at a command prompt on a network computer, type ping followed by the new IP address (for example, 192.168.0.11): ping 192.168.0.11 If the printer is active on the network, you will receive a reply. Connecting the Telephone Line NOTE: Do not connect your printer directly to a DSL (digital subscriber line). This may damage the printer. To use a DSL, you will need to use an appropriate DSL filter. Contact your service provider for the DSL filter.
-
 1
1 -
2
-
3
-
4
-
5
-
6
-
7
-
8
-
9
-
10
-
11
-
12
-
13
-
14
-
15
-
16
-
17
-
18
-
19
-
20
-
21
-
22
-
23
-
24
-
25
-
26
-
27
-
28
-
29
-
30
-
31
-
32
-
33
-
34
-
35
-
36
-
37
-
38
-
39
-
40
-
41
-
42
-
43
-
44
-
45
-
46
-
47
-
48
-
49
-
50
-
51
-
52
-
53
-
54
-
55
-
56
-
57
-
58
-
59
-
60
-
61
-
62
-
63
-
64
-
65
-
66
-
67
-
68
-
69
-
70
-
71
-
72
-
73
-
74
-
75
-
76
-
77
-
78
-
79
-
80
-
81
-
82
-
83
-
84
-
85
-
86
-
87
-
88
-
89
-
90
-
91
-
92
-
93
-
94
-
95
-
96
-
97
-
98
-
99
-
100
-
101
-
102
-
103
-
104
-
105
-
106
-
107
-
108
-
109
-
110
-
111
-
112
-
113
-
114
-
115
-
116
-
117
-
118
-
119
-
120
-
121
-
122
-
123
-
124
-
125
-
126
-
127
-
128
-
129
-
130
-
131
-
132
-
133
-
134
-
135
-
136
-
137
-
138
-
139
-
140
-
141
-
142
-
143
-
144
-
145
-
146
-
147
-
148
-
149
-
150
-
151
-
152
-
153
-
154
-
155
-
156
-
157
-
158
-
159
-
160
-
161
-
162
-
163
-
164
-
165
-
166
-
167
-
168
-
169
-
170
-
171
-
172
-
173
-
174
-
175
-
176
-
177
-
178
-
179
-
180
-
181
-
182
-
183
-
184
-
185
-
186
-
187
-
188
-
189
-
190
-
191
-
192
-
193
-
194
-
195
-
196
-
197
-
198
-
199
-
200
-
201
-
202
-
203
-
204
-
205
-
 206
206 -
 207
207 -
 208
208 -
 209
209 -
 210
210 -
 211
211 -
 212
212 -
 213
213 -
 214
214 -
 215
215 -
 216
216 -
217
-
218
-
219
-
220
-
221
-
222
-
223
-
224
-
225
-
226
-
227
-
228
-
229
-
230
-
231
-
232
-
233
-
234
-
235
-
236
-
237
-
238
-
239
-
240
-
241
-
242
-
243
-
244
-
245
-
246
-
247
-
248
-
249
-
250
-
251
-
252
-
253
-
254
-
255
-
256
-
257
-
258
-
259
-
260
 |
 |
