Dell 2405FPW User Manual - Page 21
Using the OSD, Accessing the Menu System - brightness
 |
View all Dell 2405FPW manuals
Add to My Manuals
Save this manual to your list of manuals |
Page 21 highlights
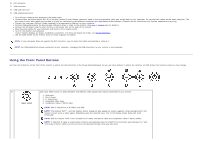
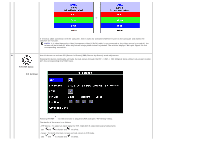
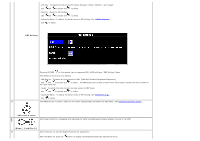
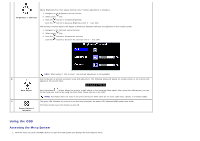
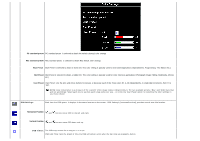
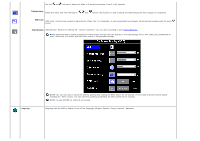
Brightness / Contrast Adjust Brightness first, then adjust Contrast only if further adjustment is necessary. 1. Navigate to the Brightness control function 2. Select using key. 3. Push the button to increase Brightness; push the button to decrease Brightness (min 0 ~ max 100). The Contrast function adjusts the degree of difference between darkness and lightness on the monitor screen. 1. Navigate to the Contrast control function 2. Select using key. 3. Push the button to increase the contrast; push the button to decrease the contrast (min 0 ~ max 100). NOTE: When using '2: DVI-D Input', the contrast adjustment is not available. E Use this button to activate automatic setup and adjustment. The following dialog will appear on a black screen as the monitor self- adjusts to the current input: Auto Adjust In Progress Auto Adjust Auto Adjustment button allows the monitor to self-adjust to the incoming video signal. After using Auto Adjustment, you can further tune your monitor by using the Pixel Clock, Phase controls in the OSD. NOTE: Auto Adjust does not occur if you press the button while there are no active video input signals, or attached cables. F The green LED indicates the monitor is on and fully functional. An amber LED indicates DPMS power save mode. Power Button & Indicator The Power button turns the monitor on and off. Using the OSD Accessing the Menu System 1. With the menu off, push the MENU button to open the OSD system and display the main features menu.
-
 1
1 -
2
-
3
-
4
-
5
-
6
-
7
-
8
-
9
-
10
-
11
-
12
-
13
-
14
-
15
-
 16
16 -
 17
17 -
 18
18 -
 19
19 -
 20
20 -
 21
21 -
 22
22 -
 23
23 -
 24
24 -
 25
25 -
 26
26 -
27
-
28
-
29
-
30
-
31
-
32
-
33
-
34
-
35
-
36
-
37
-
38
-
39
-
40
-
41
-
42
-
43
-
44
-
45
-
46
-
47
-
48
-
49
-
50
-
51
-
52
-
53
-
54
-
55
-
56
-
57
-
58
-
59
-
60
-
61
-
62
-
63
-
64
-
65
-
66
-
67
-
68
-
69
-
70
-
71
-
72
-
73
-
74
-
75
-
76
-
77
 |
 |
