Dell 2405FPW User Manual - Page 23
Pixel Clock, Phase, Positioning, Horizontal, Vertical, Image settings, Auto Adjust - flat panel monitor
 |
View all Dell 2405FPW manuals
Add to My Manuals
Save this manual to your list of manuals |
Page 23 highlights
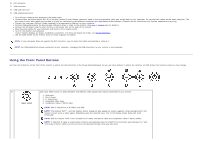
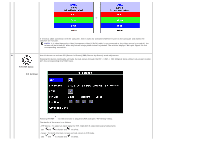
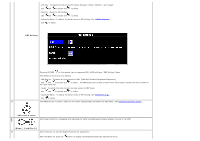
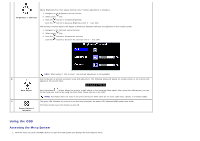
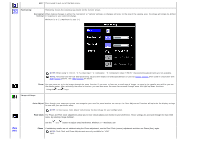
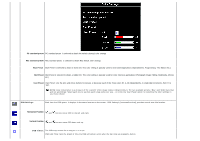
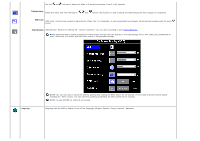
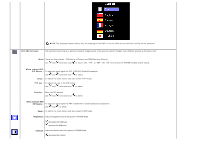
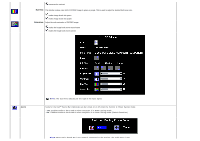
EXIT This is used to exit out of the Main menu. Positioning: Positioning moves the viewing area around on the monitor screen. Horizontal When making changes to either the 'Horizontal' or 'Vertical' settings, no changes will occur to the size of the viewing area: the image will simply be shifted Vertical in response to your selection/change. Minimum is '0' (-). Maximum is '100' (+). NOTE: When using '2: DVI-D', '3: S-video Input', '4: Composite', '5: Component video (Y Pb Pr)' the positioning adjustments are not available. NOTE: Horizontal and Vertical OSD positioning adjusts with respect to landscape (default) or portrait display rotation when used in conjunction with OSD rotation feature. See OSD Settings for details. Zoom You can zoom out or in the image through the zoom function. If you want to focus on a small area of image, to zoom in the specific area will let you see the details easier. After activating the zoom in function, you can also move the zoom lens around through zoom left/right/up/down functions. Using the and keys. Image settings: Auto Adjust Even though your computer system can recognize your new flat panel monitor on startup, the 'Auto Adjustment' function will optimize the display settings for use with your particular setup. NOTE: In most cases, 'Auto Adjust' will produce the best image for your configuration. Pixel Clock The Phase and Pixel Clock adjustments allow you to more closely adjust your monitor to your preference. These settings are accessed through the main OSD menu, by selecting 'Image Settings'. Use the and buttons to adjust away interference. Minimum: 0 ~ Maximum: 100 Phase If satisfactory results are not obtained using the Phase adjustment, use the Pixel Clock (course) adjustment and then use Phase (fine), again. NOTE: Pixel Clock and Phase Adjustments are only available for "VGA" input.
-
 1
1 -
2
-
3
-
4
-
5
-
6
-
7
-
8
-
9
-
10
-
11
-
12
-
13
-
14
-
15
-
16
-
17
-
 18
18 -
 19
19 -
 20
20 -
 21
21 -
 22
22 -
 23
23 -
 24
24 -
 25
25 -
 26
26 -
 27
27 -
 28
28 -
29
-
30
-
31
-
32
-
33
-
34
-
35
-
36
-
37
-
38
-
39
-
40
-
41
-
42
-
43
-
44
-
45
-
46
-
47
-
48
-
49
-
50
-
51
-
52
-
53
-
54
-
55
-
56
-
57
-
58
-
59
-
60
-
61
-
62
-
63
-
64
-
65
-
66
-
67
-
68
-
69
-
70
-
71
-
72
-
73
-
74
-
75
-
76
-
77
 |
 |
