Dell Force10 E300 Installing and Maintaining the E300 System - Page 22
Installing an AC Power Supply, Installing DC Power Entry Modules
 |
View all Dell Force10 E300 manuals
Add to My Manuals
Save this manual to your list of manuals |
Page 22 highlights
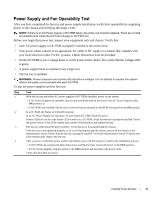
www.dell.com | support.dell.com Installing an AC Power Supply To install an AC power supply: Step 1 Task Toggle the Standby Switch of the power supply to the standby position, as shown in the image here. NOTE: If the E300 is already operating, you can insert a new power supply without shutting down the E300. Standby position l Ol 2 Slide the power supply into any open power supply slot. See Figure 5-1 for correct orientation. CAUTION: Fill all four power supply slots with power supplies or filler blanks before tightening the power supply screws. Doing this ensures that each power supply is aligned correctly. Ensure power supplies are properly aligned prior to engaging the captive screws. Doing this will reduce the likelihood of damaging screws or chassis. It may be necessary to manually align the power supplies prior to tightening. 3 Start the two captive screws of each power supply by hand before tightening them all. CAUTION: Tighten the screws with a #2 Phillips screwdriver. Use no more than five inch-pounds of torque (light torque with a manual screwdriver). Use of power drivers can damage screws or chassis. 4 Plug the AC power cord into the AC power inlet in the face of the power supply. 5 Plug the AC power cord into an AC power outlet. 6 Toggle the standby switch of the power supply to the On position. NOTE: If there is a failure in the AC Power Supply, it must be replaced. Power modules are not field serviceable. Installing DC Power Entry Modules The E300 supports a minimum of one DC PEM. You must have only one type of power module in the chassis; you cannot install a mixture of power modules. For redundant power, install two DC PEMs. To comply with safety agency and emission requirements, a blank cover must be inserted into any unused power slot. 22 | Installing Power Modules
-
 1
1 -
2
-
3
-
4
-
5
-
6
-
7
-
8
-
9
-
10
-
11
-
12
-
13
-
14
-
15
-
16
-
 17
17 -
 18
18 -
 19
19 -
 20
20 -
 21
21 -
 22
22 -
 23
23 -
 24
24 -
 25
25 -
 26
26 -
 27
27 -
28
-
29
-
30
-
31
-
32
-
33
-
34
-
35
-
36
-
37
-
38
-
39
-
40
-
41
-
42
-
43
-
44
-
45
-
46
-
47
-
48
-
49
-
50
-
51
-
52
-
53
-
54
-
55
-
56
-
57
-
58
-
59
-
60
-
61
-
62
-
63
-
64
-
65
-
66
-
67
-
68
-
69
-
70
-
71
-
72
-
73
-
74
 |
 |
