Dell Force10 E300 Installing and Maintaining the E300 System - Page 35
Installing Switch Fabric Modules (SFMs), Using the Expandable Cable Management Bracket
 |
View all Dell Force10 E300 manuals
Add to My Manuals
Save this manual to your list of manuals |
Page 35 highlights
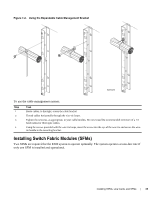
Figure 7-2. Using the Expandable Cable Management Bracket fn00142hh To use the cable management system: Step Task 1 Route cables, to the right, across the cable bracket. 2 Thread cables horizontally through the wire-tie loops. 3 Tighten the wire-ties, as appropriate, to your cable bundles. Do not exceed the recommended minimum of a 1.5 bend radius for fiber optic cables. 4 Using the screws provided with the wire-tie loops, insert the screw into the eye of the wire-tie and secure the wire- tie bundle to the mounting bracket. Installing Switch Fabric Modules (SFMs) Two SFMs are required for the E300 system to operate optimally. The system operates at non-line rate if only one SFM is installed and operational. Installing RPMs, Line Cards, and SFMs | 35
-
 1
1 -
2
-
3
-
4
-
5
-
6
-
7
-
8
-
9
-
10
-
11
-
12
-
13
-
14
-
15
-
16
-
17
-
18
-
19
-
20
-
21
-
22
-
23
-
24
-
25
-
26
-
27
-
28
-
29
-
 30
30 -
 31
31 -
 32
32 -
 33
33 -
 34
34 -
 35
35 -
 36
36 -
 37
37 -
 38
38 -
 39
39 -
 40
40 -
41
-
42
-
43
-
44
-
45
-
46
-
47
-
48
-
49
-
50
-
51
-
52
-
53
-
54
-
55
-
56
-
57
-
58
-
59
-
60
-
61
-
62
-
63
-
64
-
65
-
66
-
67
-
68
-
69
-
70
-
71
-
72
-
73
-
74
 |
 |
