Dell Force10 E300 Installing and Maintaining the E300 System - Page 32
Installing the RPMs and Line Cards, Installing a Second RPM
 |
View all Dell Force10 E300 manuals
Add to My Manuals
Save this manual to your list of manuals |
Page 32 highlights
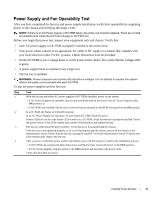
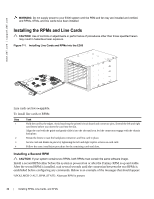
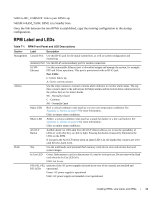
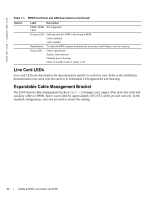
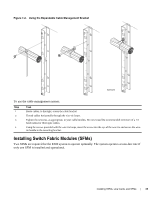
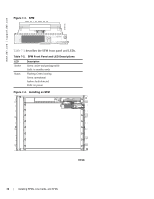
www.dell.com | support.dell.com WARNING: Do not supply power to your E300 system until the PEM and fan tray are installed and verified, and RPMs, SFMs, and line cards have been installed. Installing the RPMs and Line Cards CAUTION: Use of controls or adjustments or performance of procedures other than those specified herein may result in hazardous laser exposure. Figure 7-1. Installing Line Cards and RPMs into the E300 Line cards are hot-swappable. To install line cards or RPMs: Step Task 1 Hold the card by the edges. Avoid touching the printed circuit board and connector pins. Extend the left and right card levers before you insert the card into the slot. Align the card with the guide and gently slide it into the slot until you feel the connectors engage with the chassis backplane. 2 Rotate the levers to seat the backplane connectors and line card in place. 3 Secure card and blanks in place by tightening the left and right captive screws on each card. 4 Follow the same installation procedure for the remaining cards and slots. Installing a Second RPM CAUTION: If your system contains two RPMs, both RPMs must contain the same software image. Install a second RPM either before the system is powered on or after the Primary RPM is up and stable. After the second RPM is installed, wait several seconds until the connection between the two RPMs is established before configuring any commands. Below is an example of the messages that should appear: %POLLMGR-2-ALT_RPM_STATE: Alternate RPM is present 32 | Installing RPMs, Line Cards, and SFMs
-
 1
1 -
2
-
3
-
4
-
5
-
6
-
7
-
8
-
9
-
10
-
11
-
12
-
13
-
14
-
15
-
16
-
17
-
18
-
19
-
20
-
21
-
22
-
23
-
24
-
25
-
26
-
 27
27 -
 28
28 -
 29
29 -
 30
30 -
 31
31 -
 32
32 -
 33
33 -
 34
34 -
 35
35 -
 36
36 -
 37
37 -
38
-
39
-
40
-
41
-
42
-
43
-
44
-
45
-
46
-
47
-
48
-
49
-
50
-
51
-
52
-
53
-
54
-
55
-
56
-
57
-
58
-
59
-
60
-
61
-
62
-
63
-
64
-
65
-
66
-
67
-
68
-
69
-
70
-
71
-
72
-
73
-
74
 |
 |
