Dell PowerEdge 1655MC Information and Firmware Update
Dell PowerEdge 1655MC Manual
 |
View all Dell PowerEdge 1655MC manuals
Add to My Manuals
Save this manual to your list of manuals |
Dell PowerEdge 1655MC manual content summary:
- Dell PowerEdge 1655MC | Information
and Firmware
Update - Page 1
Dell™ Systems Information and Firmware Update www.dell.com | support.dell.com - Dell PowerEdge 1655MC | Information
and Firmware
Update - Page 2
to hardware or loss of data and tells you how to avoid the problem. CAUTION: A CAUTION indicates a potential for property damage, personal injury, Dell Computer Corporation is strictly forbidden. Trademarks used in this text: Dell, the DELL logo, PowerEdge, and Dell OpenManage are trademarks of Dell - Dell PowerEdge 1655MC | Information
and Firmware
Update - Page 3
CD Drives 1-13 Using the System Diagnostics 1-14 Using the System Management Module to Manage the Server Modules 1-14 System Management Module Time Issues Web Console Displaying Incorrect Date/Time Setting the System Management Module's Time 1-14 1-14 1-15 Logging Out of a Network Switch - Dell PowerEdge 1655MC | Information
and Firmware
Update - Page 4
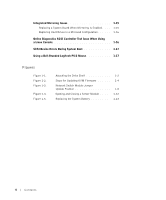
Integrated Mirroring Issues Replacing a System Board When Mirroring Is Enabled . . . . Replacing Hard Drives in a Mirrored Configuration . . . . . . 1-15 1-15 1-16 Online Diagnostics SCSI Controller Test Issue When Using a Linux Console 1-16 SCSI Device Errors During System Boot 1-17 Using a - Dell PowerEdge 1655MC | Information
and Firmware
Update - Page 5
USB diskette and USB CD drives • Using the system diagnostics • Using the system management module to manage server modules • System management module time issues • Logging out of a network switch module HTTP session • Integrated mirroring issues • Online diagnostics SCSI controller test issue when - Dell PowerEdge 1655MC | Information
and Firmware
Update - Page 6
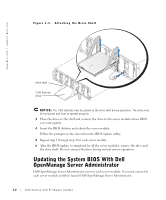
update is completed for all the server modules, remove the drive and the drive shelf. Do not connect the drive during normal system operation. Updating the System BIOS With Dell OpenManage Server Administrator Dell OpenManage Server Administrator runs on each server module. You must connect to each - Dell PowerEdge 1655MC | Information
and Firmware
Update - Page 7
website at support.dell.com, select the BIOS version that you are updating to and follow the instructions for downloading the BIOS file to your server module. 2 Start a Dell OpenManage session. 3 From the Server Administrator home page, click the System object. 4 Click the Main System Chassis object - Dell PowerEdge 1655MC | Information
and Firmware
Update - Page 8
www.dell.com | support.dell.com Updating the KVM Firmware Updating the KVM firmware on your system is a two-step process. The first step requires you to connect your system to a remote system using the null modem cable that came with your system and update the system management module. The second - Dell PowerEdge 1655MC | Information
and Firmware
Update - Page 9
modem cable that came with your system. See the System Configuration Guide for information about connecting and configuring your remote system. 3 On the remote system, create a wupdate directory. 4 Download the wupdate.zip file from the Dell Support website at support.dell.com to the directory that - Dell PowerEdge 1655MC | Information
and Firmware
Update - Page 10
www.dell.com | support.dell.com Globally Updating the Server Module KVM Firmware 1 Ensure that all server modules are powered on. When the server click Blade. 6 From the Blade Selection dialog box, highlight the appropriate server module and click Version. NOTICE: To prevent damage to the system, - Dell PowerEdge 1655MC | Information
and Firmware
Update - Page 11
from the Dell Support website at support.dell.com with the versions loaded on the network switch module. You can verify the component version on your switch module by typing show version from the command line interface (CLI). NOTE: All three of the firmware components (loader, diagnostics, and - Dell PowerEdge 1655MC | Information
and Firmware
Update - Page 12
and 3. See Figure 1-3 for the location of the switch module jumper. 3 Install the network switch module. NOTICE: Do not connect the RJ-11-to-serial cable to a phone line connector. Connecting the cable to a phone line connector could damage the remote system. 4 Connect the RJ-11-to-serial cable that - Dell PowerEdge 1655MC | Information
and Firmware
Update - Page 13
serial cable connected to the network switch module, reset the switch module by unplugging the switch module and then reinserting it. 2 During POST, press to enter the diagnostic mode. If you wait too long and your operating system begins to load let the system complete the load operation, and - Dell PowerEdge 1655MC | Information
and Firmware
Update - Page 14
serial cable connected to the network switch module, reset the switch module by unplugging the switch module and then reinserting it. 2 During POST, press to enter the diagnostic mode. If you wait too long and your operating system begins to load let the system complete the load operation, and - Dell PowerEdge 1655MC | Information
and Firmware
Update - Page 15
console redirection to log into the network switch module. Replacing the Server Module Battery CAUTION: Only trained service technicians are authorized to remove and access any components inside the system. See your System Information Guide for complete information about safety precautions, working - Dell PowerEdge 1655MC | Information
and Firmware
Update - Page 16
| support.dell.com CAUTION: There is a danger of a new battery exploding if it is incorrectly installed. Replace the battery only with the same or equivalent type recommended by the manufacturer. Discard used batteries according to the manufacturer's instructions. See your System Information Guide - Dell PowerEdge 1655MC | Information
and Firmware
Update - Page 17
Figure 1-4). 7 Install the server module. Using the USB Diskette and USB CD Drives The front of each server module has a USB port that allows you to connect a USB diskette drive or USB CD drive. The drives are used to configure the server module and to run diagnostics on the attached server module - Dell PowerEdge 1655MC | Information
and Firmware
Update - Page 18
will be corrected in a future BIOS release. Using the System Diagnostics • When running the system diagnostics, the chassis service tag is displayed at the top of the screen instead of the server module service tag. This will be corrected in a future diagnostics release. • When running the video - Dell PowerEdge 1655MC | Information
and Firmware
Update - Page 19
If the integrated mirroring option is enabled before replacing the system board, perform the following steps: 1 Replace the system board. 2 Install the server module in the system, but do not turn the server module on. 3 Insert the system board replacement utility diskette in the USB diskette drive - Dell PowerEdge 1655MC | Information
and Firmware
Update - Page 20
. 4 Turn off the server module and install the new hard drive. 5 Install the server module in the system. 6 Turn on the server module. During POST, the following message displays: Logical Drive is Degraded At this point, the hard drive begins to resynchronize. Online Diagnostics SCSI Controller Test - Dell PowerEdge 1655MC | Information
and Firmware
Update - Page 21
detected on device \Device\Harddisk0\DR0 during a paging operation. These events occur only during system boot and do not affect normal operation. Using a Dell-Branded Logitech PS/2 Mouse If you are using a Dell-branded, two-button Logitech PS/2 mouse and it is not performing correctly, replace it - Dell PowerEdge 1655MC | Information
and Firmware
Update - Page 22
www.dell.com | support.dell.com 1-18 Information and Firmware Update - Dell PowerEdge 1655MC | Information
and Firmware
Update - Page 23
Dell™ 系统 www.dell.com | support.dell.com - Dell PowerEdge 1655MC | Information
and Firmware
Update - Page 24
2002 Dell Computer Corporation Dell Computer Corporation Dell DELL 徽标 PowerEdge 和 Dell OpenManage 是 Dell Computer Corporation 的商 标 Microsoft 和 Windows 是 Microsoft Corporation Dell Computer Corporation 2002 年 11 月 P/N 7W186 Rev. A01 - Dell PowerEdge 1655MC | Information
and Firmware
Update - Page 25
目录 BIOS 2-1 使用 Dell OpenManage Server Administrator BIOS . . . . 2-3 2-3 更新 KVM 2-4 KVM 2-5 KVM 2-5 KVM 2-6 2-6 2-7 2-7 2-8 2-9 2-10 2-11 使用 USB 软盘和 USB CD 2-13 2-14 2-14 2-14 Web 2-14 2-14 HTTP 2-15 目录 3 - Dell PowerEdge 1655MC | Information
and Firmware
Update - Page 26
2-15 2-15 2-15 使用 Linux SCSI 2-16 SCSI 2-16 使用 Dell 品牌 Logitech PS/2 2-16 图 图 2-1 图 2-2 图 2-3 图 2-4 图 2-5 2-2 KVM 2-4 2-8 2-12 2-13 4 目录 - Dell PowerEdge 1655MC | Information
and Firmware
Update - Page 27
BIOS • 使用 Dell OpenManage™ Server Administrator BIOS KVM USB 软盘和 USB CD HTTP Linux SCSI SCSI Dell Logitech 鼠标 BIOS USB USB BIOS 注 此 USB Dell 提供的 USB USB CD USB USB 1 Dell 支持 Web 站点 support.dell.com BIOS BIOS 2 2-1 USB 2-1 - Dell PowerEdge 1655MC | Information
and Firmware
Update - Page 28
www.dell.com | support.dell.com 图 2-1 驱动器架 USB USB 3 BIOS 4 插入 BIOS BIOS 5 2 至步骤 4 6 BIOS 2-2 - Dell PowerEdge 1655MC | Information
and Firmware
Update - Page 29
使用 Dell OpenManage Server Administrator BIOS Dell OpenManage Server Administrator Dell OpenManage Server Administrator BIOS 1 通过 Dell 支持 Web 站点 support.dell.com BIOS BIOS 2 启动 Dell OpenManage 会话 3 在 Server Administrator System 4 单击 Main System Chassis 5 单击 BIOS 对象 6 单击 Update - Dell PowerEdge 1655MC | Information
and Firmware
Update - Page 30
www.dell.com | support.dell.com 更新 KVM 固件 KVM KVM 2-2 KVM 图 2-2 KVM KVM 固件 KVM 2-4 - Dell PowerEdge 1655MC | Information
and Firmware
Update - Page 31
KVM 固件 1 2 3 wupdate 目录 4 将 Dell 支持 Web 站点 support.dell.com 中的 wupdate.zip 3 中 5 在 wupdate wupdate.zip 文件 6 在 wupdate wupdate.exe 7 8 2 COM 端口 9 单击 Load 载入 10 11 单击 OK 确定 KVM 电路 KVM KVM KVM KVM KVM KVM 1 2 按下 - Dell PowerEdge 1655MC | Information
and Firmware
Update - Page 32
OSCAR KVM 1 2 按下 - Dell PowerEdge 1655MC | Information
and Firmware
Update - Page 33
2 至步骤 8 Hilgraeve 的 HyperTerminal Private 6.1 1 Start Programs 程序 → Accessories 附件 → Communications HyperTerminal 2 在 Connection Description 3 在 HyperTerminal Disconnect 4 在 HyperTerminal Properties 属性 5 在 Properties Configure COM 端口 a 将 Bits per second 9600 默认值 - Dell PowerEdge 1655MC | Information
and Firmware
Update - Page 34
www.dell.com | support.dell.com 3 RJ-11 4 RJ-11 RJ-11 图 2-3 1 将 RJ-11 2 在 POST 期间按 - Dell PowerEdge 1655MC | Information
and Firmware
Update - Page 35
6 选择 Xmodem 协议 7 diagxxx.bix 此处的 xxx 8 单击 Send 30 秒钟 9 d 10 键入 diag 11 9600 波特率 12 1 和 2 1 和 2 ERA/MC 1 将 RJ-11 2 在 POST 期间按 - Dell PowerEdge 1655MC | Information
and Firmware
Update - Page 36
www.dell.com | support.dell.com 10 9600 11 1 和 2 1 和 2 ERA/MC RJ-11 10/100/1000 BASE-T TFTP 要使用 R-J11 1 将 RJ-11 2 在 POST 期间按 - Dell PowerEdge 1655MC | Information
and Firmware
Update - Page 37
12 1 和 2 1 和 2 ERA/MC 1 2 a 如图 2-4 b 使用 2 参见图 2-4 c 12.7 毫米 0.5 2-4 2-11 - Dell PowerEdge 1655MC | Information
and Firmware
Update - Page 38
www.dell.com | support.dell.com 图 2-4 2 个 左侧 右侧 3 4 2-5 5 2-5 中所示 2-12 - Dell PowerEdge 1655MC | Information
and Firmware
Update - Page 39
图 2-5 + 号一侧 电池槽 6 a b 12.7 毫米 0.5 2-4 c 使用 2 2-4 7 使用 USB 软盘和 USB CD 驱动器 USB USB USB CD USB CD Dell OpenManage Server Assistant CD CD CD DOS 可引导 CD USB USB USB USB BIOS 2-13 - Dell PowerEdge 1655MC | Information
and Firmware
Update - Page 40
www.dell.com | support.dell.com HyperTerminal 会话 Web Racadm Web Web Web Racadm setractime Web Properties 属性 Chassis Summary 1 setractime Web 2 Web 2-14 - Dell PowerEdge 1655MC | Information
and Firmware
Update - Page 41
HTTP 会话 Web 控制台 HTTP Web 1 2 3 在 USB 4 将 USB 5 按下 键显示 OSCAR 6 按下 - Dell PowerEdge 1655MC | Information
and Firmware
Update - Page 42
www.dell.com | support.dell.com 3 4 5 6 POST Logical Drive is Degra ded 使用 Linux SCSI 通过 Linux SCSI SCSI LSI SCSI SCSI Microsoft® Windows The device, \Device\SCIS\symmpi1, did not respond within the timeout period. - Dell PowerEdge 1655MC | Information
and Firmware
Update - Page 43
Systèmes Dell™ Mise à jour des informations et du microcode www.dell.com | support.dell.com - Dell PowerEdge 1655MC | Information
and Firmware
Update - Page 44
de quelque manière que ce soit sans l'autorisation écrite de Dell Computer Corporation est strictement interdite. Marques utilisées dans ce document : Dell, le logo DELL, PowerEdge et Dell OpenManage sont des marques de Dell Computer Corporation ; Microsoft et Windows sont des marques déposées de - Dell PowerEdge 1655MC | Information
and Firmware
Update - Page 45
à partir de disquettes 3-1 Mise à jour du BIOS système avec Dell OpenManage Server Administrator 3-3 Mise à jour du microcode du module de gestion du syst Configuration du module de commutateur réseau 3-9 Mise à jour du composant Diagnostics 3-10 Mise à jour du composant de chargeur 3-11 Mise à - Dell PowerEdge 1655MC | Information
and Firmware
Update - Page 46
console Web affiche une date et une heure incorrectes . . . Réglage de la date et de l'heure sur 18 3-18 3-19 Problème de test des diagnostics en ligne du contrôleur SCSI en cas d' marque Dell 3-20 Figures Figure 3-1. Figure 3-2. Figure 3-3. Figure 3-4. Figure 3-5. Fixation du support de - Dell PowerEdge 1655MC | Information
and Firmware
Update - Page 47
me à partir de disquettes • Mise à jour du BIOS système avec Dell OpenManage™ Server Administrator • Mise à jour du microcode du module de gestion du systè Utilisation des diagnostics système • Utilisation du module de gestion du système pour gérer les modules serveur • Problèmes liés à la date et l' - Dell PowerEdge 1655MC | Information
and Firmware
Update - Page 48
, connectez-vous-vous au site Web de support de Dell, support.dell.com, sélectionnez la version du BIOS que vous voulez installer pour la mise à jour, et suivez les instructions de téléchargement du fichier BIOS et de création des disquettes. 2 Fixez le support de lecteur à l'avant du système (voir - Dell PowerEdge 1655MC | Information
and Firmware
Update - Page 49
voulez installer pour la mise à jour, et suivez les instructions de téléchargement du fichier BIOS sur votre module serveur. 2 Lancez une session Dell OpenManage. 3 Dans la page d'accueil de Server Administrator, cliquez sur l'objet System (Système). 4 Cliquez sur l'objet Main System Chassis (Ch - Dell PowerEdge 1655MC | Information
and Firmware
Update - Page 50
www.dell.com | support.dell.com 3 Connectez-vous au module de gestion du système. Pour plus de précisions, reportezvous au manuel Embedded Remote Access/MC User's Guide (Guide de l'utilisateur Embedded Remote Access/MC). 4 Dans la ligne de commande série, tapez racadm fwupdate -g -a u - Dell PowerEdge 1655MC | Information
and Firmware
Update - Page 51
Figure 3-2. Étapes de la mise à jour du microcode KVM Première étape : connectez le système distant au module de gestion du système et mettez à jour le microcode KVM du module. Deuxième étape : connectez-vous au système et transmettez la mise à jour KVM aux modules serveur. Mise à jour des - Dell PowerEdge 1655MC | Information
and Firmware
Update - Page 52
du système distant, reportez-vous au System Configuration Guide (Guide de configuration du système). 3 Sur le système distant, créez un répertoire wupdate. 4 Téléchargez le fichier wupdate.zip à partir du site Web de support de Dell, support.dell.com, dans le répertoire créé à l'étape 3. 5 Dézippez - Dell PowerEdge 1655MC | Information
and Firmware
Update - Page 53
EN GARDE : Pour éviter d'endommager le système, ne le mettez pas hors tension lorsque la mise à jour a commencé. 5 Dans la boîte de dialogue Blade Status (État du module), cliquez sur Update (Mettre à jour) pour lancer la mise à jour de tous les modules serveur. Pendant la mise à jour d'un module - Dell PowerEdge 1655MC | Information
and Firmware
Update - Page 54
de Dell, support.dell.com, avec les versions chargées sur le module de commutateur réseau. Pour vérifier la version du composant de votre module de commutateur, tapez show version sur la l'interface de ligne de commande (CLI). REMARQUE : Les trois composants du microcode (chargeur, diagnostics et - Dell PowerEdge 1655MC | Information
and Firmware
Update - Page 55
3 Dans la barre d'outils de HyperTerminal, cliquez sur Fin pour mettre fin à la connexion série au module de commutateur réseau. 4 Dans la barre d'outils de HyperTerminal, cliquez sur Propriétés. 5 Dans la boîte de dialogue Propriétés, cliquez sur Configurer et configurez le port COM comme suit : a - Dell PowerEdge 1655MC | Information
and Firmware
Update - Page 56
www.dell.com | support.dell.com Figure 3-3. Position de mise à jour du cavalier du module de commutateur réseau Mise à jour du composant Diagnostics 1 Après avoir branché le câble de conversion RJ-11/série sur le module de commutateur réseau, réinitialisez ce dernier en le déconnectant, puis en le - Dell PowerEdge 1655MC | Information
and Firmware
Update - Page 57
) pour télécharger le fichier. Le téléchargement dure environ 30 secondes. 9 Une fois le téléchargement terminé, appuyez sur pour mettre à jour le composant de diagnostics. 10 Tapez diag comme nom de fichier. 11 Une fois la mise à jour terminée, modifiez la vitesse en bauds du système distant en - Dell PowerEdge 1655MC | Information
and Firmware
Update - Page 58
www.dell.com | support.dell.com 8 Cliquez sur Send (Envoyer) pour télécharger le fichier. Le télé réintroduisant. 2 Pendant les tests POST, appuyez sur pour accéder au mode de diagnostic. Si vous attendez trop longtemps et que votre système d'exploitation commence à se charger, laissez - Dell PowerEdge 1655MC | Information
and Firmware
Update - Page 59
, appuyez sur une touche pour continuer ou passez à « Mise à jour du composant Diagnostics » ou « Mise à jour du composant de chargeur. » Si vous ne mettez composants internes du système et à y accéder. Reportez-vous au Guide Informations sur le système pour obtenir des informations complètes sur les - Dell PowerEdge 1655MC | Information
and Firmware
Update - Page 60
www.dell.com | support.dell.com ATTENTION : En cas d'installation incorrecte, la batterie neuve risque d'exploser. Remplacez la batterie uniquement par une batterie identique ou équivalente recommandée par le fabricant. Jetez les batteries usagées conformément aux instructions du fabricant. Pour - Dell PowerEdge 1655MC | Information
and Firmware
Update - Page 61
3 Posez les deux côtés du module serveur sur une surface plane. 4 Retirez la batterie du module serveur (voir la Figure 3-5). Tout en tirant la batterie du module serveur vers l'avant, dégagez-la de son connecteur à l'aide d'un objet non conducteur et non pointu, tel qu'un tournevis en plastique. 5 - Dell PowerEdge 1655MC | Information
and Firmware
Update - Page 62
www.dell.com | support.dell.com Utilisation des lecteurs de disquette et de CDROM USB L' exécuter les diagnostics sur le module de serveur connecté. MISE EN GARDE : Si vous utilisez le lecteur de CD USB comme lecteur d'amorçage, vous devez utiliser le CD Dell OpenManage Server Assistant fourni avec - Dell PowerEdge 1655MC | Information
and Firmware
Update - Page 63
setractime via l'interface série ou l'utilitaire Racadm, lorsque la console Web met de nouveau à jour la fenêtre Properties Chassis Summary (Propriétés - Récapitulatif du châssis), les zones de la date de connexion et de l'heure contiennent des données incorrectes. Pour corriger les zones de - Dell PowerEdge 1655MC | Information
and Firmware
Update - Page 64
www.dell.com | support.dell.com Déconnexion d'une session HTTP sur un module de est le premier défini dans la séquence d'amorçage. 7 Enregistrez les modifications et quittez le programme System Setup. 8 Réinitialisez le module serveur afin qu'il exécute l'utilitaire de remplacement de la carte - Dell PowerEdge 1655MC | Information
and Firmware
Update - Page 65
le module serveur. Pendant les tests POST, le message suivant s'affiche : Logical Drive is Degraded (L'unité logique est dégradée) A ce stade, la resynchronisation du disque dur commence. Problème de test des diagnostics en ligne du contrôleur SCSI en cas d'utilisation d'une console Linux Lorsque - Dell PowerEdge 1655MC | Information
and Firmware
Update - Page 66
www.dell.com | support.dell.com Erreurs de périphérique SCSI pendant l'initialisation du syst une souris Logitech PS/2 commercialisée sous la marque Dell Si vous utilisez une souris Logitech PS/2 à deux boutons commercialisée sous la marque Dell et qu'elle ne fonctionne pas correctement, remplacez- - Dell PowerEdge 1655MC | Information
and Firmware
Update - Page 67
Dell™-Systeme Informationen und FirmwareAktualisierung www.dell.com | support.dell.com - Dell PowerEdge 1655MC | Information
and Firmware
Update - Page 68
von Hardware oder den Verlust von Daten hin und wie dieses Problem vermieden werden kann. VORSICHT: VORSICHT weist darauf hin, dass Gefahr Dell Computer Corporation erlaubt. Im vorliegenden Text verwendete Warenzeichen: Dell, das DELL-Logo, PowerEdge und Dell OpenManage sind Warenzeichen der Dell - Dell PowerEdge 1655MC | Information
and Firmware
Update - Page 69
Aktualisieren des System-BIOS von Disketten 4-1 Aktualisieren des System-BIOS mit Hilfe des Dell OpenManage™ Server Administrator 4-3 des Netzwerk-Switch . . . . 4-8 Einrichten der Baud-Rate zur seriellen Verbindung für das Remote-System 4-8 Konfigurieren des Netzwerk-Switch-Moduls 4-9 - Dell PowerEdge 1655MC | Information
and Firmware
Update - Page 70
Beenden der HTTP-Sitzung im Netzwerk-Switch-Modul . . . . 4-18 Probleme bei integrierter Spiegelung Ersetzen der Systemplatine bei aktivierter Spiegelungsfunktion Ersetzen von Festplatten bei gespiegelter Konfiguration. . . . 4-19 4-19 4-20 Probleme beim SCSI-Controller-Test im Rahmen der - Dell PowerEdge 1655MC | Information
and Firmware
Update - Page 71
• Aktualisieren des System-BIOS von Disketten • Aktualisieren des System-BIOS mit Hilfe des Dell OpenManage™ Server Administrator • Aktualisieren der Firmware des Systemverwaltungsmoduls • Aktualisieren der KVM-Firmware • Aktualisieren der Firmware des Netzwerk-Switch-Moduls • Ersetzen der Batterie - Dell PowerEdge 1655MC | Information
and Firmware
Update - Page 72
www.dell.com | support.dell.com 1 Rufen Sie von einem Remote-System aus die Dell Support-Webseite support.dell.com auf und wählen Sie die entsprechende BIOS-Version, die Sie für die Aktualisierung benötigen. Folgen Sie den Anweisungen zum Download der BIOS-Datei und - Dell PowerEdge 1655MC | Information
and Firmware
Update - Page 73
Servermodul anschließen und danach den Dell OpenManage Server Administrator starten. HINWEIS: Um Ihr System-BIOS aktualisieren zu können, müssen Sie beim System mit Administrator-Privilegien angemeldet sein. 1 Wählen Sie auf der Dell Support-Website - support.dell.com - die BIOS-Version, die Sie - Dell PowerEdge 1655MC | Information
and Firmware
Update - Page 74
Access/MC und in der Online-Hilfe. 1 Richten Sie Ihr Remote-System als TFTP-Server ein. 2 Laden Sie von Ihrem Remote-System aus das Firmware-Image von der Dell SupportWebsite support.dell.com auf das Root-Verzeichnis des TFTP-Servers herunter. 3 Melden Sie sich beim Systemverwaltungsmodul an. Nähere - Dell PowerEdge 1655MC | Information
and Firmware
Update - Page 75
die Aktualisierung der KVM-Firmware nötig sind. Abbildung 4-2. Schritte zur Aktualisierung der KVM-Firmware Erster Schritt: Schließen Sie das Remote-System an das Systemverwaltungsmodul an und aktualisieren Sie die KVM-Firmware auf dem Systemverwaltungsmodul. Zweiter Schritt: Melden Sie sich beim - Dell PowerEdge 1655MC | Information
and Firmware
Update - Page 76
Informationen zum Anschließen und Konfigurieren Ihres Remote-Systems finden Sie im Handbuch für die System-Konfigurierung. 3 Erstellen Sie im Remote-System ein wupdate-Verzeichnis. 4 Laden Sie die Datei wupdate.zip von der Dell-Support-Website support.dell.com in das Verzeichnis herunter, das Sie in - Dell PowerEdge 1655MC | Information
and Firmware
Update - Page 77
und klicken Sie auf Version. BITTE BEACHTEN: Um eine Beschädigung des Systems zu verhindern, unterbrechen Sie nicht die Stromversorgung des Systems, wenn das Aktualisierungsverfahren begonnen hat. 7 Klicken Sie im Dialogfeld Blade Version (Blattversion) auf Load Firmware (Firmware laden), um mit dem - Dell PowerEdge 1655MC | Information
and Firmware
Update - Page 78
Sie die Versionen auf der Dell-Support-Website support.dell.com mit den Versionen, die auf das Netzwerk-Switch-Modul geladen sind. Sie dem Remote-System (TFTP-Server) verbundenen Uplink-Ports zu aktualisieren. Einrichten der Baud-Rate zur seriellen Verbindung für das Remote-System Dieses Verfahren - Dell PowerEdge 1655MC | Information
and Firmware
Update - Page 79
Verwendung des Kabels mit einem Telefonanschluss kann das RemoteSystem beschädigt werden. 4 Stecken Sie das Adapterkabel von RJ-11 zu seriell, das Sie mit Ihrem System erhalten haben, in den RJ-11-Anschluss am Netzwerk-Switch-Modul und in einen seriellen Anschluss an einem Remote - Dell PowerEdge 1655MC | Information
and Firmware
Update - Page 80
www.dell.com | support.dell.com Abbildung 4-3. Jumper-Position des Netzwerk-Switch-Moduls beim Aktualisierungsvorgang Aktualisieren der Diagnose-Komponente 1 Mit dem Adapterkabel von RJ-11 zu seriell, welches an das Netzwerk-Switch-Modul angeschlossen ist, setzen Sie das Switch-Modul zurück, indem - Dell PowerEdge 1655MC | Information
and Firmware
Update - Page 81
zurück, indem Sie das Switch-Modul herausnehmen und es danach wieder einsetzen. 2 Drücken Sie unter POST die Taste , um in den Diagnosemodus zu gelangen. Wenn Sie zu lange warten und Ihr Betriebssystem mit dem Laden beginnt, warten Sie bis das System den Ladevorgang beendet hat und wiederholen - Dell PowerEdge 1655MC | Information
and Firmware
Update - Page 82
www.dell.com | support.dell.com 7 Suchen Sie die Datei loaderxxx.bix, wobei xxx der Version der dem Remote-System (TFTP-Server) verbundenen Uplink-Ports verwendet werden. Nähere Informationen zur Aktualisierung der Switch-ModulFirmware finden Sie in der Dokumentation zum Netzwerk-Switch-Modul. Fü - Dell PowerEdge 1655MC | Information
and Firmware
Update - Page 83
siehe "Einrichten der Baud-Rate zur seriellen Verbindung für das Remote-System"). 12 Zur Aktualisierung weiterer Komponenten drücken Sie eine beliebige Sie keine weiteren Komponenten aktualisieren möchten, entfernen Sie das Netzwerk-Switch-Modul und setzen Sie den Jumper auf die Steckerpositionen 1 - Dell PowerEdge 1655MC | Information
and Firmware
Update - Page 84
www.dell.com | support.dell.com Ersetzen der Servermodul-Batterie VORSICHT: Nur geschulte Servicetechniker dürfen in Ihren Systeminformationen. 1 Entfernen Sie das entsprechende Servermodul. 2 Öffnen Sie das Server-Modul. a Richten Sie das Servermodul gemäß Abbildung 4-4 aus, sodass sich die - Dell PowerEdge 1655MC | Information
and Firmware
Update - Page 85
Abbildung 4-4. Öffnen und Schließen des Servermoduls linke Seite Servermodul Befestigungsschrauben (2) ServermodulGriff rechte Seite 3 Legen Sie die beiden Seiten des Servermoduls auf eine ebene Fläche. 4 Entfernen Sie die Batterie des Servermoduls (siehe Abbildung 4-5). Während Sie die Batterie des - Dell PowerEdge 1655MC | Information
and Firmware
Update - Page 86
www.dell.com | support.dell.com Abbildung 4-5. Ersetzen der System-Batterie Batterie "+"-Seite Batterie-Sockel 6 -Laufwerk als Boot-Laufwerk verwenden, müssen Sie die Dell OpenManage Server Assistant-CD verwenden, die Sie mit Ihrem System als bootfähige CD erhalten haben. Die Verwendung einer - Dell PowerEdge 1655MC | Information
and Firmware
Update - Page 87
entfernen, bevor das Servermodul den Startvorgang vollständig beendet hat, blockiert das System, da es noch nach dem USB-Gerät sucht. Dies wird durch eine Systemdiagnose wird oben auf dem Bildschirm statt des Servermodul-Service-Tag das Gehäuse-Service-Tag angezeigt. Dies wird durch eine zukünftige - Dell PowerEdge 1655MC | Information
and Firmware
Update - Page 88
dell.com | support.dell Web-Konsole im Fenster Properties - Chassis Summary (Eigenschaften Gehäusezusammenfassung) in einstellen, nachdem Sie das System an einen AC-Stromanschluss angeschlossen Sitzung im NetzwerkSwitch-Modul Wenn Sie ein Netzwerk-Switch-Modul verwenden und eine HTTP-Sitzung auf einer - Dell PowerEdge 1655MC | Information
and Firmware
Update - Page 89
integrierter Spiegelung Die bekannten Probleme, die bei der integrierten Spiegelung auftreten können, -Sequenz an erster Stelle steht. 7 Speichern Sie die Änderungen und beenden Sie das System-Setup-Programm. 8 Starten Sie das Servermodul neu, um das Dienstprogramm zum Ersetzen der Systemplatine - Dell PowerEdge 1655MC | Information
and Firmware
Update - Page 90
www.dell.com | support.dell.com Ersetzen von Festplatten bei gespiegelter Konfiguration Wenn Sie eine System. 6 Schalten Sie das Servermodul an. Die folgende Meldung wird unter POST angezeigt: Logical Drive is Degraded An dieser Stelle beginnt die Festplatte mit der Neu-Synchronisierung. Probleme - Dell PowerEdge 1655MC | Information
and Firmware
Update - Page 91
des Systemstarts auf und haben keine Auswirkungen auf den normalen Betrieb. Verwenden einer mit Dell-Logo versehenen Logitech PS/2-Maus Wenn Sie eine Logitech PS/2 Zwei-Tasten-Maus mit Dell-Logo verwenden und diese nicht richtig funktioniert, verwenden Sie stattdessen ein anderes Model der Serie - Dell PowerEdge 1655MC | Information
and Firmware
Update - Page 92
www.dell.com | support.dell.com 4-22 Information und Firmware-Aktualisierung - Dell PowerEdge 1655MC | Information
and Firmware
Update - Page 93
Dell www.dell.com | support.dell.com - Dell PowerEdge 1655MC | Information
and Firmware
Update - Page 94
2002 Dell Computer Corporation Dell Computer Corporation Dell、DELL PowerEdge Dell OpenManage は、 Dell Computer Corporation Microsoft および Windows は、Microsoft Corporation Dell Computer Corporation 2002 年 11 月 P/N 7W186 Rev. A01 - Dell PowerEdge 1655MC | Information
and Firmware
Update - Page 95
目次 BIOS 5-1 Dell OpenManage Server Administrator BIOS 5-3 5-4 KVM 5-4 KVM 5-5 KVM 5-6 KVM 5-7 5-8 5-8 5-9 5-10 5-11 5-12 5-13 USB USB CD 5-15 5-16 5-16 目次 3 - Dell PowerEdge 1655MC | Information
and Firmware
Update - Page 96
5-17 Web 5-17 5-17 HTTP 5-17 5-18 5-18 5-18 Linux SCSI 5-19 SCSI 5-19 Dell の Logitech 2 5-19 図 図 5-1 図 5-2 図 5-3 図 5-4 図 5-5 5-2 KVM 5-5 5-10 5-14 5-15 4 目次 - Dell PowerEdge 1655MC | Information
and Firmware
Update - Page 97
BIOS Dell OpenManage™ Server Administrator BIOS KVM USB USB CD HTTP Linux SCSI SCSI Dell の Logitech 2 BIOS USB USB BIOS メモ:USB Dell の USB USB CD USB USB 1 Dell Web サイト support.dell.com BIOS BIOS 5-1 - Dell PowerEdge 1655MC | Information
and Firmware
Update - Page 98
www.dell.com | support.dell.com 2 5-1 USB 図 5-1 USB 注意 : USB 3 BIOS 4 BIOS BIOS 5 2 4 6 BIOS 5-2 - Dell PowerEdge 1655MC | Information
and Firmware
Update - Page 99
Dell OpenManage Server Administrator BIOS Dell OpenManage Server Administrator Dell OpenManage Server Administrator BIOS 1 Dell Web サイト support.dell.com BIOS BIOS 2 Dell OpenManage 3 Server Administrator System 4 Main System Chassis 5 BIOS 6 Update 7 BIOS 5-3 - Dell PowerEdge 1655MC | Information
and Firmware
Update - Page 100
www.dell.com | support.dell.com Web racadm Embedded Remote Access/MC User's Guide 1 TFTP 2 Dell Web サイト support.dell.com TFTP 3 Embedded Remote Access/MC User's Guide 4 racadm fwupdate -g -a -u -f filepath\firmimg.cm1 ipaddress> は TFTP IP メモ:TFTP IP DOS - Dell PowerEdge 1655MC | Information
and Firmware
Update - Page 101
図 5-2. KVM 手順 1 KVM 手順 2 KVM KVM 1 2 3 wupdate 4 Dell Web サイト support.dell.com から wupdate.zip 手順 3 5 wupdate.zip wupdate 5-5 - Dell PowerEdge 1655MC | Information
and Firmware
Update - Page 102
www.dell.com | support.dell.com 6 wupdate wupdate.exe 7 8 手順 2 COM 9 Load 10 11 OK KVM KVM KVM KVM KVM KVM KVM 1 2 - Dell PowerEdge 1655MC | Information
and Firmware
Update - Page 103
5 Update OSCAR KVM 1 2 - Dell PowerEdge 1655MC | Information
and Firmware
Update - Page 104
www.dell.com | support.dell.com 3 Dell Web サイト support.dell.com CLI)で show version 3 RJ-11 RJ-11 RJ-11 10/100/1000 BASET TFTP 2 8 Hilgraeve HyperTerminal Private Edition 6.1 1 2 3 4 5 COM a 9600 b 8 c 5-8 - Dell PowerEdge 1655MC | Information
and Firmware
Update - Page 105
d 1 e 6 OK 7 OK 8 9 - Dell PowerEdge 1655MC | Information
and Firmware
Update - Page 106
www.dell.com | support.dell.com 図 5-3 1 RJ-11 2 POST 中に - Dell PowerEdge 1655MC | Information
and Firmware
Update - Page 107
8 30 9 d 10 diag 11 9600 12 1 と 2 1 と 2 ERA/MC 1 RJ-11 2 POST 中に - Dell PowerEdge 1655MC | Information
and Firmware
Update - Page 108
www.dell.com | support.dell.com 9 l L 10 9600 11 1 と 2 1 と 2 ERA/MC RJ-11 10/100/1000 BASET TFTP R-J11 1 RJ-11 2 POST 中に - Dell PowerEdge 1655MC | Information
and Firmware
Update - Page 109
7 runtimexxx.bix xxx 8 5 9 r 10 runtime 11 9600 12 1 と 2 1 と 2 ERA/MC 1 2 a 図 5-4 2 b #2 2 5-4 5-13 - Dell PowerEdge 1655MC | Information
and Firmware
Update - Page 110
www.dell.com | support.dell.com c 12.7 mm 5-4 図 5-4 2) 左側 右側 3 4 5-5 5 5-5 5-14 - Dell PowerEdge 1655MC | Information
and Firmware
Update - Page 111
図 5-5 「+」側 6 a b 12.7 mm 5-4 c #2 2 5-4 7 USB USB CD USB USB USB CD 注意 : USB CD CD Dell OpenManage Server Assistant CD CD DOS CD 5-15 - Dell PowerEdge 1655MC | Information
and Firmware
Update - Page 112
www.dell.com | support.dell.com USB USB USB USB BIOS Web racadm Web 5-16 - Dell PowerEdge 1655MC | Information
and Firmware
Update - Page 113
Web Web racadm setractime Web Properties - Chassis Summary 1 Web setractime 2 Web AC HTTP Web HTTP Web 5-17 - Dell PowerEdge 1655MC | Information
and Firmware
Update - Page 114
www.dell.com | support.dell.com 1 2 3 USB 4 USB 5 - Dell PowerEdge 1655MC | Information
and Firmware
Update - Page 115
POST Logical Drive is Degraded Linux SCSI Linux SCSI SCSI LSI SCSI SCSI Microsoft® Windows The device, \Device\SCIS\symmpi1, did not respond within the timeout period. An error was detected on device \Device\Harddisk0\DR0 during a paging operation. Dell の Logitech 2 Dell - Dell PowerEdge 1655MC | Information
and Firmware
Update - Page 116
www.dell.com | support.dell.com 5-20 - Dell PowerEdge 1655MC | Information
and Firmware
Update - Page 117
Dell www.dell.com | support.dell.com - Dell PowerEdge 1655MC | Information
and Firmware
Update - Page 118
2002 Dell Computer Corporation Dell Computer Corporation Dell, DELL 로고, PowerEdge 및 Dell OpenManage는 Dell Computer Corporation Microsoft와 Windows는 Microsoft Corporation Dell Computer Corporation 2002년 11월 P/N 7W186 Rev. A01 - Dell PowerEdge 1655MC | Information
and Firmware
Update - Page 119
차례 BIOS 6-1 Dell OpenManage Server Administrator BIOS 6-3 6-3 KVM 6-4 KVM 6-5 KVM 6-6 KVM 6-6 6-7 6-7 6-8 6-9 6-10 6-10 6-12 USB USB CD 6-14 6-15 6-15 6-15 6-15 6-16 HTTP 6-16 차례 3 - Dell PowerEdge 1655MC | Information
and Firmware
Update - Page 120
6-16 6-16 6-17 Linuxs SCSI 6-17 SCSI 6-18 Dell 상표의 Logitech PS/2 6-18 그림 그림 6-1 그림 6-2 그림 6-3 그림 6-4 그림 6-5 6-2 KVM 6-4 6-8 6-13 6-14 4 차례 - Dell PowerEdge 1655MC | Information
and Firmware
Update - Page 121
BIOS Dell OpenManage™ Server Administrator BIOS KVM USB USB CD HTTP Linux SCSI SCSI Del l 상표의 Logitech 2 BIOS USB USB BIOS 주: USB 포트는 Dell USB USB CD USB USB 1 Dell support.dell.com BIOS BIOS 6-1 - Dell PowerEdge 1655MC | Information
and Firmware
Update - Page 122
www.dell.com | support.dell.com 2 6-1 USB 그림 6-1 USB USB 3 BIOS 4 BIOS BIOS 5 2단계~4 6 BIOS 6-2 - Dell PowerEdge 1655MC | Information
and Firmware
Update - Page 123
BIOS Dell OpenManage Server Administrator Dell OpenManage Server Administrator BIOS 1 Dell support.dell.com BIOS BIOS 2 Dell OpenManage 3 Server Administrator System 4 Main System Chassis 5 BIOS 6 Update 7 BIOS Racadm MC 1 TFTP 2 Dell support.dell.com - Dell PowerEdge 1655MC | Information
and Firmware
Update - Page 124
www.dell.com | support.dell.com KVM KVM 1 2 KVM 6-2는 KVM 그림 6-2. KVM 1 KVM 2 KVM 6-4 - Dell PowerEdge 1655MC | Information
and Firmware
Update - Page 125
KVM 1 2 3 wupdate 4 Dell support.dell.com)로부터 wupdate.zip 파일을 3 5 압축된 wupdate.zip 파일을 wupdate 6 wupdate wupdate.exe 7 8 2 COM 9 Load 10 11 OK KVM KVM KVM KVM KVM KVM 6-5 - Dell PowerEdge 1655MC | Information
and Firmware
Update - Page 126
www.dell.com | support.dell.com KVM 1 2 OSCAR(On-Screen Configuration and Activity Reporting Print Screen 3 OSCAR Commands 4 Commands Blade Status 5 Blade Status Update를 OSCAR KVM 1 2 OSCAR Print Screen 3 OSCAR Commands 4 Commands Display Versions 5 Version Blade - Dell PowerEdge 1655MC | Information
and Firmware
Update - Page 127
Dell support.dell.com CLI(Command Line Interface)에서 show version RJ-11 RJ-11 RJ-11 10/100/1000 BASE-T TFTP 2단계~8 Hilgraeve's HyperTerminal Private Edition 6.1 1 2 3 4 5 COM a 9600 b 8 c d 1 e 6 7 6-7 - Dell PowerEdge 1655MC | Information
and Firmware
Update - Page 128
www.dell.com | support.dell.com 8 9 Enter 1 2 2번 핀과 3 6-3 3 RJ-11 4 RJ-11 RJ-11 그림 6-3 6-8 - Dell PowerEdge 1655MC | Information
and Firmware
Update - Page 129
1 RJ-11 2 POST Esc 1단계와 2 3 0 4 115200 5 6 Xmodem 7 diagxxx.bix xxx 8 30 9 d 10 diag 11 9600 12 1번 핀과 2 1번 핀과 2 ERA/MC 6-9 - Dell PowerEdge 1655MC | Information
and Firmware
Update - Page 130
www.dell.com | support.dell.com 1 RJ-11 2 POST Esc 1단계와 2 3 0 4 115200 5 6 Xmodem 7 loaderxxx.bix xxx 8 10 9 l L 10 9600 11 1번 핀과 2 1번 핀과 2 ERA/MC RJ-11 또는 10/100/1000 BASE-T TFTP 6-10 - Dell PowerEdge 1655MC | Information
and Firmware
Update - Page 131
RJ-11 1 RJ-11 2 POST Esc 1단계와 2 3 0 4 115200 5 6 Xmodem 7 runtimexxx.bix xxx 8 5 9 r 10 runtime 11 9600 12 1번 핀과 2 1번 핀과 2 ERA/MC 6-11 - Dell PowerEdge 1655MC | Information
and Firmware
Update - Page 132
www.dell.com | support.dell.com 1 2 a 그림 6-4 b #2 Phillips 6-4 참조). c 12.7mm(0.5 6-4 참조). 6-12 - Dell PowerEdge 1655MC | Information
and Firmware
Update - Page 133
그림 6-4 2) 3 4 6-5 참조). 5 그림 6-5 6-13 - Dell PowerEdge 1655MC | Information
and Firmware
Update - Page 134
www.dell.com | support.dell.com 그림 6-5 6 a b 12.7mm(0.5 6-4 참조). c #2 Phillips 6-4 참조). 7 USB USB CD USB USB USB CD USB CD CD Dell OpenManage Server Assistant CD CD DOS 부팅 CD non-system disk System Setup USB USB USB USB BIOS 6-14 - Dell PowerEdge 1655MC | Information
and Firmware
Update - Page 135
Racadm Racadm setractime Properties Chassis Summary 1 setractime 2 6-15 - Dell PowerEdge 1655MC | Information
and Firmware
Update - Page 136
www.dell.com | support.dell.com AC HTTP HTTP 1 2 3 USB 4 USB 5 OSCAR Print Screen 6 System Setup F2 Boot Sequence 옵션을 USB 7 System Setup 8 6-16 - Dell PowerEdge 1655MC | Information
and Firmware
Update - Page 137
9 10 USB 1 2 3 4 5 6 POST Logical Drive is Degraded Linuxs SCSI Linuxs SCSI SCSI LSI SCSI 6-17 - Dell PowerEdge 1655MC | Information
and Firmware
Update - Page 138
www.dell.com | support.dell.com SCSI Microsoft® Windows The device, \Device\SCIS\symmpi1, did not respond within the timeout period. An error was detected on device \Device\Harddisk0\DR0 during a paging operation. Dell 상표의 Logitech PS/2 Dell 상표의 Logitech 2 단추 PS/2 Logitech PS/2 6-18 - Dell PowerEdge 1655MC | Information
and Firmware
Update - Page 139
Sistemas Dell™ Información y actualización del firmware www.dell.com | support.dell.com - Dell PowerEdge 1655MC | Information
and Firmware
Update - Page 140
ón en cualquier medio sin la autorización por escrito de Dell Computer Corporation. Marcas comerciales utilizadas en este documento: Dell, el logotipo de DELL, PowerEdge y Dell OpenManage son marcas comerciales de Dell Computer Corporation; Microsoft y Windows son marcas registradas de Microsoft - Dell PowerEdge 1655MC | Information
and Firmware
Update - Page 141
Contenido Actualización del BIOS del sistema desde disquetes 7-1 Actualización del BIOS del sistema con Dell OpenManage Server Administrator 7-3 Actualización del firmware del módulo de administración del sistema 7-3 Actualización del firmware de KVM 7-4 Actualización del firmware del módulo de - Dell PowerEdge 1655MC | Information
and Firmware
Update - Page 142
19 Errores de dispositivo SCSI durante el arranque del sistema . . 7-20 Utilización de un ratón PS/2 Logitech con la marca Dell . . . . 7-20 Figuras Figura 7-1. Figura 7-2. Figura 7-3. Figura 7-4. Figura 7-5. Acoplamiento del estante de unidades . . . . . Pasos para actualizar el firmware de KVM - Dell PowerEdge 1655MC | Information
and Firmware
Update - Page 143
relacionados con el sistema: • Actualización del BIOS del sistema desde disquetes • Actualización del BIOS del sistema con el Dell OpenManage™ Server Administrator • Actualización del firmware del módulo de administración del sistema • Actualización del firmware de KVM • Actualización del firmware - Dell PowerEdge 1655MC | Information
and Firmware
Update - Page 144
1 Desde un sistema remoto, conéctese al sitio Web Dell | Support en la dirección support.dell.com, seleccione la versión del BIOS a la que vaya a actualizar y siga las instrucciones para descargar el archivo del BIOS y la creación de disquetes. 2 Conecte el - Dell PowerEdge 1655MC | Information
and Firmware
Update - Page 145
ón en Dell OpenManage. 3 Desde la página de inicio de Server Administrator, haga clic en el objeto System (Sistema). 4 Haga clic en el objeto Main System Chassis (Chasis Web o la utilidad Racadm. Consulte la Embedded Remote Access/MC User's Guide (Guía del usuario de acceso remoto incorporado/MC) y - Dell PowerEdge 1655MC | Information
and Firmware
Update - Page 146
www.dell.com | support.dell.com 3 Inicie sesión en el módulo de administración del sistema. Consulte la Embedded Remote Access/MC User's Guide (Guía del usuario de acceso remoto incorporado/MC) para más detalles. 4 En la línea de comandos serie, escriba racadm fwupdate -g -a -u -f - Dell PowerEdge 1655MC | Information
and Firmware
Update - Page 147
Figura 7-2. Pasos para actualizar el firmware de KVM Primero: conecte el sistema remoto al módulo de administración del sistema y actualice el firmware KVM en el módulo de administración del sistema. Segundo: inicie la sesión en el sistema y fuerce la actualización del firmware KVM en los módulos - Dell PowerEdge 1655MC | Information
and Firmware
Update - Page 148
sistema remoto. 3 En el sistema remoto, cree el directorio wupdate. 4 Descargue el archivo wupdate.zip desde el sitio Web de Dell | Support que se encuentra en la dirección support.dell.com en el directorio creado en el paso 3. 5 Descomprima el archivo wupdate.zip en el directorio wupdate. 6 En el - Dell PowerEdge 1655MC | Information
and Firmware
Update - Page 149
pantalla e informe de actividad OSCAR). 3 En el menú OSCAR, haga clic en Commands (Comandos). 4 En el cuadro de diálogo Commands (Comandos), haga clic en Blade Status (Estado de elemento). AVISO: Para evitar daños en el sistema, no lo apague una vez que se haya iniciado el proceso de actualizaci - Dell PowerEdge 1655MC | Information
and Firmware
Update - Page 150
www.dell.com | support.dell.com 7 En el cuadro de diálogo Blade Version (Versión de elemento), haga clic en Load . Antes de actualizar los componentes, compare las versiones del sitio Web Dell | Support en la dirección support.dell.com con las versiones cargadas en el módulo de conmutación de - Dell PowerEdge 1655MC | Information
and Firmware
Update - Page 151
red 2 En el módulo de conmutación, desplace el puente a las patillas 2 y 3. Consulte la Figura 7-3 para ver la ubicación del puente del módulo de conmutación. 3 Instale el módulo de conmutación de red AVISO: No conecte el cable RJ-11÷a÷serie en un conector de línea telefónica. Conectar el cable a un - Dell PowerEdge 1655MC | Information
and Firmware
Update - Page 152
www.dell.com | support.dell.com Figura 7-3. Posición de actualización del puente del módulo de conmutación de red Actualización del componente de diagnósticos 1 Con el cable RJ-11÷a÷serie - Dell PowerEdge 1655MC | Information
and Firmware
Update - Page 153
8 Haga clic en Send (Enviar) para descargar el archivo. La descarga tarda unos 30 segundos aproximadamente. 9 Después de finalizar la descarga, pulse para actualizar el componente de diagnósticos. 10 Escriba diag para el nombre de archivo. 11 Después de completar la actualización, cambie la - Dell PowerEdge 1655MC | Information
and Firmware
Update - Page 154
www.dell.com | support.dell.com 8 Haga clic en Send (Enviar) para descargar el archivo. La descarga tarda unos 10 segundos aproximadamente. 9 Después de finalizar la descarga, pulse (L minúscula) - Dell PowerEdge 1655MC | Information
and Firmware
Update - Page 155
5 Haga clic en Send (Enviar) para acceder al cuadro de diálogo Send File (Enviar archivo). 6 Seleccione el protocolo Xmodeml. 7 Explore y seleccione el archivo runtimexxx.bix, donde xxx es la versión del componente de tiempo de ejecución. 8 Haga clic en Send (Enviar) para descargar el archivo. La - Dell PowerEdge 1655MC | Information
and Firmware
Update - Page 156
www.dell.com | support.dell.com PRECAUCIÓN: Existe peligro de que la nueva batería explote si está instalada de forma incorrecta. Sustituya la batería por una del mismo tipo o equivalente - Dell PowerEdge 1655MC | Information
and Firmware
Update - Page 157
batería del módulo de servidor, saque la batería de su conector utilizando un objeto despuntado no conductivo, como un destornillador de plástico. 5 Instale la nueva batería del módulo de servidor con el lado con la etiqueta "+" orientada como se muestra en la Figura 7-5. Figura 7-5. Sustitución de - Dell PowerEdge 1655MC | Information
and Firmware
Update - Page 158
www.dell.com | support.dell.com Utilización de la disquetera USB y la unidad de CD USB Si está utilizando la unidad de CD USB como la unidad de arranque, debe utilizar el CD de Dell OpenManage Server Assistant que se suministra con el sistema como CD de arranque. Utilizar un CD de arranque de DOS - Dell PowerEdge 1655MC | Information
and Firmware
Update - Page 159
un comando setractime utilizando la interfaz serie o la utilidad Racadm, la siguiente vez que la consola Web actualice la ventana Properties - Chassis Summary (Propiedades - Resumen del chasis), los campos de hora y fecha de inicio de sesión muestra datos incorrectos. Para corregir los campos - Dell PowerEdge 1655MC | Information
and Firmware
Update - Page 160
www.dell.com | support.dell.com Problemas de duplicación integrada Los problemas conocidos para antes de sustituir la placa del sistema, realice los pasos siguientes: 1 Sustituya la placa del sistema. 2 Instale el módulo de servidor en el sistema pero no encienda el módulo de servidor. 3 Inserte el - Dell PowerEdge 1655MC | Information
and Firmware
Update - Page 161
la nueva unidad de disco duro. 5 Instale el módulo de servidor en el sistema. 6 Encienda el módulo de servidor. Durante POST, aparece el mensaje siguiente: Logical Drive is Degraded En este momento, la unidad de disco duro comienza a sincronizarse de nuevo. Problema en prueba de controladora SCSI - Dell PowerEdge 1655MC | Information
and Firmware
Update - Page 162
www.dell.com | support.dell.com Errores de dispositivo SCSI durante el arranque del sistema normal. Utilización de un ratón PS/2 Logitech con la marca Dell Si está utilizando un ratón PS/2 Logitech de dos botones con la marca Dell y no funciona correctamente, sustitúyalo por un modelo diferente de - Dell PowerEdge 1655MC | Information and Firmware Update - Page 163
- Dell PowerEdge 1655MC | Information
and Firmware
Update - Page 164
Printed in the U.S.A Imprimé aux Etats-Unis. Gedruckt in U.S.A. Impreso en EE.UU. 07W186A01 P/N 7W186 Rev. A01 www.dell.com | support.dell.com - Dell PowerEdge 1655MC | Information and Firmware Update - Page 165
- Dell PowerEdge 1655MC | Information
and Firmware
Update - Page 166
Printed in Malaysia Printed on recycled paper Imprimé en Malaisie Gedruckt in Malaysia Impreso en Malasia 07W186A01 P/N 7W186 Rev. A01 www.dell.com | support.dell.com - Dell PowerEdge 1655MC | Information and Firmware Update - Page 167
- Dell PowerEdge 1655MC | Information
and Firmware
Update - Page 168
Printed in China Printed on recycled paper Imprimé en Chine Gedruckt in China Impreso en China 07W186A01 P/N 7W186 Rev. A01 www.dell.com | support.dell.com - Dell PowerEdge 1655MC | Information and Firmware Update - Page 169
- Dell PowerEdge 1655MC | Information
and Firmware
Update - Page 170
Printed in Ireland Imprimé en Irelande Gedruckt in Ireland Impreso en Irelanda 07W186A01 P/N 7W186 Rev. A01 www.dell.com | support.dell.com
-
 1
1 -
 2
2 -
 3
3 -
 4
4 -
 5
5 -
 6
6 -
 7
7 -
8
-
9
-
10
-
11
-
12
-
13
-
14
-
15
-
16
-
17
-
18
-
19
-
20
-
21
-
22
-
23
-
24
-
25
-
26
-
27
-
28
-
29
-
30
-
31
-
32
-
33
-
34
-
35
-
36
-
37
-
38
-
39
-
40
-
41
-
42
-
43
-
44
-
45
-
46
-
47
-
48
-
49
-
50
-
51
-
52
-
53
-
54
-
55
-
56
-
57
-
58
-
59
-
60
-
61
-
62
-
63
-
64
-
65
-
66
-
67
-
68
-
69
-
70
-
71
-
72
-
73
-
74
-
75
-
76
-
77
-
78
-
79
-
80
-
81
-
82
-
83
-
84
-
85
-
86
-
87
-
88
-
89
-
90
-
91
-
92
-
93
-
94
-
95
-
96
-
97
-
98
-
99
-
100
-
101
-
102
-
103
-
104
-
105
-
106
-
107
-
108
-
109
-
110
-
111
-
112
-
113
-
114
-
115
-
116
-
117
-
118
-
119
-
120
-
121
-
122
-
123
-
124
-
125
-
126
-
127
-
128
-
129
-
130
-
131
-
132
-
133
-
134
-
135
-
136
-
137
-
138
-
139
-
140
-
141
-
142
-
143
-
144
-
145
-
146
-
147
-
148
-
149
-
150
-
151
-
152
-
153
-
154
-
155
-
156
-
157
-
158
-
159
-
160
-
161
-
162
-
163
-
164
-
165
-
166
-
167
-
168
-
169
-
170
 |
 |

www.dell.com | support.dell.com
Dell™ Systems
Information and Firmware
Update