Dell PowerEdge 1655MC Information and Firmware Update - Page 9
Updating the System Management Module KVM Firmware, modules in your system
 |
View all Dell PowerEdge 1655MC manuals
Add to My Manuals
Save this manual to your list of manuals |
Page 9 highlights
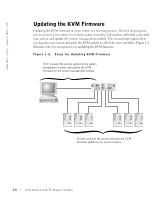
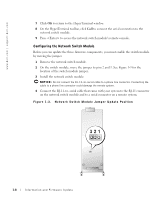
Updating the System Management Module KVM Firmware 1 Ensure that the system is powered on. 2 Connect the remote system to your system management module using the null modem cable that came with your system. See the System Configuration Guide for information about connecting and configuring your remote system. 3 On the remote system, create a wupdate directory. 4 Download the wupdate.zip file from the Dell Support website at support.dell.com to the directory that you created in step 3. 5 Unzip the wupdate.zip file in the wupdate directory. 6 From the wupdate directory, double-click wupdate.exe to access the firmware update utility dialog box. 7 In the dialog box, click the desired language. 8 Click the COM port of the remote system that you connected to the system management module in step 2. 9 Click Load. A terminal login dialog box is displayed. 10 In the terminal login dialog box, type your system management module user name and password. 11 Click OK. The firmware update procedure begins. When the firmware update is complete, the system management module firmware reboots the KVM circuitry of the management module. NOTE: When the system management module firmware reboots the KVM circuitry, the video is turned off momentarily, but is automatically restored. After the KVM firmware is updated on the system management module, you must log into your system to update the KVM firmware on the server modules. To update all the server modules in your system, see "Globally Updating the Server Module KVM Firmware." To update individual server modules, see "Individually Updating the Server Module KVM Firmware." Information and Firmware Update 1-5
-
 1
1 -
2
-
3
-
 4
4 -
 5
5 -
 6
6 -
 7
7 -
 8
8 -
 9
9 -
 10
10 -
 11
11 -
 12
12 -
 13
13 -
 14
14 -
15
-
16
-
17
-
18
-
19
-
20
-
21
-
22
-
23
-
24
-
25
-
26
-
27
-
28
-
29
-
30
-
31
-
32
-
33
-
34
-
35
-
36
-
37
-
38
-
39
-
40
-
41
-
42
-
43
-
44
-
45
-
46
-
47
-
48
-
49
-
50
-
51
-
52
-
53
-
54
-
55
-
56
-
57
-
58
-
59
-
60
-
61
-
62
-
63
-
64
-
65
-
66
-
67
-
68
-
69
-
70
-
71
-
72
-
73
-
74
-
75
-
76
-
77
-
78
-
79
-
80
-
81
-
82
-
83
-
84
-
85
-
86
-
87
-
88
-
89
-
90
-
91
-
92
-
93
-
94
-
95
-
96
-
97
-
98
-
99
-
100
-
101
-
102
-
103
-
104
-
105
-
106
-
107
-
108
-
109
-
110
-
111
-
112
-
113
-
114
-
115
-
116
-
117
-
118
-
119
-
120
-
121
-
122
-
123
-
124
-
125
-
126
-
127
-
128
-
129
-
130
-
131
-
132
-
133
-
134
-
135
-
136
-
137
-
138
-
139
-
140
-
141
-
142
-
143
-
144
-
145
-
146
-
147
-
148
-
149
-
150
-
151
-
152
-
153
-
154
-
155
-
156
-
157
-
158
-
159
-
160
-
161
-
162
-
163
-
164
-
165
-
166
-
167
-
168
-
169
-
170
 |
 |