Dell PowerEdge M620 Owners Manual - Page 44
Installing The Network Daughter Card/LOM Riser Card, Processors, Removing A Processor
 |
View all Dell PowerEdge M620 manuals
Add to My Manuals
Save this manual to your list of manuals |
Page 44 highlights
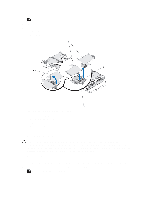
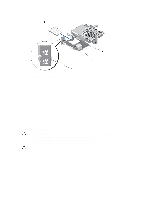
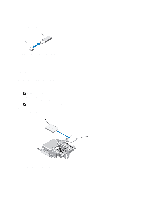
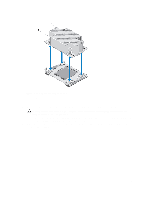
Installing The Network Daughter Card/LOM Riser Card CAUTION: Many repairs may only be done by a certified service technician. You should only perform troubleshooting and simple repairs as authorized in your product documentation, or as directed by the online or telephone service and support team. Damage due to servicing that is not authorized by Dell is not covered by your warranty. Read and follow the safety instructions that came with the product. 1. Remove the blade from the enclosure. 2. Open the blade. 3. Install the Network Daughter Card/LOM riser card: a) Align the slots on the card edge with the projection tabs on the plastic bracket covering the mezzanine card slots. b) Lower the card into place until the card connector fits into the corresponding connector on the system board. c) Secure the card with the two screws. 4. Close the blade. 5. Install the blade in the enclosure. Processors • Your system supports up to two Intel Xeon processor E5-2600 product family. • Single-processor configuration is supported. • Use 57 mm heat sinks for processors up to 95 W and 77 mm heat sinks with 115 W/130 W processors. • Do not mix processors of different Wattages. Use the following procedure when: • Installing an additional processor • Replacing a processor Removing A Processor CAUTION: Many repairs may only be done by a certified service technician. You should only perform troubleshooting and simple repairs as authorized in your product documentation, or as directed by the online or telephone service and support team. Damage due to servicing that is not authorized by Dell is not covered by your warranty. Read and follow the safety instructions that came with the product. 1. Remove the blade from the enclosure. 2. Open the blade. WARNING: The processor and heat sink can become extremely hot. Be sure the processor has had sufficient time to cool before handling. 3. Remove the cooling shroud. CAUTION: Never remove the heat sink from a processor unless you intend to remove the processor. The heat sink is necessary to maintain proper thermal conditions. 4. Loosen the screws that secure the heat sink to the blade system board. 5. Remove the heat sink. Set the heat sink upside down on the work surface to avoid contaminating the thermal grease. 44
-
 1
1 -
2
-
3
-
4
-
5
-
6
-
7
-
8
-
9
-
10
-
11
-
12
-
13
-
14
-
15
-
16
-
17
-
18
-
19
-
20
-
21
-
22
-
23
-
24
-
25
-
26
-
27
-
28
-
29
-
30
-
31
-
32
-
33
-
34
-
35
-
36
-
37
-
38
-
 39
39 -
 40
40 -
 41
41 -
 42
42 -
 43
43 -
 44
44 -
 45
45 -
 46
46 -
 47
47 -
 48
48 -
 49
49 -
50
-
51
-
52
-
53
-
54
-
55
-
56
-
57
-
58
-
59
-
60
-
61
-
62
-
63
-
64
-
65
-
66
-
67
-
68
-
69
-
70
-
71
-
72
-
73
-
74
-
75
-
76
-
77
-
78
-
79
-
80
-
81
-
82
-
83
-
84
-
85
-
86
-
87
-
88
-
89
-
90
-
91
-
92
-
93
-
94
-
95
-
96
-
97
-
98
-
99
-
100
-
101
-
102
-
103
-
104
-
105
-
106
-
107
-
108
-
109
-
110
-
111
-
112
-
113
-
114
-
115
-
116
-
117
-
118
-
119
-
120
-
121
-
122
-
123
-
124
-
125
-
126
-
127
-
128
-
129
-
130
-
131
-
132
-
133
-
134
-
135
-
136
-
137
-
138
-
139
-
140
-
141
-
142
-
143
 |
 |