Epson 2070 Service Manual - Page 139
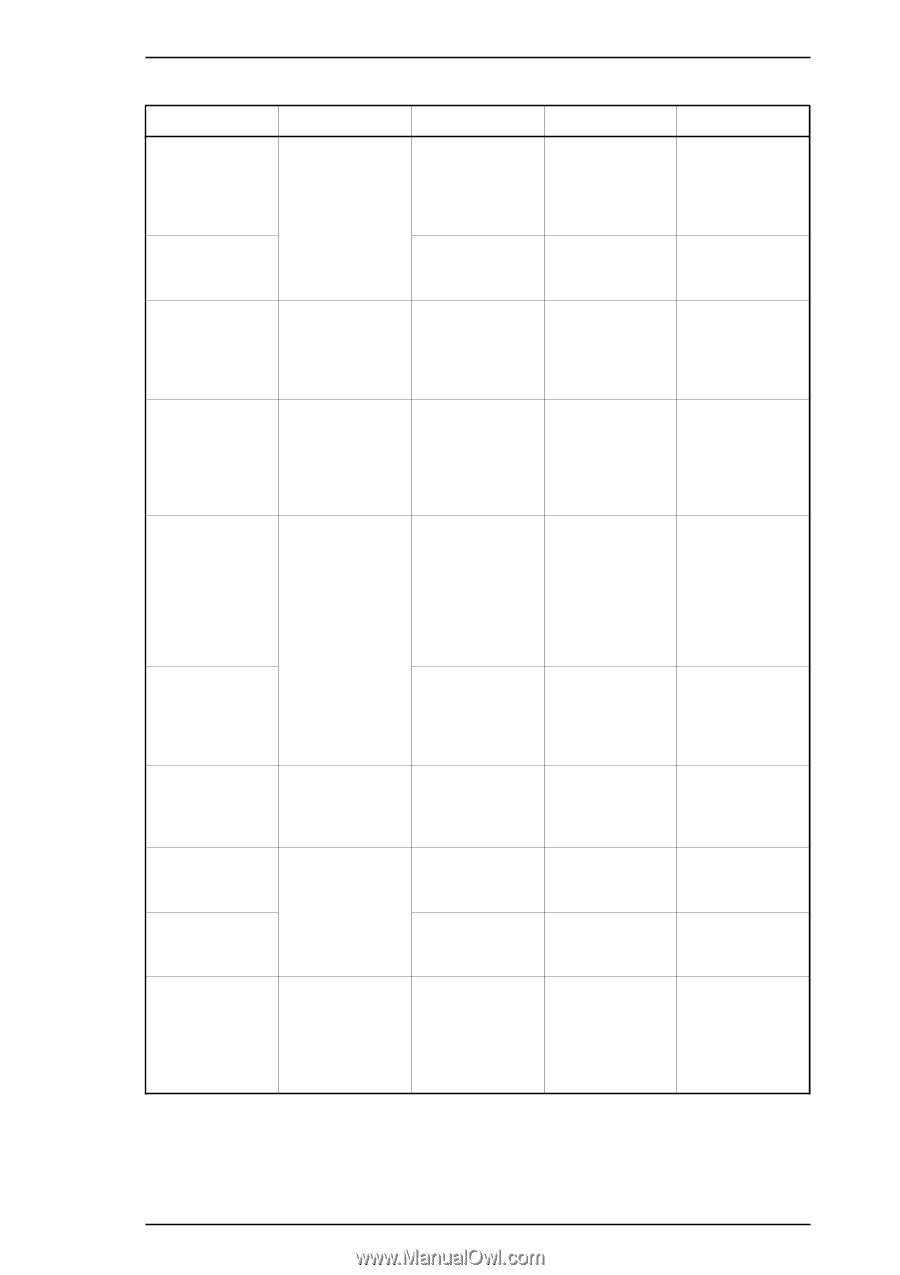
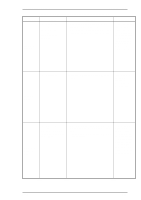
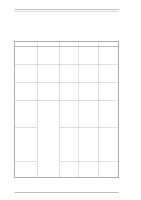
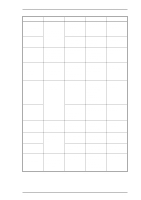
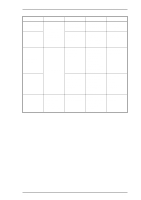
Table 5-8. Repairing the Printer Mechanism, Symptom, Cause, Checkpoint, Solution
 |
UPC - 010343812277
View all Epson 2070 manuals
Add to My Manuals
Save this manual to your list of manuals |
Page 139 highlights
LQ-2070 Service Manual Troubleshooting Table 5-8. Repairing the Printer Mechanism Problem CR operation is abnormal. ^ ^ Printing is abnormal. ^ ^ ^ ^ ^ Abnormal paper feed. Symptom Cause Checkpoint Solution The CR moves slightly and then stops and all indicators blinks. A foreign object is jammed between both terminals of the HP sensor. CN4 connector removed from the HP sensor. Check the HP sensor. Remove the any foreign object. Check the Connect the CN4 connection of the correctly. connector. The CR moves to the left side (HP side) and strikes the frame of the printer. The HP sensor is defective. Check the operation of the HP sensor. Refer to page 5-2. Replace the HP sensor. No image is printed. Common wires in the printhead FFC are disconnected or there is no continuity. Check the common wires in the printhead FFC. Replace the printhead FFC. The printer does not print a particular dot. The printhead is defective. Measure the coil resistance of the printhead. The resistance should be approximately 39.3 ohms. Refer to page 5-1. Replace the printhead. The printhead FFC is disconnected, or there is no continuity. Check the continuity in the FFC. Replace the printhead FFC. Printing is uneven on both edges of the column. Platen parallelism is not adjusted properly. Check the platen parallelism. Refer to page 4-2. Adjust the platen parallelism. The printed result is too light. The printhead is defective. Check if the tip of the dot wire is worn. Replace the printhead. The platen gap is Check the platen Adjust the platen too wide. gap. Refer to gap properly. page 4-2. The PF motor does not rotate at all. The PF motor is defective. Measure the coil resistance of the PF motor. The value is approximately 16 ohms. Replace the PF motor. Rev.A 5-17
-
 1
1 -
2
-
3
-
4
-
5
-
6
-
7
-
8
-
9
-
10
-
11
-
12
-
13
-
14
-
15
-
16
-
17
-
18
-
19
-
20
-
21
-
22
-
23
-
24
-
25
-
26
-
27
-
28
-
29
-
30
-
31
-
32
-
33
-
34
-
35
-
36
-
37
-
38
-
39
-
40
-
41
-
42
-
43
-
44
-
45
-
46
-
47
-
48
-
49
-
50
-
51
-
52
-
53
-
54
-
55
-
56
-
57
-
58
-
59
-
60
-
61
-
62
-
63
-
64
-
65
-
66
-
67
-
68
-
69
-
70
-
71
-
72
-
73
-
74
-
75
-
76
-
77
-
78
-
79
-
80
-
81
-
82
-
83
-
84
-
85
-
86
-
87
-
88
-
89
-
90
-
91
-
92
-
93
-
94
-
95
-
96
-
97
-
98
-
99
-
100
-
101
-
102
-
103
-
104
-
105
-
106
-
107
-
108
-
109
-
110
-
111
-
112
-
113
-
114
-
115
-
116
-
117
-
118
-
119
-
120
-
121
-
122
-
123
-
124
-
125
-
126
-
127
-
128
-
129
-
130
-
131
-
132
-
133
-
 134
134 -
 135
135 -
 136
136 -
 137
137 -
 138
138 -
 139
139 -
 140
140 -
 141
141 -
 142
142 -
 143
143 -
 144
144 -
145
-
146
-
147
-
148
-
149
-
150
-
151
-
152
-
153
-
154
-
155
-
156
-
157
-
158
-
159
-
160
-
161
-
162
-
163
-
164
-
165
 |
 |