Epson 5550C User Manual - Page 140
Bringing out detail in your projected image
 |
UPC - 010343820807
View all Epson 5550C manuals
Add to My Manuals
Save this manual to your list of manuals |
Page 140 highlights
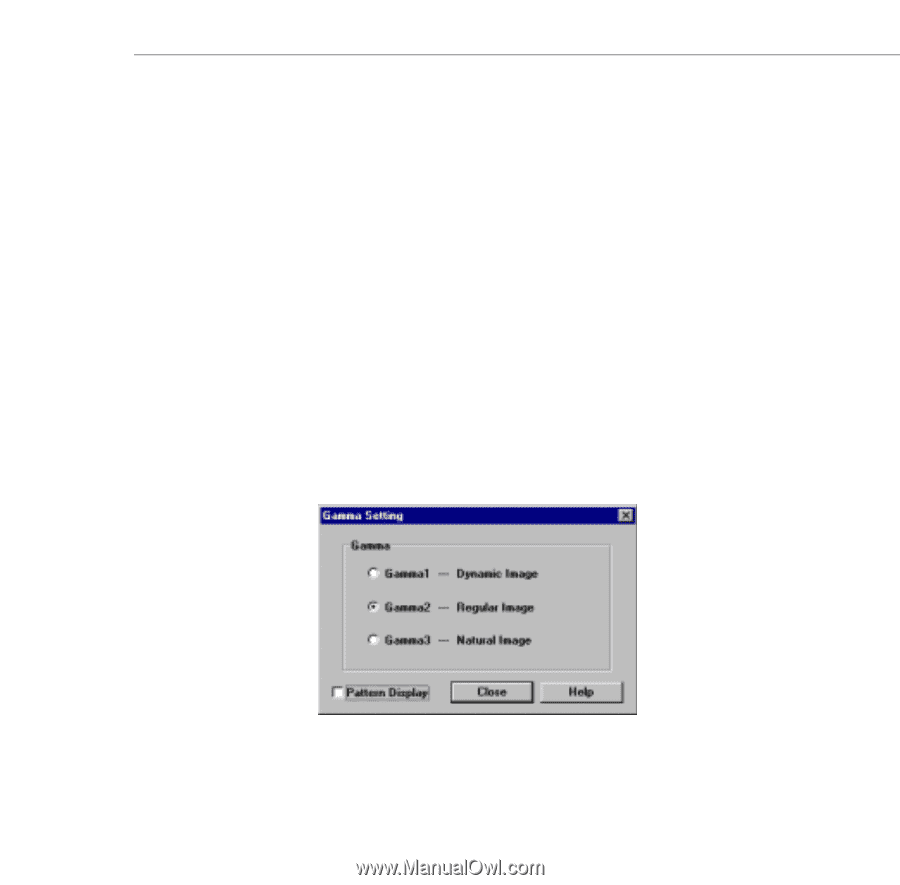
6. Click the Save button to save your logo to your hard disk. The Save As dialog box appears. Type a name for your logo, using the .lgo extension, then click OK. Note: You must save logo files with the extension .lgo. 7. To download a logo file to the projector, click the Download button and follow the instructions on the screen. 8. Click Close to return to the Projector Setting dialog box. Bringing out detail in your projected image If much of your image appears hidden in shadow, you can increase visible detail by gamma correction, which brings out the midtones in the image. This correction often achieves better results than simply correcting contrast or brightness from the Video tab. 1. Click Gamma on the Projector Setting dialog box. The Gamma Setting dialog box appears: Using the Projector Setting Dialog Box 127
-
 1
1 -
2
-
3
-
4
-
5
-
6
-
7
-
8
-
9
-
10
-
11
-
12
-
13
-
14
-
15
-
16
-
17
-
18
-
19
-
20
-
21
-
22
-
23
-
24
-
25
-
26
-
27
-
28
-
29
-
30
-
31
-
32
-
33
-
34
-
35
-
36
-
37
-
38
-
39
-
40
-
41
-
42
-
43
-
44
-
45
-
46
-
47
-
48
-
49
-
50
-
51
-
52
-
53
-
54
-
55
-
56
-
57
-
58
-
59
-
60
-
61
-
62
-
63
-
64
-
65
-
66
-
67
-
68
-
69
-
70
-
71
-
72
-
73
-
74
-
75
-
76
-
77
-
78
-
79
-
80
-
81
-
82
-
83
-
84
-
85
-
86
-
87
-
88
-
89
-
90
-
91
-
92
-
93
-
94
-
95
-
96
-
97
-
98
-
99
-
100
-
101
-
102
-
103
-
104
-
105
-
106
-
107
-
108
-
109
-
110
-
111
-
112
-
113
-
114
-
115
-
116
-
117
-
118
-
119
-
120
-
121
-
122
-
123
-
124
-
125
-
126
-
127
-
128
-
129
-
130
-
131
-
132
-
133
-
134
-
 135
135 -
 136
136 -
 137
137 -
 138
138 -
 139
139 -
 140
140 -
 141
141 -
 142
142 -
 143
143 -
 144
144 -
 145
145 -
146
-
147
-
148
-
149
-
150
-
151
-
152
-
153
-
154
-
155
-
156
-
157
-
158
-
159
-
160
-
161
-
162
-
163
-
164
-
165
-
166
-
167
-
168
-
169
-
170
-
171
-
172
-
173
-
174
-
175
-
176
-
177
-
178
 |
 |