Epson 5550C User Manual - Page 149
Replace the lamp cover and tighten the cover screw. Make sure
 |
UPC - 010343820807
View all Epson 5550C manuals
Add to My Manuals
Save this manual to your list of manuals |
Page 149 highlights
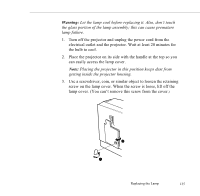
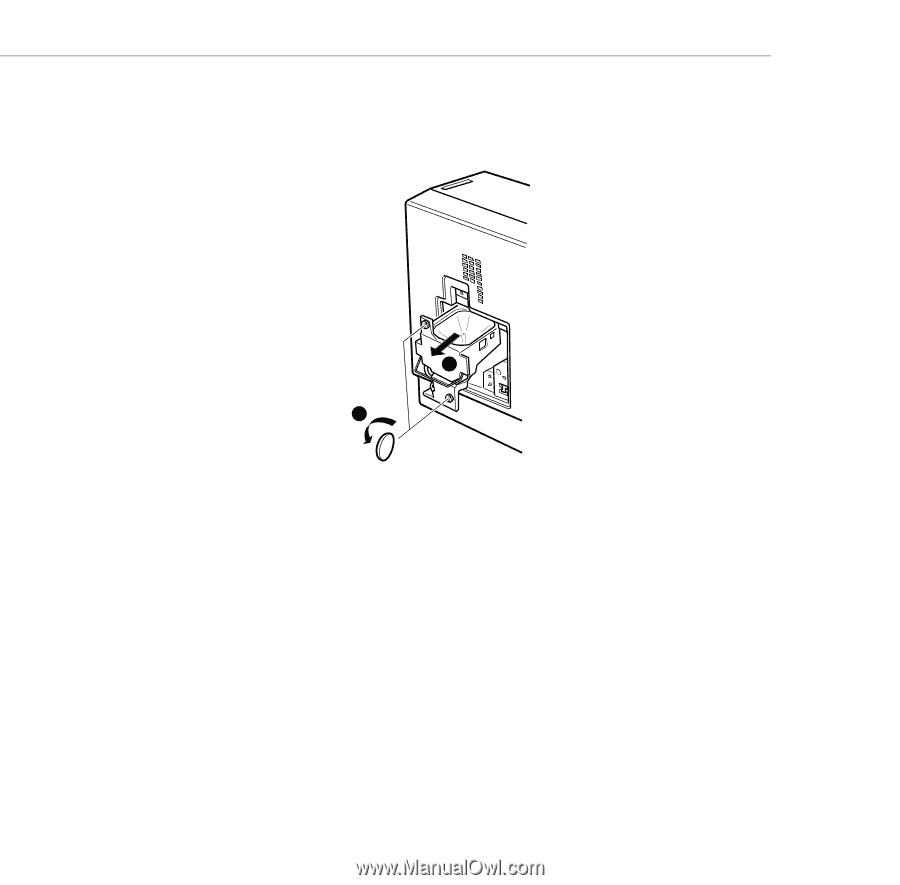
4. Use a screwdriver, coin, or similar object to loosen the two screws holding the lamp assembly in position. (You can't remove these screws either.) 2 1 Caution: Don't touch the glass portion of the lamp assembly; this can cause premature lamp failure. 5. Lift up the handle and pull out the lamp assembly. 6. Gently lower the new lamp into position and make sure it's inserted securely. Tighten the screws on the new lamp assembly. 7. Replace the lamp cover and tighten the cover screw. (Make sure the lamp cover is securely fastened. The projector won't run if the lamp cover is open.) 136 5 • Maintenance
-
 1
1 -
2
-
3
-
4
-
5
-
6
-
7
-
8
-
9
-
10
-
11
-
12
-
13
-
14
-
15
-
16
-
17
-
18
-
19
-
20
-
21
-
22
-
23
-
24
-
25
-
26
-
27
-
28
-
29
-
30
-
31
-
32
-
33
-
34
-
35
-
36
-
37
-
38
-
39
-
40
-
41
-
42
-
43
-
44
-
45
-
46
-
47
-
48
-
49
-
50
-
51
-
52
-
53
-
54
-
55
-
56
-
57
-
58
-
59
-
60
-
61
-
62
-
63
-
64
-
65
-
66
-
67
-
68
-
69
-
70
-
71
-
72
-
73
-
74
-
75
-
76
-
77
-
78
-
79
-
80
-
81
-
82
-
83
-
84
-
85
-
86
-
87
-
88
-
89
-
90
-
91
-
92
-
93
-
94
-
95
-
96
-
97
-
98
-
99
-
100
-
101
-
102
-
103
-
104
-
105
-
106
-
107
-
108
-
109
-
110
-
111
-
112
-
113
-
114
-
115
-
116
-
117
-
118
-
119
-
120
-
121
-
122
-
123
-
124
-
125
-
126
-
127
-
128
-
129
-
130
-
131
-
132
-
133
-
134
-
135
-
136
-
137
-
138
-
139
-
140
-
141
-
142
-
143
-
 144
144 -
 145
145 -
 146
146 -
 147
147 -
 148
148 -
 149
149 -
 150
150 -
 151
151 -
 152
152 -
 153
153 -
 154
154 -
155
-
156
-
157
-
158
-
159
-
160
-
161
-
162
-
163
-
164
-
165
-
166
-
167
-
168
-
169
-
170
-
171
-
172
-
173
-
174
-
175
-
176
-
177
-
178
 |
 |
5
•
Maintenance
136
4.
Use a screwdriver, coin, or similar object to loosen the two
screws holding the lamp assembly in position. (You can’t
remove these screws either.)
Caution:
Don’t touch the glass portion of the lamp assembly;
this can cause premature lamp failure.
5.
Lift up the handle and pull out the lamp assembly.
6.
Gently lower the new lamp into position and make sure it’s
inserted securely. Tighten the screws on the new lamp
assembly.
7.
Replace the lamp cover and tighten the cover screw. (Make sure
the lamp cover is securely fastened. The projector won’t run if
the lamp cover is open.)
2
1