Epson 5550C User Manual - Page 85
Adjusting Video Settings (Image Source = Computer)
 |
UPC - 010343820807
View all Epson 5550C manuals
Add to My Manuals
Save this manual to your list of manuals |
Page 85 highlights
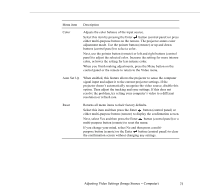
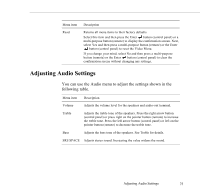
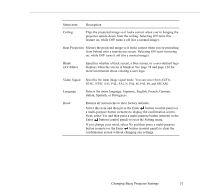
Adjusting Video Settings (Image Source = Computer) You can adjust the projected image by using the Video menu. The following options are available when the image source is Computer. Note: The computer must be connected and operating, and the image source on the projector must be set to Computer for you to access these menu options. To change the image source on the projector, press the Source button on the remote control or control panel. Menu item Position Description Select this item by pressing the Enter button (control panel) or the top or bottom multi-purpose button (remote) to enter screen position (H/V) adjustment mode. Then use the pointer button (remote) or up, down, left, and right buttons (control panel) to move the screen position in the corresponding direction. When you finish making adjustments, press the Menu button on the control panel or the remote to return to the Video menu. Tracking Sync. Matches the projector's internal clock to various computer graphic signals. Adjust this setting to remove vertical lines from the image. Synchronizes with the tracking signal sent from the computer. Adjust this setting to correct fuzziness or screen flicker. Brightness Contrast Lightens or darkens the overall image. Increase brightness to lighten an image, or decrease it to darken the image. Adjusts the difference between light and dark areas. Increase the contrast to make light areas lighter and dark areas darker. Decrease it to minimize the difference between light and dark areas. 72 3 • Adjusting Projector Settings
-
 1
1 -
2
-
3
-
4
-
5
-
6
-
7
-
8
-
9
-
10
-
11
-
12
-
13
-
14
-
15
-
16
-
17
-
18
-
19
-
20
-
21
-
22
-
23
-
24
-
25
-
26
-
27
-
28
-
29
-
30
-
31
-
32
-
33
-
34
-
35
-
36
-
37
-
38
-
39
-
40
-
41
-
42
-
43
-
44
-
45
-
46
-
47
-
48
-
49
-
50
-
51
-
52
-
53
-
54
-
55
-
56
-
57
-
58
-
59
-
60
-
61
-
62
-
63
-
64
-
65
-
66
-
67
-
68
-
69
-
70
-
71
-
72
-
73
-
74
-
75
-
76
-
77
-
78
-
79
-
 80
80 -
 81
81 -
 82
82 -
 83
83 -
 84
84 -
 85
85 -
 86
86 -
 87
87 -
 88
88 -
 89
89 -
 90
90 -
91
-
92
-
93
-
94
-
95
-
96
-
97
-
98
-
99
-
100
-
101
-
102
-
103
-
104
-
105
-
106
-
107
-
108
-
109
-
110
-
111
-
112
-
113
-
114
-
115
-
116
-
117
-
118
-
119
-
120
-
121
-
122
-
123
-
124
-
125
-
126
-
127
-
128
-
129
-
130
-
131
-
132
-
133
-
134
-
135
-
136
-
137
-
138
-
139
-
140
-
141
-
142
-
143
-
144
-
145
-
146
-
147
-
148
-
149
-
150
-
151
-
152
-
153
-
154
-
155
-
156
-
157
-
158
-
159
-
160
-
161
-
162
-
163
-
164
-
165
-
166
-
167
-
168
-
169
-
170
-
171
-
172
-
173
-
174
-
175
-
176
-
177
-
178
 |
 |