Epson 7880 User's Guide - Page 140
Manually Aligning the Print Head, correct thickness setting for most Epson papers.
 |
UPC - 010343866874
View all Epson 7880 manuals
Add to My Manuals
Save this manual to your list of manuals |
Page 140 highlights
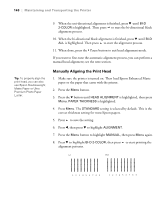
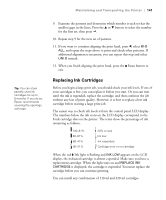
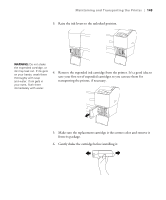
140 | Maintaining and Transporting the Printer Tip: To properly align the print head, you can also use Epson Doubleweight Matte Paper or Ultra Premium Photo Paper Luster. 9. When the uni-directional alignment is finished, press d until BI-D 2-COLOR is highlighted. Then press to start the bi-directional black alignment process. 10. When the bi-directional black alignment is finished, press d until BI-D ALL is highlighted. Then press to start the alignment process. 11. When done, press the Pause button to exit head alignment mode. If you want to fine-tune the automatic alignment process, you can perform a manual head alignment; see the next section. Manually Aligning the Print Head 1. Make sure the printer is turned on. Then load Epson Enhanced Matte paper or the paper that came with the printer. 2. Press the Menu button. 3. Press the d button until HEAD ALIGNMENT is highlighted, then press Menu. PAPER THICKNESS is highlighted. 4. Press Menu. The STANDARD setting is selected by default. This is the correct thickness setting for most Epson papers. 5. Press to save the setting. 6. Press l, then press d to highlight ALIGNMENT. 7. Press the Menu button to highlight MANUAL, then press Menu again. 8. Press d to highlight BI-D 2-COLOR, then press to start printing the alignment patterns. Lc VLm 1 2 3 45 67 8 9 1 2 3 45 67 8 9 140
-
 1
1 -
2
-
3
-
4
-
5
-
6
-
7
-
8
-
9
-
10
-
11
-
12
-
13
-
14
-
15
-
16
-
17
-
18
-
19
-
20
-
21
-
22
-
23
-
24
-
25
-
26
-
27
-
28
-
29
-
30
-
31
-
32
-
33
-
34
-
35
-
36
-
37
-
38
-
39
-
40
-
41
-
42
-
43
-
44
-
45
-
46
-
47
-
48
-
49
-
50
-
51
-
52
-
53
-
54
-
55
-
56
-
57
-
58
-
59
-
60
-
61
-
62
-
63
-
64
-
65
-
66
-
67
-
68
-
69
-
70
-
71
-
72
-
73
-
74
-
75
-
76
-
77
-
78
-
79
-
80
-
81
-
82
-
83
-
84
-
85
-
86
-
87
-
88
-
89
-
90
-
91
-
92
-
93
-
94
-
95
-
96
-
97
-
98
-
99
-
100
-
101
-
102
-
103
-
104
-
105
-
106
-
107
-
108
-
109
-
110
-
111
-
112
-
113
-
114
-
115
-
116
-
117
-
118
-
119
-
120
-
121
-
122
-
123
-
124
-
125
-
126
-
127
-
128
-
129
-
130
-
131
-
132
-
133
-
134
-
 135
135 -
 136
136 -
 137
137 -
 138
138 -
 139
139 -
 140
140 -
 141
141 -
 142
142 -
 143
143 -
 144
144 -
 145
145 -
146
-
147
-
148
-
149
-
150
-
151
-
152
-
153
-
154
-
155
-
156
-
157
-
158
-
159
-
160
-
161
-
162
-
163
-
164
-
165
-
166
-
167
-
168
-
169
-
170
-
171
-
172
-
173
-
174
-
175
-
176
-
177
-
178
-
179
-
180
-
181
-
182
-
183
-
184
-
185
-
186
-
187
-
188
-
189
-
190
-
191
-
192
-
193
-
194
-
195
-
196
-
197
-
198
-
199
-
200
-
201
-
202
-
203
-
204
-
205
-
206
-
207
-
208
-
209
-
210
-
211
-
212
-
213
-
214
-
215
-
216
-
217
-
218
 |
 |