Epson 7880 User's Guide - Page 198
Printing Using the Auto Take-Up Reel, Auto Cut On.
 |
UPC - 010343866874
View all Epson 7880 manuals
Add to My Manuals
Save this manual to your list of manuals |
Page 198 highlights
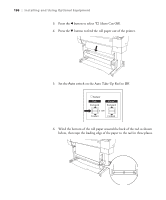
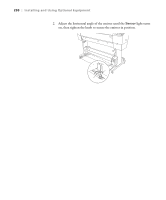
198 | Installing and Using Optional Equipment Warning: Do not touch the Auto Take-Up Reel while it is operating; doing so may result in injury. Do not look directly at the sensor beam across the front of the reel; doing so may cause permanent eye damage. Turn off the Auto Take-Up Reel before removing the reel; if the reel operates unexpectedly, bodily injury may occur. Caution: Do not place your hand or other object in the sensor detection area across the front of the reel. Interrupting the sensor beam can cause paper to be taken up under tension and adversely affect printing. Do not touch the Manual switch while printing; doing so may damage your prints. Printing Using the Auto Take-Up Reel Once the Auto Take-Up Reel is installed and paper is attached to it, you can use it to take up your prints. 1. Press the l button to select (Auto Cut Off). 2. Set the direction in which you loaded paper on the Auto Take-Up Reel using the Auto switch. For paper wound forward (print winds on outside of reel) For paper wound backward (print winds on inside of reel) 3. Send a print job to the printer. As the printer prints, the Auto Take-Up Reel takes up the roll paper 1/4 to 1/2 turn at a time as it feeds past the sensor. 4. When you are ready to remove your prints, turn off the Auto Take-Up Reel. 5. Press the l button to select (Auto Cut On). If you are printing on very thick paper, leave Auto Cut turned off, then feed and cut the paper manually to avoid damaging the cutter (see page 61). Continue with step 7. 6. Press and hold the button for 3 seconds. The roll paper is cut automatically. 198
-
 1
1 -
2
-
3
-
4
-
5
-
6
-
7
-
8
-
9
-
10
-
11
-
12
-
13
-
14
-
15
-
16
-
17
-
18
-
19
-
20
-
21
-
22
-
23
-
24
-
25
-
26
-
27
-
28
-
29
-
30
-
31
-
32
-
33
-
34
-
35
-
36
-
37
-
38
-
39
-
40
-
41
-
42
-
43
-
44
-
45
-
46
-
47
-
48
-
49
-
50
-
51
-
52
-
53
-
54
-
55
-
56
-
57
-
58
-
59
-
60
-
61
-
62
-
63
-
64
-
65
-
66
-
67
-
68
-
69
-
70
-
71
-
72
-
73
-
74
-
75
-
76
-
77
-
78
-
79
-
80
-
81
-
82
-
83
-
84
-
85
-
86
-
87
-
88
-
89
-
90
-
91
-
92
-
93
-
94
-
95
-
96
-
97
-
98
-
99
-
100
-
101
-
102
-
103
-
104
-
105
-
106
-
107
-
108
-
109
-
110
-
111
-
112
-
113
-
114
-
115
-
116
-
117
-
118
-
119
-
120
-
121
-
122
-
123
-
124
-
125
-
126
-
127
-
128
-
129
-
130
-
131
-
132
-
133
-
134
-
135
-
136
-
137
-
138
-
139
-
140
-
141
-
142
-
143
-
144
-
145
-
146
-
147
-
148
-
149
-
150
-
151
-
152
-
153
-
154
-
155
-
156
-
157
-
158
-
159
-
160
-
161
-
162
-
163
-
164
-
165
-
166
-
167
-
168
-
169
-
170
-
171
-
172
-
173
-
174
-
175
-
176
-
177
-
178
-
179
-
180
-
181
-
182
-
183
-
184
-
185
-
186
-
187
-
188
-
189
-
190
-
191
-
192
-
 193
193 -
 194
194 -
 195
195 -
 196
196 -
 197
197 -
 198
198 -
 199
199 -
 200
200 -
 201
201 -
 202
202 -
 203
203 -
204
-
205
-
206
-
207
-
208
-
209
-
210
-
211
-
212
-
213
-
214
-
215
-
216
-
217
-
218
 |
 |
